anupkumar/galaxy_tool_prediction repository overview






:information_source: 19.01 will be the last release which is based on ubuntu:14.04 and
PostgreSQL 9.3. We will migrate to ubuntu:18.04 and a newer PostgreSQL version in 19.05. Furthermore, we will not
support old Galaxy tool dependencies. These are deprecated since a few years and we think its time to remove support
for this in the default installation. You can install all needed packages manually to enable support again, though.
In short, with 19.05:
- Galaxy tool dependencies will not be supported by default
ubuntu:18.04will be the new base image- a new PostgreSQL version means you need to migrate any old database to the new version
Galaxy Docker Image
The Galaxy Docker Image is an easy distributable full-fledged Galaxy installation, that can be used for testing, teaching and presenting new tools and features.
One of the main goals is to make the access to entire tool suites as easy as possible. Usually, this includes the setup of a public available web-service that needs to be maintained, or that the Tool-user needs to either setup a Galaxy Server by its own or to have Admin access to a local Galaxy server. With docker, tool developers can create their own Image with all dependencies and the user only needs to run it within docker.
The Image is based on Ubuntu 14.04 LTS and all recommended Galaxy requirements are installed. The following chart should illustrate the Docker image hierarchy we have build to make is as easy as possible to build on different layers of our stack and create many exciting Galaxy flavors.
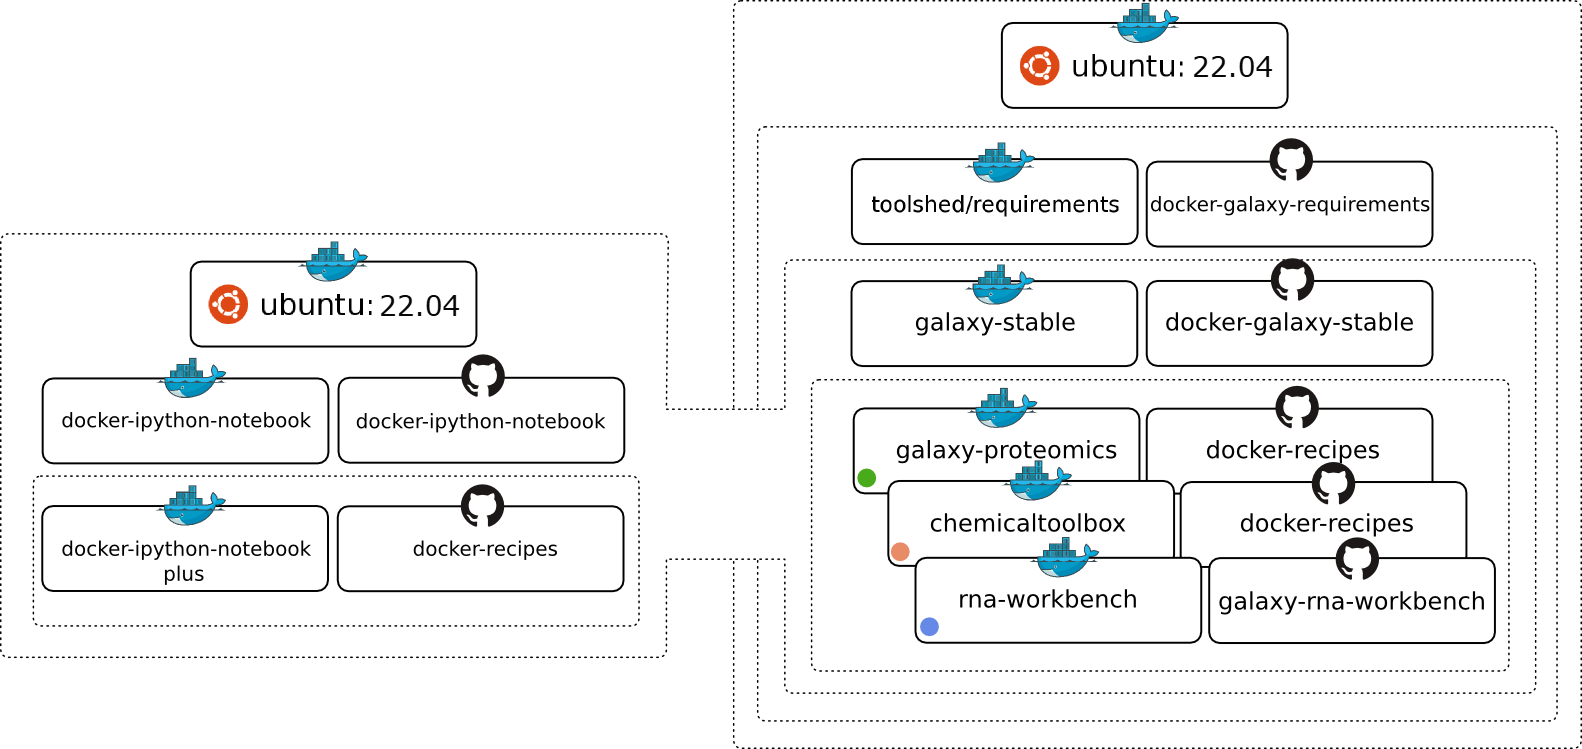
Table of Contents
-
- Usage
- Upgrading images
- Enabling Interactive Environments in Galaxy
- Using passive mode FTP or SFTP
- Using Parent docker
- Galaxy Report Webapp
- Galaxy's config settings
- Configuring Galaxy's behind a proxy
- On-demand reference data with CVMFS
- Personalize your Galaxy
- Deactivating services
- Restarting Galaxy
- Advanced Logging
- Running on an external cluster (DRM)
- Enable Galaxy to use BioContainers (Docker)
- Magic Environment variables
- HTTPS Support
- Lite Mode
- Extending the Docker Image
- Integrating non-Tool Shed tools into the container
- Users & Passwords
- Development
- Requirements
- History
- Support & Bug Reports
Usage [toc]
This chapter explains how to launch the container manually. An ansible playbook that launches the container automatically is available here.
At first you need to install docker. Please follow the very good instructions from the Docker project.
After the successful installation, all you need to do is:
docker run -d -p 8080:80 -p 8021:21 -p 8022:22 bgruening/galaxy-stable
I will shortly explain the meaning of all the parameters. For a more detailed description please consult the docker manual, it's really worth reading.
Let's start:
-
docker runwill run the Image/Container for you.In case you do not have the Container stored locally, docker will download it for you.
-
-p 8080:80will make the port 80 (inside of the container) available on port 8080 on your host. Same holds for port 8021 and 8022, that can be used to transfer data via the FTP or SFTP protocol, respectively.Inside the container a nginx Webserver is running on port 80 and that port can be bound to a local port on your host computer. With this parameter you can access your Galaxy instance via
http://localhost:8080immediately after executing the command above. If you work with the Docker Toolbox on Mac or Windows, you need to connect to the machine generated by 'Docker Quickstart'. You get its IP address fromdocker-machine lsor from the first line in the terminal, e.g.:docker is configured to use the default machine with IP 192.168.99.100. -
bgruening/galaxy-stableis the Image/Container name, that directs docker to the correct path in the docker index. -
-dwill start the docker container in daemon mode.
For an interactive session, you can execute:
docker run -i -t -p 8080:80 \
    bgruening/galaxy-stable \
    /bin/bash
and run the startup script by yourself, to start PostgreSQL, nginx and Galaxy.
Docker images are "read-only", all your changes inside one session will be lost after restart. This mode is useful to present Galaxy to your colleagues or to run workshops with it. To install Tool Shed repositories or to save your data you need to export the calculated data to the host computer.
Fortunately, this is as easy as:
docker run -d -p 8080:80 \
    -v /home/user/galaxy_storage/:/export/ \
    bgruening/galaxy-stable
With the additional -v /home/user/galaxy_storage/:/export/ parameter, Docker will mount the local folder /home/user/galaxy_storage into the Container under /export/. A startup.sh script, that is usually starting nginx, PostgreSQL and Galaxy, will recognize the export directory with one of the following outcomes:
- In case of an empty
/export/directory, it will move the PostgreSQL database, the Galaxy database directory, Shed Tools and Tool Dependencies and various config scripts to /export/ and symlink back to the original location. - In case of a non-empty
/export/, for example if you continue a previous session within the same folder, nothing will be moved, but the symlinks will be created.
This enables you to have different export folders for different sessions - means real separation of your different projects.
You can also collect and store /export/ data of Galaxy instances in a dedicated docker Data volume Container created by:
docker create -v /export \
    --name galaxy-store \
    bgruening/galaxy-stable \
    /bin/true
To mount this data volume in a Galaxy container, use the --volumes-from parameter:
docker run -d -p 8080:80 \
    --volumes-from galaxy-store \
    bgruening/galaxy-stable
This also allows for data separation, but keeps everything encapsulated within the docker engine (e.g. on OS X within your $HOME/.docker folder - easy to backup, archive and restore. This approach, albeit at the expense of disk space, avoids the problems with permissions reported for data export on non-Linux hosts.
Upgrading images [toc]
We will release a new version of this image concurrent with every new Galaxy release. For upgrading an image to a new version we have assembled a few hints for you. Please, take in account that upgrading may vary depending on your Galaxy installation, and the changes in new versions. Use this example carefully!
- Create a test instance with only the database and configuration files. This will allow testing to ensure that things run but won't require copying all of the data.
- New unmodified configuration files are always stored in a hidden directory called
.distribution_config. Use this folder to diff your configurations with the new configuration files shipped with Galaxy. This prevents needing to go through the change log files to find out which new files were added or which new features you can activate. - Note that copying database and datasets can be expensive if you have many GB of data.
- Download newer version of the Galaxy image
$ sudo docker pull bgruening/galaxy-stable
- Stop and rename the current galaxy container
$ sudo docker stop galaxy-instance
$ sudo docker rename galaxy-instance galaxy-instance-old
- Rename the data directory (the one that is mounted to /export in the docker)
$ sudo mv /data/galaxy-data /data/galaxy-data-old
- Run a new Galaxy container using newer image and wait while Galaxy generates the default content for /export
$ sudo docker run -p 8080:80 -v /data/galaxy-data:/export --name galaxy-instance bgruening/galaxy-stable
- Stop the Galaxy container
$ sudo docker stop galaxy-instance
- Replace the content of the postgres database by the old db data
$ sudo rm -r /data/galaxy-data/postgresql/
$ sudo rsync -var /data/galaxy-data-old/postgresql/  /data/galaxy-data/postgresql/
- Use diff to find changes in the config files (only if you changed any config file).
$ cd /data/galaxy-data/.distribution_config
$ for f in *; do echo $f; diff $f ../../galaxy-data-old/galaxy-central/config/$f; read; done
- Copy all the users' datasets to the new instance
$ sudo rsync -var /data/galaxy-data-old/galaxy-central/database/files/* /data/galaxy-data/galaxy-central/da
tabase/files/
- Copy all the installed tools
$ sudo rsync -var /data/galaxy-data-old/tool_deps/* /data/galaxy-data/tool_deps/
$ sudo rsync -var /data/galaxy-data-old/shed_tools/* /data/galaxy-data/shed_tools/
- Copy the welcome page and all its files.
$ sudo rsync -var /data/galaxy-data-old/welcome* /data/galaxy-data/
- Create an auxiliary docker in interactive mode and upgrade the database.
$ sudo docker run -it --rm -v /data/galaxy-data:/export bgruening/galaxy-stable /bin/bash
# Startup all processes
> startup &
#Upgrade the database to the most recent version
> sh manage_db.sh upgrade
#Logout
> exit
- Start the docker and test
$ sudo docker start galaxy-instance
- Clean the old container and image
Enabling Interactive Environments in Galaxy [toc]
Interactive Environments (IE) are sophisticated ways to extend Galaxy with powerful services, like Jupyter, in a secure and reproducible way.
For this we need to be able to launch Docker containers inside our Galaxy Docker container. At least docker 1.3 is needed on the host system.
docker run -d -p 8080:80 -p 8021:21 -p 8800:8800 \
    --privileged=true \
    -v /home/user/galaxy_storage/:/export/ \
    bgruening/galaxy-stable
The port 8800 is the proxy port that is used to handle Interactive Environments. --privileged is needed to start docker containers inside docker. If your IE does not open, please make sure you open your Galaxy instance with your hostname or a FQDN, but not with localhost or 127.0.0.1.
Using passive mode FTP or SFTP [toc]
By default, FTP servers running inside of docker containers are not accessible via passive mode FTP, due to not being able to expose extra ports. To circumvent this, you can use the --net=host option to allow Docker to directly open ports on the host server:
docker run -d \
    --net=host \
    -v /home/user/galaxy_storage/:/export/ \
    bgruening/galaxy-stable
Note that there is no need to specifically bind individual ports (e.g., -p 80:80) if you use --net.
An alternative to FTP and it's shortcomings it to use the SFTP protocol via port 22. Start your Galaxy container with a port binding to 22.
docker run -i -t -p 8080:80 -p 8022:22 \
    -v /home/user/galaxy_storage/:/export/ \
    bgruening/galaxy-stable
And use for example Filezilla or the sftp program to transfer data:
sftp -v -P 8022 -o [email protected] localhost <<< $'put <YOUR FILE HERE>'
Using Parent docker [toc]
On some linux distributions, Docker-In-Docker can run into issues (such as running out of loopback interfaces). If this is an issue, you can use a 'legacy' mode that use a docker socket for the parent docker installation mounted inside the container. To engage, set the environmental variable DOCKER_PARENT
docker run -p 8080:80 -p 8021:21 -p 8800:8800 \
    --privileged=true -e DOCKER_PARENT=True \
    -v /var/run/docker.sock:/var/run/docker.sock \
    -v /home/user/galaxy_storage/:/export/ \
    bgruening/galaxy-stable
Galaxy Report Webapp [toc]
For admins wishing to have more information on the status of a galaxy instance, the Galaxy Report Webapp is served on http://localhost:8080/reports. As default this site is password protected with admin:admin. You can change this by providing a reports_htpasswd file in /home/user/galaxy_storage/.
You can disable the Report Webapp entirely by providing the environment variable NONUSE during container startup.
docker run -p 8080:80 \
    -e "NONUSE=reports" \
    bgruening/galaxy-stable
Galaxy's config settings [toc]
Every Galaxy configuration parameter in config/galaxy.ini can be overwritten by passing an environment variable to the docker run command during startup. The name of the environment variable has to be:
GALAXY_CONFIG+ the_original_parameter_name_in_capital_letters
For example, you can set the Galaxy session timeout to 5 minutes and set your own Galaxy brand by invoking the docker run like this:
docker run -p 8080:80 \
    -e "GALAXY_CONFIG_BRAND='My own Galaxy flavour'" \
    -e "GALAXY_CONFIG_SESSION_DURATION=5" \
    bgruening/galaxy-stable
Note, that if you would like to run any of the cleanup scripts, you will need to add the following to /export/galaxy-central/config/galaxy.yml:
database_connection = postgresql://galaxy:galaxy@localhost:5432/galaxy
file_path = /export/galaxy-central/database/files
Security Configuration
By default the admin_users and master_api_key variables are set to:
admin_users: [email protected]
master_api_key: HSNiugRFvgT574F43jZ7N9F3
Additionally Galaxy encodes various internal values that can be part of output using secret string configurable as id_secret in the config file (use 5-65 bytes long string). This prevents 'guessing' of Galaxy's internal database sequences. Example:
id_secret: d5c910cc6e32cad08599987ab64dcfae
You should change all three configuration variables above manually in /export/galaxy-central/config/galaxy.yml.
Alternatively you can pass the security configuration when running the image but please note that it is a security problem. E.g. if a tool exposes all env's your secret API key will also be exposed.
Configuring Galaxy's behind a proxy [toc]
If your Galaxy docker instance is running behind an HTTP proxy server, and if you're accessing it with a specific path prefix (e.g. http://www.example.org/some/prefix/), you need to make Galaxy aware of it. There is an environment variable available to do so:
PROXY_PREFIX=/some/prefix
You can and should overwrite these during launching your container:
docker run -p 8080:80 \
    -e "PROXY_PREFIX=/some/prefix" \
    bgruening/galaxy-stable
On-demand reference data with CVMFS [toc]
By default, Galaxy instances launched with this image will have on-demand access to approximately 3TB of
reference genomes and indexes. These are the same reference data available on the main Galaxy server.
This is achieved by connecting to Galaxy's CernVM filesystem (CVMFS) at data.galaxyproject.org repository,
which is geographically distributed among numerous servers.
The CVMFS capability doesn't add to the size of the Docker image, but when running, CVMFS maintains
a cache to keep the most recently used data on the local disk.
Note: for CVMFS directories to be mounted-on-demand with autofs, you must launch Docker as --privileged
Personalize your Galaxy [toc]
The Galaxy welcome screen can be changed by providing a welcome.html page in /home/user/galaxy_storage/. All files starting with welcome will be copied during startup and served as introduction page. If you want to include images or other media, name them welcome_* and link them relative to your welcome.html (example).
Deactivating services [toc]
Non-essential services can be deactivated during startup. Set the environment variable NONUSE to a comma separated list of services. Currently, nodejs, postgres, proftp, reports, slurmd and slurmctld are supported.
docker run -d -p 8080:80 -p 9002:9002 \
    -e "NONUSE=nodejs,proftp,reports,slurmd,slurmctld" \
    bgruening/galaxy-stable
A graphical user interface, to start and stop your services, is available on port 9002 if you run your container like above.
Restarting Galaxy [toc]
If you want to restart Galaxy without restarting the entire Galaxy container you can use docker exec (docker > 1.3).
docker exec <container name> supervisorctl restart galaxy:
In addition you can start/stop every supervisord process using a web interface on port 9002. Start your container with:
docker run -p 9002:9002 bgruening/galaxy-stable
Advanced Logging [toc]
You can set the environment variable $GALAXY_LOGGING to FULL to access all logs from supervisor. For example start your container with:
docker run -d -p 8080:80 -p 8021:21 \
    -e "GALAXY_LOGGING=full" \
    bgruening/galaxy-stable
Then, you can access the supervisord web interface on port 9002 and get access to log files. To do so, start your container with:
docker run -d -p 8080:80 -p 8021:21 -p 9002:9002 \
    -e "GALAXY_LOGGING=full" \
    bgruening/galaxy-stable
Alternatively, you can access the container directly using the following command:
docker exec -it <container name> bash
Once connected to the container, log files are available in /home/galaxy/logs.
A volume can also be used to map this directory to one external to the container - for instance if logs need to be persisted for auditing reasons (security, debugging, performance testing, etc...).:
mkdir gx_logs
docker run -d -p 8080:80 -p 8021:21 -e "GALAXY_LOGGING=full" -v `pwd`/gx_logs:/home/galaxy/logs bgruening/galaxy-stable
Running on an external cluster (DRM) [toc]
Basic setup for the filesystem [toc]
The easy way
The easiest way is to create a /export mount point on the cluster and mount the container with /export:/export.
Not using the /export mount point on the cluster.
The docker container sets up all its files on the /export directory, but this directory may not exist on the cluster filesystem. This can be solved with symbolic links on the cluster filesystem but it can also be solved within the container itself.
In this example configuration the cluster file system has a directory /cluster_storage/galaxy which is accessible for the galaxy user in the container (UID 1450) and the user starting the container.
The container should be started with the following settings configured:
docker run -d -p 8080:80 -p 8021:21 \
-v /cluster_storage/galaxy/galaxy_export:/export \ # This makes sure all galaxy files are on the cluster filesystem
-v /cluster_storage/galaxy:/cluster_storage/galaxy \ # This ensures the links within the docker container and on the cluster fs are the same
# The following settings make sure that each job is configured with the paths on the cluster fs instead of /export
-e GALAXY_CONFIG_TOOL_DEPENDENCY_DIR="/cluster_storage/galaxy/galaxy_export/tool_deps" \
-e GALAXY_CONFIG_TOOL_DEPENDENCY_CACHE_DIR="/cluster_storage/galaxy/galaxy_export/tool_deps/_cache" \
-e GALAXY_CONFIG_FILE_PATH="/cluster_storage/galaxy/galaxy_export/galaxy-central/database/files" \
-e GALAXY_CONFIG_TOOL_PATH="/cluster_storage/galaxy/galaxy_export/galaxy-central/tools" \
-e GALAXY_CONFIG_TOOL_DATA_PATH="/cluster_storage/galaxy/galaxy_export/galaxy-central/tool-data" \
-e GALAXY_CONFIG_SHED_TOOL_DATA_PATH="/cluster_storage/galaxy/galaxy_export/galaxy-central/tool-data" \
# The following settings are for directories that can be anywhere on the cluster fs.
GALAXY_CONFIG_JOB_WORKING_DIRECTORY="/cluster_storage/galaxy/galaxy_export/galaxy-central/database/job_working_directory" \ #IMPORTANT: needs to be created manually. Can also be placed elsewhere, but is originally located here
-e GALAXY_CONFIG_NEW_FILE_PATH="/cluster_storage/galaxy/tmp" \ # IMPORTANT: needs to be created manually. This needs to be writable by UID=1450 and have its flippy bit set (chmod 1777 for world-writable with flippy bit)
-e GALAXY_CONFIG_CLUSTER_FILES_DIRECTORY="/cluster_storage/galaxy/job_scripts" \ # Job scripts and stdout and stderr will be written here.
-e GALAXY_CONFIG_OUTPUTS_TO_WORKING_DIRECTORY=False \ # Writes Job scripts, stdout and stderr to job_working_directory.
-e GALAXY_CONFIG_RETRY_JOB_OUTPUT_COLLECTION=5 \ #IF your cluster fs uses nfs this may introduce latency. You can set galaxy to retry if a job output is not yet created.
# Conda settings. IMPORTANT!
-e GALAXY_CONFIG_CONDA_PREFIX="/cluster_storage/galaxy/_conda" \ # Can be anywhere EXCEPT cluster_storage/galaxy/galaxy_export!
# Conda uses $PWD to determine where the virtual environment is. If placed inside the export directory conda will determine $PWD to be a subirectory of the  /export folder which does not exist on the cluster!
-e GALAXY_CONFIG_CONDA_AUTO_INIT=True # When the necessary environment can not be found a new one will automatically be created
Setting up a python virtual environment on the cluster [toc]
The python environment in the container is not accessible from the cluster. So it needs to be created beforehand.
In this example configuration the python virtual environment is created on /cluster_storage/galaxy/galaxy_venv and the export folder on /cluster_storage/galaxy/galaxy_export. To create the virtual environment:
- Create the virtual environment
virtualenv /cluster_storage/galaxy/galaxy_venv - Activate the virtual environment
source /cluster_storage/galaxy/galaxy_venv/bin/activate - Install the galaxy requirements `pip install --index-url https://wheels.galaxyproject.org/simple -
Tag summary
Content type
Image
Digest
Size
1.3 GB
Last updated
over 7 years ago
docker pull anupkumar/galaxy_tool_prediction