any35/golang-web-vim repository overview
go-vim Docker image
This Docker image adds Go tools and the following vim plugins to the official Go image:
when use screen, don't forget to use 256 colors. By default, screen use an 8-color terminal emulator. To enable 256 colors, you need to edit ~/.screenrc
attrcolor b ".I"
termcapinfo xterm 'Co#256:AB=\E[48;5;%dm:AF=\E[38;5;%dm'
defbce on
for more information pls visit use 256 colors in screen
- delimitMate provides automatic closing of quotes, parenthesis, brackets, etc.
- neocomplete auto completion. It provides keyword completion system by maintaining a cache of keywords in the current buffer
- gitgutter shows a git diff in the gutter (sign column) and stages/reverts hunks.
- colors-solarized color scheme--solarized
- airline lean & mean status/tabline for vim that's light as air
- scala a "bundle" for Vim that builds off of the initial Scala plugin
- easymotion EasyMotion provides a much simpler way to use some motions in vim.
- json A better JSON for Vim: distinct highlighting of keywords vs values, JSON-specific (non-JS) warnings, quote concealing. Pathogen-friendly.
- go Go development plugin for Vim
- snipmate provide support for textual snippets, similar to TextMate or other Vim plugins like UltiSnips.
- Vundle plugin manager for vim.
- tabular Aligning text
- less syntax highlighting, indenting and autocompletion for the dynamic stylesheet language
LESS. - snippets snipMate & UltiSnip Snippets
- nerdtree-tabs NERDTree and tabs together in Vim, painlessly
- bufexplorer BufExplorer Plugin for Vim
- ctrlp Fuzzy file, buffer, mru, tag, etc finder.
- tagbar Vim plugin that displays tags in a window, ordered by scope http://majutsushi.github.com/tagbar/
- addon-mw-utils interpret a file by function and cache file automatically(required by snipmate)
- undotree The ultimate undo history visualizer for VIM
- indent-object This plugin defines a new text object, based on indentation levels.
- indent-guides Indent Guides is a plugin for visually displaying indent levels in Vim.
- html5 HTML5 omnicomplete and syntax
- javascript JavaScript bundle for vim, this bundle provides syntax and indent plugins.
- markdown Markdown Vim Mode
- nerdcommenter Vim plugin for intensely orgasmic commenting
- nerdtree A tree explorer plugin for vim.
- syntastic Syntax checking hacks for vim
- expand-region visually select increasingly larger regions of text using the same key combination.
- multiple-cursors True Sublime Text style multiple selections for Vim
- tlib (required by snipmatge)
- fugitive fugitive.vim: a Git wrapper so awesome
- haml Vim runtime files for Haml, Sass, and SCSS
- repeat repeat.vim: enable repeating supported plugin maps with "."
- surround surround.vim: quoting/parenthesizing made simple
- EasyGrep Fast and Easy Find and Replace Across Multiple Files
- YankRing Maintains a history of previous yanks, changes and deletes
- mru Plugin to manage Most Recently Used (MRU) files
- taglist Source code browser (supports C/C++, java, perl, python, tcl, sql, php, etc)
Usage
Run this image from within your go workspace. You can than edit your project using vim, and usual go commands: go build, go run, etc.
cd your/go/workspace
docker run --rm -tiv `pwd`:/go any35/golang-web-vim
#or you can specify port mapping
docker run --rm -p 9000:9000 -p 35729:35729  -tiv `pwd`:/go any35/golang-web-vim
add --privileged flag debugger is needed
Plugin Details
TBD.
delimitMate
shift+tab jump to next autocomplete chart
neocomplete

gitgutter

colors-solarized
Modify .vimrc
syntax enable
set background=dark
colorscheme solarized
or
syntax enable
set background=light
colorscheme solarized
easymotion
=====
<cursor>Lorem ipsum dolor sit amet.
Type <Leader><Leader>w(<Plug>(easymotion-w)) to trigger the word motion w.
When the motion is triggered, the text is updated (no braces are actually added,
the text is highlighted in red by default):
<cursor>Lorem {a}psum {b}olor {c}it {d}met.
Press c to jump to the beginning of the word "sit":
Lorem ipsum dolor <cursor>sit amet.
Similarly, if you're looking for an "o", you can use the f motion.
Type <Leader><Leader>fo, and all "o" characters are highlighted:
<cursor>L{a}rem ipsum d{b}l{c}r sit amet.
Press b to jump to the second "o":
Lorem ipsum d<cursor>olor sit amet.
Jeffrey Way of Nettuts+ has also written a tutorial about EasyMotion.
json
snipMate
For example, in C, typing for<tab> could be expanded to
for (i = 0; i < count; i++) {
    /* code */
}
with successive presses of tab jumping around the snippet.
in go, type fun<tab> could be expanded to
    func funcName() error {

    }
for more snippets in golang pls see go.snippets and more snippets
fencview
this plugin auto detect CJK and Unicode file encodings.
:FencAutoDectect or :FencView
and you can select the right encodings.
tabular
Aligning assignments
Before:
one = 1
two = 2
three = 3
four = 4
Running :Tab /= produces
one   = 1
two   = 2
three = 3
four  = 4
Colon assignments
There are a couple of different ways that colon assignments could be aligned. If we start with an example that is not aligned:
var video = {
    metadata: {
        title: "Aligning assignments"
        h264Src: "/media/alignment.mov",
        oggSrc: "/media/alignment.ogv"
        posterSrc: "/media/alignment.png"
        duration: 320,
    }
}
Select the inner block by positioning your cursor inside it and running vi} (enable Visual mode, and select inner Brace). Then you could run :Tab/: which would produce this result:var
video = {
    metadata: {
        title     : "Aligning assignments"
        h264Src   : "/media/alignment.mov",
        oggSrc    : "/media/alignment.ogv"
        posterSrc : "/media/alignment.png"
        duration  : 320,
    }
}
If you don’t like stacking the colons in a column, you could use the \zs atom to exclude the : character from the search match. Running :Tab /:\zs produces this result:
var video = {
    metadata: {
        title:      "Aligning assignments"
        h264Src:    "/media/alignment.mov",
        oggSrc:     "/media/alignment.ogv"
        posterSrc:  "/media/alignment.png"
        duration:   320,
    }
}
Be aware that if you work in a team, there may be a house style that you should follow.
Table markup
Here is a scenario outline for cucumber steps, including a pipe-delimited table of examples:
Scenario Outline: eating
  Given there are <start> cucumbers
  When I eat <eat> cucumbers
  Then I should have <left> cucumbers

  Examples:
    |start|eat|left|
    |12|5|7|
    |20|5|15|
With the cursor positioned anywhere in the table, running :Tab/| produces:
Scenario Outline: eating
  Given there are <start> cucumbers
  When I eat <eat> cucumbers
  Then I should have <left> cucumbers

  Examples:
    | start | eat | left |
    | 12    | 5   | 7    |
    | 20    | 5   | 15   |
see tabular for more information. See doc/Tabular.txt for detailed documentation.
vimless
nerdtree-tabs
F7 nerdTreeTabs toggle
i### buf explorer
F4 open BufExplorer
<Leader>be BufExplorer
after open buf explorer windows,
j or k to choose file, r re-order files, d or D close fiel.
CtrlP.vim
- Run
F6or:CtrlPor:CtrlP [starting-directory]to invoke CtrlP in find file mode. - Run
:CtrlPBufferor:CtrlPMRUto invoke CtrlP in find buffer or find MRU file mode. - Run
:CtrlPMixedto search in Files, Buffers and MRU files at the same time.
Check :help ctrlp-commands and :help ctrlp-extensions for other commands.
Once CtrlP is open:
- Press
<F6>to purge the cache for the current directory to get new files, remove deleted files and apply new ignore options. - Press
<c-f>and<c-b>to cycle between modes. - Press
<c-d>to switch to filename only search instead of full path. - Press
<c-r>to switch to regexp mode. - Use
<c-j>,<c-k>or the arrow keys to navigate the result list. - Use
<c-t>or<c-v>,<c-x>to open the selected entry in a new tab or in a new split. - Use
<c-n>,<c-p>to select the next/previous string in the prompt's history. - Use
<c-y>to create a new file and its parent directories. - Use
<c-z>to mark/unmark multiple files and<c-o>to open them.
Run :help ctrlp-mappings or submit ? in CtrlP for more mapping help.
- Submit two or more dots
..to go up the directory tree by one or multiple levels. - End the input string with a colon
:followed by a command to execute it on the opening file(s):
Use:25to jump to line 25.
Use:diffthiswhen opening multiple files to run:diffthison the first 4 files.
Tagbar
F8 TagbarToggle
UndoTree
F5 UndotreeToggle
indent object
This plugin defines two new text objects. These are very similar - they differ only in whether they include the line below the block or not.
Key Mapping Description ~
===
<count>ai (A)n (I)ndentation level and line above.
<count>ii (I)nner (I)ndentation level (no line above).
<count>aI (A)n (I)ndentation level and lines above/below.
<count>iI (I)nner (I)ndentation level (no lines above/below).
Note that the iI mapping is mostly included simply for completeness, it is effectively a synonym for ii.
Just like regular text objects, these mappings can be used either with operators expecting a motion, such as 'd' or 'c', as well as in visual mode. In visual mode the mapping can be repeated, which has the effect of iteratively increasing the scope of indentation block selected. Specifying a count can be used to achieve the same effect.
The difference between |ai| and |aI| is that |ai| includes the line immediately above the indentation block, whereas aI includes not only that, but also the line below. Which of these is most useful largely depends on the structure of the language being edited.
For example, when editing the Python code, |ai| is generally more useful, as the line above the indentation block is usually related to it. For example, in the following code ( * is used to indicate the cursor position):
      if foo > 3:
         log("foo is big") *
         foo = 3
      do_something_else()
the if clause is logically related to the code block, whereas the function call below is not. It is unlikely we would want to select the line below when we are interested in the if block.
However, in other languages, such as Vim scripts, control structures are usually terminated with something like 'endif'. Therefore, in this example:
      if foo > 3
         echo "foo is big" *
         let foo = 3
      endif
      call do_something_else()
we would more likely want to include the endif when we select the if structure. for example( * is used to indicate the cursor position)
aaaaaaaaaaaaa
    bbbbbbbbb*
    ccccccccc
        ddddddddd
eeeeeeeeeeeee
in normal model, when we execute
>aiit become
	aaaaaaaaaaaaa
		bbbbbbbbb*
		ccccccccc
			ddddddddd
eeeeeeeeeeeee
>iiit cecome
aaaaaaaaaaaaa
		bbbbbbbbb*
		ccccccccc
			ddddddddd
eeeeeeeeeeeee
>aIit cecome
	aaaaaaaaaaaaa
		bbbbbbbbb*
		ccccccccc
			ddddddddd
	eeeeeeeeeeeee
>iIit cecome
aaaaaaaaaaaaa
		bbbbbbbbb*
		ccccccccc
			ddddddddd
eeeeeeeeeeeee
indent guides
<leader>ig to switch indent guides display
javascript.vim
=G auto indent
NOTE: jquery syntax is not worked yet!
markdown
]]: go to next header.<Plug>Markdown_MoveToNextHeader[[: go to previous header. Contrast with]c.<Plug>Markdown_MoveToPreviousHeader][: go to next sibling header if any.<Plug>Markdown_MoveToNextSiblingHeader[]: go to previous sibling header if any.<Plug>Markdown_MoveToPreviousSiblingHeader]c: go to Current header.<Plug>Markdown_MoveToCurHeader]u: go to parent header (Up).<Plug>Markdown_MoveToParentHeaderdetails document
nerdcommenter
The following key mappings are provided by default (there is also a menu provided that contains menu items corresponding to all the below mappings):
Most of the following mappings are for normal/visual mode only. The |NERDComInsertComment| mapping is for insert mode only.
[count]\<leader\>cc |NERDComComment|
Comment out the current line or text selected in visual mode.
[count]\<leader\>cn |NERDComNestedComment|
Same as <leader>cc but forces nesting.
[count]\<leader\>c<space> |NERDComToggleComment|
Toggles the comment state of the selected line(s). If the topmost selected
line is commented, all selected lines are uncommented and vice versa.
[count]\<leader\>cm |NERDComMinimalComment|
Comments the given lines using only one set of multipart delimiters.
[count]\<leader\>ci |NERDComInvertComment|
Toggles the comment state of the selected line(s) individually.
[count]\<leader\>cs |NERDComSexyComment|
Comments out the selected lines ``sexily''
[count]\<leader\>cy |NERDComYankComment|
Same as <leader>cc except that the commented line(s) are yanked first.
\<leader\>c$ |NERDComEOLComment|
Comments the current line from the cursor to the end of line.
\<leader\>cA |NERDComAppendComment|
Adds comment delimiters to the end of line and goes into insert mode between
them.
|NERDComInsertComment|
Adds comment delimiters at the current cursor position and inserts between.
Disabled by default.
\<leader\>ca |NERDComAltDelim|
Switches to the alternative set of delimiters.
[count]\<leader\>cl
[count]\<leader\>cb |NERDComAlignedComment|
Same as |NERDComComment| except that the delimiters are aligned down the
left side (<leader>cl) or both sides (<leader>cb).
[count]\<leader\>cu |NERDComUncommentLine|
Uncomments the selected line(s).
NERD tree
F7 NERDTreeTabsToggle
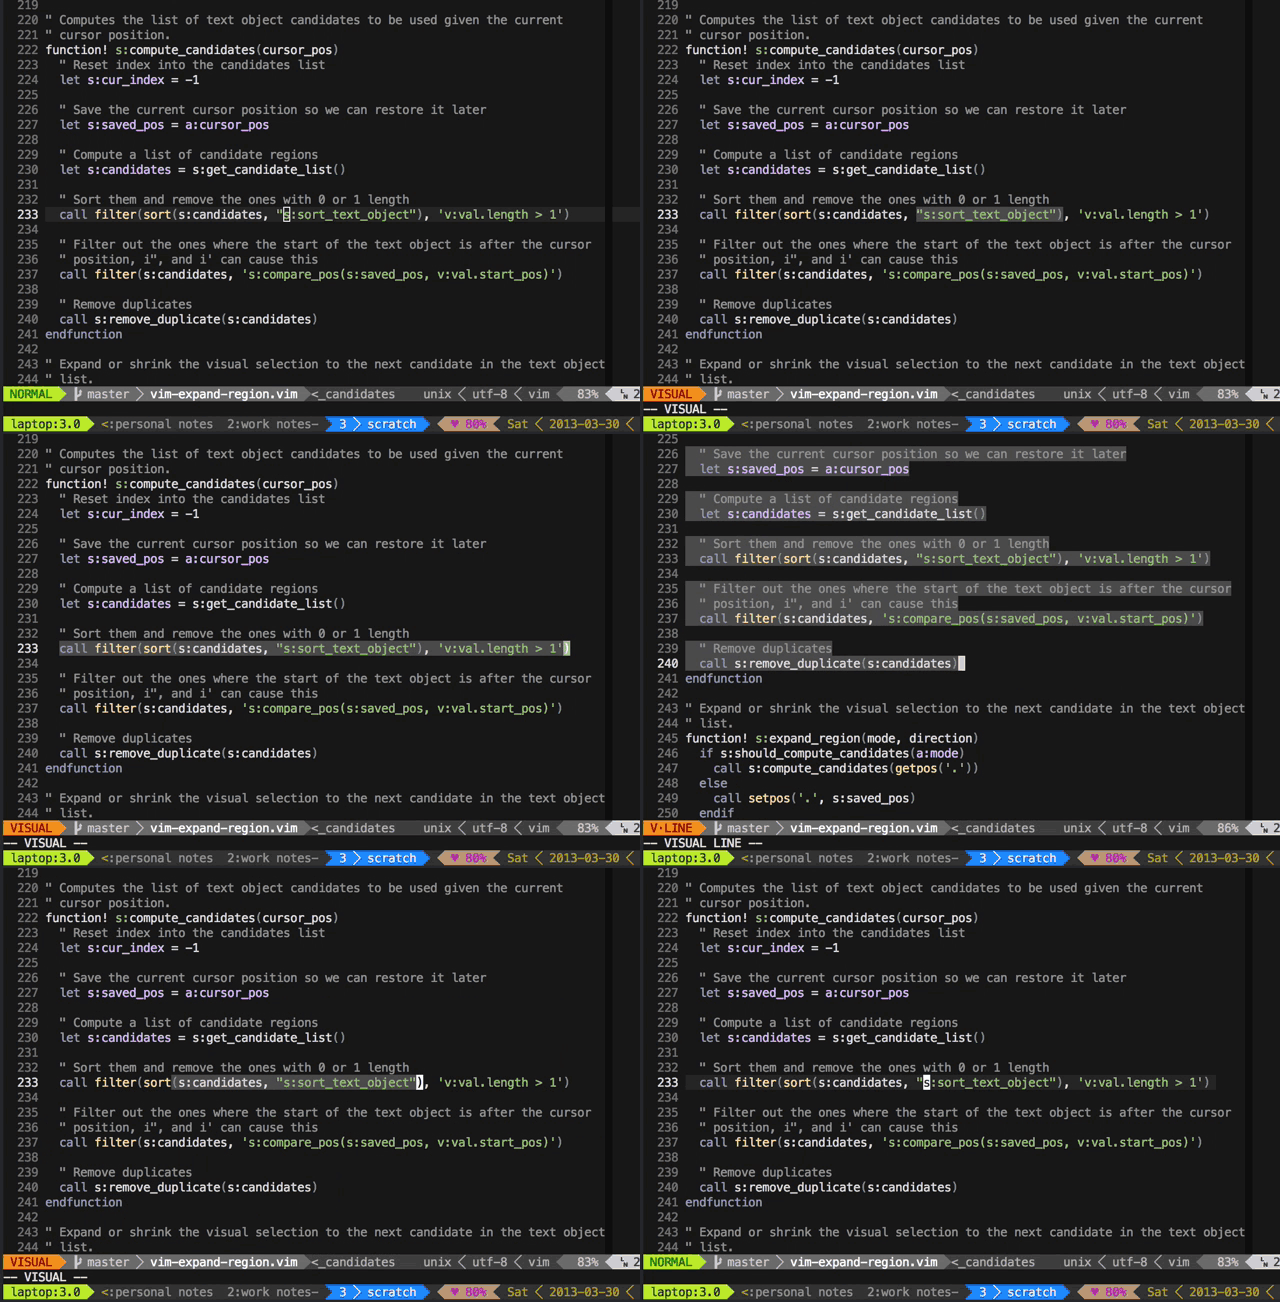
vim-expand-region
Press + to expand the visual selection and _ to shrink it.
vim-multiple-cursors
It's great for quick refactoring

- jump to
pwithfp - select the word under cursor with
<C-n> - do that two more times for the other two occurrences in the function
- press
cto change - type the replacement
- press
<Esc>to quit back to regular Vim
Add a cursor to each line of your visual selection

- select the line with
V - go to the end of the file with
G - press
<C-n>to add a cursor at the beginning of every line and move to normal mode - press
Ito insert at the beginning of the line - type
",move to end of line with<C-e>, type another"followed by, - move every cursor down one line with
<C-j>(this is a custom mapping of mine in Insert mode) - hit
<BS>, now all the words are on the same line - the rest is just normal Vim
Do it backwards too! This is not just a replay of the above gif :)

- press
dt"to delete everything until the first quote - press
$to go to end of line - pree
r, to replace the]with, - go back to the beginning of the line with
^, pressf, to find the first comma - press
vto select,in visual mode, and mash on<C-n>until the last occurrence - press
cfollowed by<CR>to break the line into multiple lines - move every cursor up one line with
<C-k>(again my custom mapping) - delete the left quote with
C-g<BS>(custom mapping to move cursor in insert mode) - go to end of line and delete right quote with
C-e<BS>
Add multiple cursors using regexes

- press
jVto visually select the second line - press
Gkto select all but the last line - type
:followed by theMultipleCursorsFindcommand - press
oto toggle the cursor for each visual selection - press
pto paste the content of the+register (I haveclipboard=unnamedplusin my vimrc) to each virtual cursor see more details
Out of the box, all you need to know is a single key Ctrl-n. Pressing the key in Normal mode highlights the current word under the cursor in Visual mode and places a virtual cursor at the end of it. Pressing it again finds the next occurrence and places another virtual cursor at the end of the visual selection. If you select multiple lines in Visual mode, pressing the key puts a virtual cursor at every line and leaves you in Normal mode.
After you've marked all your locations with Ctrl-n, you can change the visual selection with normal Vim motion commands in Visual mode. You could go to Normal mode by pressing v and wield your motion commands there. Single key command to switch to Insert mode such as c or s from Visual mode or i, a, I, A in Normal mode should work without any issues.
At any time, you can press <Esc> to exit back to regular Vim.
Two additional keys are also mapped:
Ctrl-pin Visual mode will remove the current virtual cursor and go back to the previous virtual cursor location. This is useful if you are trigger happy withCtrl-nand accidentally went too far.Ctrl-xin Visual mode will remove the current virtual cursor and skip to the next virtual cursor location. This is useful if you don't want the current selection to be a candidate to operate on later.
You can also add multiple cursors using a regular expression. The command MultipleCursorsFind accepts a range and a pattern, and it will create a virtual cursor at the end of every match within the range. If no range is passed in, then it defaults to the entire buffer.
NOTE: If at any time you have lingering cursors on screen, you can press Ctrl-n in Normal mode and it will remove all prior cursors before starting a new one.
fugitive
many command to git.
- merge conflic
- in a git work directory, input
vim :Gstatusshow the confilc file list- move cursor to a file and press
dv, this will open merge windows - in the middle window show the merge result, change it and save. after merge, apply the merge by
git addcommand.
- in a git work directory, input
more information, see the document
vim haml
TDB.
repeat.vim
If you've ever tried using the . command after a plugin map, you were likely disappointed to discover it only repeated the last native command inside that map, rather than the map as a whole. That disappointment ends today. Repeat.vim remaps . in a way that plugins can tap into it.
The following plugins support repeat.vim:
- surround.vim
- speeddating.vim
- abolish.vim
- unimpaired.vim
- commentary.vim
- vim-easyclip
surround
It's easiest to explain with examples. Press cs"' inside
"Hello world!"
to change it to
'Hello world!'
Now press cs'<q> to change it to
<q>Hello world!</q>
To go full circle, press cst" to get
"Hello world!"
To remove the delimiters entirely, press ds".
Hello world!
Now with the cursor on "Hello", press ysiw] (iw is a text object).
[Hello] world!
Let's make that braces and add some space (use } instead of { for no
space): cs]{
{ Hello } world!
Now wrap the entire line in parentheses with yssb or yss).
({ Hello } world!)
Revert to the original text: ds{ds)
Hello world!
Emphasize hello: ysiw<em>
<em>Hello</em> world!
Finally, let's try out visual mode. Press a capital V (for linewise
visual mode) followed by S<p class="important">.
<p class="important">
  <em>Hello</em> world!
</p>
This plugin is very powerful for HTML and XML editing, a niche which currently seems underfilled in Vim land. (As opposed to HTML/XML inserting, for which many plugins are available). Adding, changing, and removing pairs of tags simultaneously is a breeze.
The . command will work with ds, cs, and yss
easy grep
Keymappings:
<Leader>vv- Grep for the word under the cursor, match all occurences, like |gstar|<Leader>vV- Grep for the word under the cursor, match whole word, like |star|<Leader>va- Like vv, but add to existing list<Leader>vA- Like vV, but add to existing list<Leader>vr- Perform a global search search on the word under the cursor and prompt for a pattern with which to replace it.<Leader>vo- Select the files to search in and set grep options
Commands:
+ :Grep [arg]
Search for the specified arg, like vv. When an ! is added,
search like vV
+ `:GrepAdd [arg]`
    Search for the specified arg, add to existing file list, as in
    <Leader>va.  When an ! is added, search like <Leader>vA

+ `:Replace [target] [replacement]`
    Perform a global search and replace.  The function searches
    the same set of files a grep for the desired target and opens a dialog to
    confirm replacement.

+ `:ReplaceUndo`
    Undoes the last :Replace operation.  Does not stack successive
    searches; only the last replace may be undone.  This function may not
    work well when edits are made between a call to Replace and a call to
    ReplaceUndo.

+ `:GrepOptions [arg]`
    Open a window to set grep options.
YankRing
Examples:
yy
Tag summary
Content type
Image
Digest
sha256:30586ce4d…
Size
457.8 MB
Last updated
almost 11 years ago
docker pull any35/golang-web-vim