flex/gns3-proxy
Proxy server to support multiple users in a GNS3 server environment
2.1K
flex/gns3-proxy repository overview
gns3-proxy
Proxy Server for GNS3. The proxy is configured as a regular remote server in the GNS3-GUI, as the GNS3-GUI client does not yet support proxies gns3-gui issue #2696. Basic idea is to allow the use of central GNS3 server backends for classroom / lab setups, as used, e.g., in the Network Laboratory of Fulda University of Applied Sciences. Students can connect to the proxy and requests will be authenticated, filtered and forwarded to appropriate backend servers. Proxy authentication also circumvents the current lack of multi-user support in GNS3. Without the proxy, due to the multi user limitations (see "Multiple Users Environment" in GNS3 Security), users will have to use the same admin credentials for GNS3 to access the backend. Also, requests cannot be filtered and authorized (e.g., to deny deletion/creation of projects etc.). As GNS3 does not support proxies, several tweaks were necessary to the forked proxy.py project to allow transparent REST and WebSocket passthrough.

Features
Inherited from proxy.py:
- Distributed as a single file module
- No external dependency other than standard Python library
- Support for
http,httpsandwebsocketsrequest proxy - Optimized for large file uploads and downloads
- IPv4 and IPv6 support
Changes/enhancements to proxy.py:
- Redirect requests to backend servers (fixed proxying independent from request URL)
- Definition of users (username and password used in GNS3-GUI) for authentication and authorization at the proxy, proxy replaces credentials for backend servers
- Selection (mapping) of GNS3 backend server and possibility of load-balancing based on username (using regexp)
- Filtering of denied requests to server backends (based on username, REST/HTTP method/URL path/headers/body (using regexp)
- Filtering of project list for individual users
- Configuration file to allow basic proxy configuration as well as GNS3 backend server, users, mappings and request filters
- Support for REST calls (GET requests with body etc., not handled by proxy.py)
- Fixes and tweaks to allow the connection to GNS3 backends, especially keeping connections alive and leaving HTTP headers to support direct passthrough of WebSocket connections
- Basic access logging/status monitoring support
Further utilities provided to use the proxy:
- gns3_proxy_manage_projects.py allows management of projects on backend servers, e.g., bulk import/export, start, stop, delete, duplicate projects on all or certain backend servers based on regexp.
- gns3_proxy_replicate_projects.py supports replication of projects across backend servers.
gns3_proxy_manage_project.py and gns3_proxy_replicate_projects.py can be combined with cron entry to run tasks periodically.
- gns3_proxy_manage_images.py import/export of images on backend servers.
- gns3_proxy_replicate_images.py supports replication of images across backend servers.
- gns3_proxy_manage_templates.py allows management of templates (router, switches etc. in the palette) on backend servers.
- gns3_proxy_replicate_templates.py supports replication of templates across backend servers.
Concept
In our Network Laboratory we use several network emulators (besides GNS3 esp., mininet, CML-P and EVE-NG) and simulators for courses and lab sessions as well as individual research or students' projects. As GNS3 is focusing on single user installations, several changes were necessary to provide lab session in class as well as to students working from at home. The following figure describes our setup:
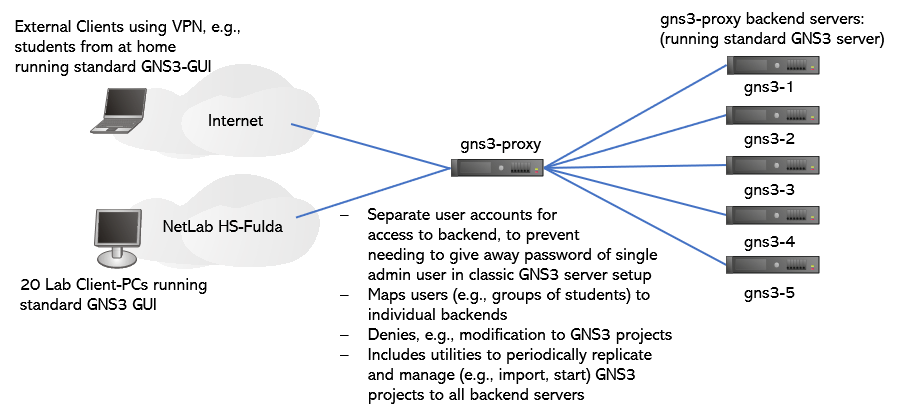
Using gns3-proxy, we can use separate credentials for users accessing the proxy without needing to share the single admin user provided by the standard gns3 server. However, no modifications are necessary to the standard GNS3 server used in our backends and for the GNS3 client GUI. Users defined in the proxy, e.g., a group of students working together in a group or on individual projects from at home, will be mapped to an individual backend server allowing load balancing and failover, since GNS3 compared to other network emulation environments does not offer a cluster setup to spread running projects and contained resources. The proxy also allows to filter and hence deny requests that contain modifications to projects. Prepared projects are periodically synced to all server backends using cron and the replication utility gns3_proxy_replicate_projects.py.
Installation
You can clone this repository or simply copy gns3_proxy.py and gns3_proxy_config.ini to a host that has Python >=3.4 installed.
Even easier is the installation using a Docker container. Simply install and run the latest version of the gns3-proxy container image from Docker Hub, e.g., using
$ docker pull flex/gns3-proxy
$ docker run -p 0.0.0.0:14080:14080/tcp flex/gns3-proxy
You can use a bootstrap script to install the sample scripts , pull the container image an run it:
$ bash <(curl -s https://raw.githubusercontent.com/srieger1/gns3-proxy/develop/scripts/docker-container-example/bootstrap-gns3-proxy-container)
Also, you can install the gns3-proxy from PyPI using
$ pip install gns3-proxy
Configuration
Settings of the proxy are stored in gns3_proxy_config.ini.
The [proxy] section contains following parameters for gns3-proxy:
- hostname: IP address or corresponding hostname the proxy should bind to, listening for incoming requests (default: 0.0.0.0)
- port TCP port the proxy will listen on (default: 14080)
- backend_user Username to use to connect to GNS3 server backend (default: admin, standard GNS3 server user)
- backend_password Password to use to connect to GNS3 server backend (default: password)
- backend_port TCP port the backend servers listen on (default: 3080, standard GNS3 server port)
- default_server Default server backend to use if no individual mapping for the user was found. Can be omitted to use explicit mapping (default: gns3-1)
- backlog Backlog of the proxy. Increase to allow the processing of more concurrent requests (default: 1000)
- server-recvbuf-size Server receive buffer size (TCP socket) of the proxy in bytes. Increase this value for better performance of large responses from backend servers (default: 65536, recommended for production: 1048576)
- client-recvbuf-size Client receive buffer size (TCP socket) of the proxy in bytes. Increase this value for better performance of large requests from clients (default: 65536, recommended for production: 1048576)
- open-file-limit Maximum number of parallel open files (socket fds) of the proxy (default: 1024)
- inactivity-timeout Timeout for inactive connections through the proxy. E.g., relevant for web terminal connections passing through the proxy that will be closed after this timeout if inactive. (default: 300)
The [servers] section contains the defined backend servers (server_name=ip_address), e.g.:
gns3-1=192.168.76.205
gns3-2=192.168.76.206
The [users] section defines the users allowed to access the proxy and their passwords (username=password), e.g.:
user1=pass1
user2=pass2
The [mapping] section maps users to the backend servers (mapping_id="user regexp":"server_name"), e.g.:
mapping1="user2":"gns3-2"
mapping2="user(.*)":"gns3-1"
The [project-filter] section allows for filtering projects shown in the project list for individual users. Only
projects matching the filter (filter_id="username regexp":"project name filter") are listed.
filter1="user1":"(.*)Group1(.*)"
filter2="user2":"(.*)Group2(.*)"
The [deny] section defines requests that should be filtered and hence denied by the proxy (rule_id="user regexp":"http_request_method":"url regexp":"header regexp":"body regexp"), e.g. to deny modification to existing projects as well as deletion and creation of projects:
rule1="user(.*)":"POST":"(.*)/projects$":"":""
rule2="user(.*)":"POST":"(.*)/nodes$":"":""
rule3="user(.*)":"POST":"(.*)/links$":"":""
rule4="user(.*)":"POST":"(.*)/drawings$":"":""
rule5="user(.*)":"POST":"(.*)/appliances/(.*)":"":""
rule6="user(.*)":"POST":"(.*)/compute":"":""
rule7="user(.*)":"POST":"(.*)/compute/(.*)":"":""
rule8="user(.*)":"DELETE":"":"":""
Installing a new server backend
Deploy the GNS3 server appliance as usual. You can find further information regarding the installation of a server for multiple clients in the GNS3 server for multiple clients docu. Make sure to allow VT-x/AMD-V for the backend server. If configured correctly, "KVM support available: true" should be displayed in the menu after starting the server. The server should be configured to use a static IP address. This can be done using the Shell or selecting the option "Network" (Configure network settings) from the GNS3 menu. Configure static IP addresses using the template in /etc/netplan/90_gns3vm_static_netcfg.yaml.
Afterwards you can use "Migrate" from another GNS3 host to migrate setup and images and projects to the new backend.
To configure the backend directly for gns3-proxy, an easier option is to use the provided setup-backend.sh script, e.g., by running:
$ ./setup-backend.sh gns3_proxy_config.ini 192.168.229.12
The first argument should lead to a gns3-proxy config containing backend port, username, password to use. Second argument is the the IP address of the new backend to be configured.
You can use gns3_proxy_replicate_images.py and gns3_proxy_replicate_templates.py to replicate all templates and images of an existing backend server to new server. These scripts can also be used periodically using cron to replicate images and templates to all gns3-proxy backends.
gns3_proxy_manage_images.py and gns_proxy_manage_templates.py additionally offer im- and export as well as deletion and listing of all images and templates on backend servers.
Manual configuration of GNS3 server backends
The only change necessary in the GNS3 server backends, is to edit the regular gns3_server.conf (available in the appliance terminal and, e.g., used to change username password etc., see also GNS3 server configuration file) and change the hostname from 0.0.0.0 to the IP address the server should listen on, e.g.:
host = 192.168.1.100
After you changed the config of the GNS3 backend servers and restarted them, configure gns3_proxy_config.ini based on your needs and run gns3_proxy.py. You can then, configure GNS3-GUI to use the proxy as a remote GNS3 server. By default, the proxy listens on 0.0.0.0 and TCP port 14080.
Deploying and managing projects on gns3-proxy backends
gns3_proxy_replicate_projects.py facilitates the replication of projects across backend servers. Command syntax is:
usage: gns3_proxy_replicate_projects.py [-h] [--config-file CONFIG_FILE]
                                        [--log-level LOG_LEVEL]
                                        [--delete-target-project] [--force]
                                        [--include-base-images]
                                        [--include-snapshots]
                                        [--reset-mac-addresses]
                                        [--compression COMPRESSION]
                                        (--project-id PROJECT_ID | --project-name PROJECT_NAME)
                                        [--duplicate-target-project]
                                        [--duplicate-name DUPLICATE_NAME]
                                        [--duplicate-start DUPLICATE_START]
                                        [--duplicate-end DUPLICATE_END]
                                        [--duplicates-per-target-server DUPLICATES_PER_TARGET_SERVER]
                                        [--inject-replication-note]
                                        [--regenerate-mac-address REGENERATE_MAC_ADDRESS]
                                        --source-server SOURCE_SERVER
                                        --target-server TARGET_SERVER
The provided example crontab contains examples to use gns3_proxy_replicate_projects.py. For example:
gns3_proxy_replicate_projects.py --source gns3-master --target "gns3-(.*)" --project-name "KommProt(.*)" --regenerate-mac-address "02:01:00:(.*)" --force
will replicate all GNS3 project names beginning with "KommProt" from the backend server gns3-master as the source to all backend servers matching the regular expression "gns3-.(.*)". The option --force tells the utility to overwrite existing projects with the same name on the targets without further notice. The option --regenerate-mac-address searches for the given MAC address in the projects and creates a new locally administered MAC address. This is especially necessary for links to cloud node types in the project. Otherwise all projects will use the same address leading to duplicate MAC and consequently duplicated IP addresses.
gns3_proxy_manage_projects.py facilitates the management of projects on backend servers. Command syntax is:
usage: gns3_proxy_manage_projects.py [-h] [--config-file CONFIG_FILE]
                                     [--log-level LOG_LEVEL] [--force]
                                     (--project-id PROJECT_ID | --project-name PROJECT_NAME)
                                     [--include-base-images]
                                     [--include-snapshots]
                                     [--reset-mac-addresses]
                                     [--compression COMPRESSION]
                                     [--duplicate-name DUPLICATE_NAME]
                                     [--duplicate-start DUPLICATE_START]
                                     [--duplicate-end DUPLICATE_END]
                                     [--duplicates-per-target-server DUPLICATES_PER_TARGET_SERVER]
                                     (--export-to-dir EXPORT_TO_DIR | --import-from-file IMPORT_FROM_FILE | --show | --delete | --duplicate | --start | --stop)
                                     --target-server TARGET_SERVER
The provided example crontab contains examples to use gns3_proxy_manage_projects.py. For example:
gns3_proxy_manage_projects.py --show --project-name "(.*)" --target "(.*)"
will show the status of all projects on all backend server.
gns3_proxy_manage_projects.py --start --project-name TestProject --target gns3-1
will start the project with the name TestProject on the server gns3-1 defined as a backend in gns3_proxy_config.ini. Can be used, e.g., together with cron to start the project ahead of time for lab sessions or courses, avoiding waiting for projects to be ready for use when students take the lab.
gns3_proxy_manage_projects.py --export-to-dir . --project-name TestProject --target gns3-1
will export the project TestProject from gns3-1 to a ZIP file that can be used as a backup, e.g. to import later using GNS3 GUI, or --import-from-file option, like:
gns3_proxy_manage_projects.py --import-from-file project.zip --project-id f1d1e2b8-c41f-42cf-97d4-513f3fd01cd2 --target gns3-1
will import GNS3 project exported in file project.zip to backend server gns3-1. The specified project-id (must be a valid UUID v4 in GNS3) will be used for the import.
Tag summary
Content type
Image
Digest
sha256:600ce9c38…
Size
26.8 MB
Last updated
about 3 years ago
docker pull flex/gns3-proxy