gbseuropagmbh/workflowmanager
Low-code platform for an easy workflow management for Microsoft 365, SharePoint, Domino & Cloud!
3.6K
gbseuropagmbh/workflowmanager repository overview

Quick Reference
- Maintained by: GBS Workflow Manager Team
- Where to get help: our Support
What is GBS Workflow Manager?
The GBS Workflow Manager is a low-code development platform with the focus on workflow management, making it easy to shape and automate business processes. It provides
- Visual workflow modeling based on BPMN 2.0
- Visual form design to define forms to be used within the workflows
- Tools to design navigation structures and views to list workflow items
- Code library for scripts to automate tasks
- Workflow run time engine
- Multi tenant management
- Interface to Active Directory and Azure Active Directory
- Optional an interface to Microsoft 365 or Microsoft SharePoint
Find out more on our Landing Page.
Running the image
For running GBS Workflow Manager in Docker you can use the docker-compose command. This command needs a 'docker-compose.yml' file where all the involved images are configured:
- GBS Workflow Manager image based on a Wildfly Application Server image
- MongoDB image
- PostgreSQL image or alternatively a Microsoft SQL Server image
The 'docker-compose' command downloads all images from Docker Hub. Depending which database you prefer the 'docker-compose.yml' file and other necessary files look different.
Alternative A - Using PostgreSQL image
The following configuration uses the PostgreSQL image. Copy the following text and create a file with the name 'docker-compose.yml'. Save the file in a local working folder.
docker-compose.yml
services:
# see https://hub.docker.com/_/mongo?tab=tags
# image: mongo:latest
# image: mongo:7.0.22 = db version v6.0.10
  mongodb:
    container_name: wfm-mongodb
    image: mongo:7.0.22
    environment:
      - MONGO_INITDB_ROOT_USERNAME=${MONGODB_USER:-root}
      - MONGO_INITDB_ROOT_PASSWORD=${MONGODB_PASSWORD:-changeit}
    volumes:
      - mongodata:/data/db
    ports:
      - 27017:27017
    networks:
      - wfmnw

# see https://hub.docker.com/_/postgres?tab=tags
# image: postgres:latest = postgres (PostgreSQL)
# image: postgres:15.13-alpine = postgres (PostgreSQL) 15.13 - Alpine is a much smaller version of Linux, it results in a smaller container than the full postgres image.
# image: postgres:15.13-alpine3.21 = postgres (PostgreSQL)
  postgres:
    container_name: wfm-postgres
    image: postgres:15.13-alpine3.21
    environment:
      POSTGRES_USER: ${POSTGRES_USER:-root}
      POSTGRES_PASSWORD: ${POSTGRES_PASSWORD:-changeit}
      POSTGRES_DB: postgres
      PGDATA: /data/postgres
      POSTGRES_INITDB_ARGS: "-E UTF8 --no-locale"
    volumes:
      - postgres:/data/postgres
      - ./postgres-dbs/init.sql:/docker-entrypoint-initdb.d/init.sql
    ports:
      - 5432:5432
    networks:
      - wfmnw
    restart: unless-stopped

  workflowmanager:
    container_name: wfm-wildfly
    image: gbseuropagmbh/workflowmanager:${TAG:-latest}
    environment:
# Use - Datasource_MongoDB_Connectionstring=NONE when you do not want to work with MongoDB and do not want to initialize MongoDB
      - Datasource_MongoDB_Connectionstring=mongodb://${MONGODB_USER:-root}:${MONGODB_PASSWORD:-changeit}@wfm-mongodb:27017
#     - Datasource_MongoDB_ReadOnly_Connectionstring=
      - Datasource_ProcessEngine_Connectionstring=jdbc:postgresql://wfm-postgres:5432/ProcessEngine
      - Datasource_ProcessEngine_Username=${POSTGRES_USER:-root}
      - Datasource_ProcessEngine_Password=${POSTGRES_PASSWORD:-changeit}
#     - Datasource_ProcessEngine_MinPoolSize=0
#     - Datasource_ProcessEngine_InitialPoolSize=0
#     - Datasource_ProcessEngine_MaxPoolSize=100
#     - Datasource_ProcessEngine_BlockingTimeoutMillis=30000
#     - Datasource_ProcessEngine_IdleTimeoutMinutes=5
      - Datasource_Driver_Class=org.postgresql.Driver
      - Datasource_Driver_Module=org.postgres
      - System_Database_Dialect=org.hibernate.dialect.PostgreSQL95Dialect
#     - System_Security_Transport_Guarantee=NONE
      - System_Tenant_Admin_Username=${SYSTEM_TENANT_USER:-root}
      - System_Tenant_Admin_Password=${SYSTEM_TENANT_PASSWORD:-changeit}
#     - System_FormDesigner_Internal_Protocol=
#     - System_FormDesigner_Internal_Host=
#     - System_FormDesigner_Internal_Port=8080
#     - System_Infinispan_CacheType=replicated
#     - System_Quartz_ThreadPool_ThreadCount=
    ports:
      - 8080:8080
      - 9990:9990
    command: bash -c "/opt/jboss/wildfly/bin/add-user.sh admin ${WILDFLY_ADMIN_PASSWORD:-changeit} --silent && /opt/jboss/wildfly/bin/standalone.sh -b 0.0.0.0 -bmanagement 0.0.0.0"
    networks:
      - wfmnw
    depends_on:
      - postgres
      - mongodb

networks:
  wfmnw:
    driver: bridge

volumes:
  postgres:
  mongodata:
For creating the necessary PostgreSQL database you have to create a corresponding SQL file. Copy the following text and create a file with the name 'init.sql'. Store the file in a subfolder of your working folder with the name 'postgres-dbs'.
postgres-dbs/init.sql
CREATE DATABASE "ProcessEngine";
The 'docker-compose.yml' file defines the default values for all involved user names and passwords. If you want to define your own user names and passwords copy the following text and create a file with the name '.env'. Adapt the values of the environment variables as desired. Store the file in your working folder next to the 'docker-compose.yml' file.
.env
TAG=latest
POSTGRES_USER=root
POSTGRES_PASSWORD=changeit
WILDFLY_ADMIN_PASSWORD=changeit
MONGODB_USER=root
MONGODB_PASSWORD=changeit
SYSTEM_TENANT_USER=root
SYSTEM_TENANT_PASSWORD=changeit
Open a command prompt window from your working folder and run the docker compose command:
docker-compose up -d
Corresponding docker containers will be created with the help of the configured and downloaded images.
Alternative B - Using Microsoft SQL Server image
The following configuration uses the Microsoft SQL Server image. Copy the following text and create a file with the name 'docker-compose.yml'. Save the file in a local working folder.
docker-compose.yml
services:
# see https://hub.docker.com/_/mongo?tab=tags
# image: mongo:latest
# image: mongo:7.0.22
  mongodb:
    container_name: wfm-mongodb
    image: mongo:7.0.22
    environment:
      - MONGO_INITDB_ROOT_USERNAME=${MONGODB_USER:-root}
      - MONGO_INITDB_ROOT_PASSWORD=${MONGODB_PASSWORD:-changeit}
    volumes:
      - mongodata:/data/db
    ports:
      - 27017:27017
    networks:
      - wfmnw

# image is defined in mssql-dbs/Dockerfile
  mssql:
    container_name: wfm-mssql
    build:
      context: ./mssql-dbs/
      dockerfile: Dockerfile
    environment:
      - ACCEPT_EULA=Y
      - MSSQL_SA_PASSWORD=${MSSQL_SA_PASSWORD:-changeit4MSSQLAdmin}
      - MSSQL_USER=${MSSQL_USER:-root}
      - MSSQL_PASSWORD=${MSSQL_PASSWORD:-changeit4MSSQLUser}
    volumes:
      - mssqlsystem:/var/opt/mssql
      - mssqluser:/var/opt/sqlserver
    ports:
      - 1433:1433
    networks:
      - wfmnw

  workflowmanager:
    container_name: wfm-wildfly
    image: gbseuropagmbh/workflowmanager:${TAG:-latest}
    environment:
# Use - Datasource_MongoDB_Connectionstring=NONE when you do not want to work with MongoDB and do not want to initialize MongoDB
      - Datasource_MongoDB_Connectionstring=mongodb://${MONGODB_USER:-root}:${MONGODB_PASSWORD:-changeit}@wfm-mongodb:27017
#     - Datasource_MongoDB_ReadOnly_Connectionstring=
      - Datasource_ProcessEngine_Connectionstring=jdbc:sqlserver://wfm-mssql:1433;databaseName=ProcessEngine;sendStringParametersAsUnicode=false
      - Datasource_ProcessEngine_Username=${MSSQL_USER:-root}
      - Datasource_ProcessEngine_Password=${MSSQL_PASSWORD:-changeit4MSSQLUser}
#     - Datasource_ProcessEngine_MinPoolSize=0
#     - Datasource_ProcessEngine_InitialPoolSize=0
#     - Datasource_ProcessEngine_MaxPoolSize=100
#     - Datasource_ProcessEngine_BlockingTimeoutMillis=30000
#     - Datasource_ProcessEngine_IdleTimeoutMinutes=5
      - Datasource_Driver_Class=com.microsoft.sqlserver.jdbc.SQLServerDriver
      - Datasource_Driver_Module=com.microsoft.sqlserver
      - System_Database_Dialect=org.hibernate.dialect.SQLServer2012Dialect
#     - System_Security_Transport_Guarantee=NONE
      - System_Tenant_Admin_Username=${SYSTEM_TENANT_USER:-root}
      - System_Tenant_Admin_Password=${SYSTEM_TENANT_PASSWORD:-changeit}
#     - System_FormDesigner_Internal_Protocol=
#     - System_FormDesigner_Internal_Host=
#     - System_FormDesigner_Internal_Port=8080
#     - System_Infinispan_CacheType=replicated
#     - System_Quartz_ThreadPool_ThreadCount=
    ports:
      - 8080:8080
      - 9990:9990
    command: bash -c "/opt/jboss/wildfly/bin/add-user.sh admin ${WILDFLY_ADMIN_PASSWORD:-changeit} --silent && /opt/jboss/wildfly/bin/standalone.sh -b 0.0.0.0 -bmanagement 0.0.0.0"
    networks:
      - wfmnw
    depends_on:
      - mssql
      - mongodb

networks:
  wfmnw:
    driver: bridge

volumes:
  mssqlsystem:
  mssqluser:
  mongodata:
For creating the necessary Microsoft SQL database you have to create a corresponding SQL file. Copy the following text and create a file with the name 'setup.sql'. Store the file in a subfolder of your working folder with the name 'mssql-dbs'.
mssql-dbs/setup.sql
CREATE DATABASE ProcessEngine;
GO
USE ProcessEngine;
GO
CREATE LOGIN $(GBS_SQL_USER) WITH PASSWORD = '$(GBS_SQL_PASSWORD)';
GO
CREATE USER $(GBS_SQL_USER) FOR LOGIN $(GBS_SQL_USER);
GO
ALTER SERVER ROLE sysadmin ADD MEMBER [$(GBS_SQL_USER)];
GO
The Microsoft SQL Server image will be created with the help of a Dockerfile. Copy the following text and create a file with the name 'Dockerfile'. Store the file in a subfolder of your working folder with the name 'mssql-dbs'.
mssql-dbs/Dockerfile
# see https://hub.docker.com/_/microsoft-mssql-server
FROM mcr.microsoft.com/mssql/server:2022-latest

# Switch to root user for access to apt-get install
USER root

# Install node/npm
RUN apt-get -y update  && \
        apt-get install -y dos2unix

# Create app directory
RUN mkdir -p /usr/src/app
WORKDIR /usr/src/app

# Bundle app source
COPY . /usr/src/app

RUN dos2unix *

# Grant permissions for the import-data script to be executable
RUN chmod +x /usr/src/app/import-data.sh

# Switch back to mssql user and run the entrypoint script
USER mssql
ENTRYPOINT /bin/bash ./entrypoint.sh
An additional file entrypoint.sh is necessary. Copy the following text and create a file with the name 'entrypoint.sh'. Store the file in a subfolder of your working folder with the name 'mssql-dbs'
mssql-dbs/entrypoint.sh
/usr/src/app/import-data.sh & /opt/mssql/bin/sqlservr
An additional file import-data.sh is necessary. Copy the following text and create a file with the name 'import-data.sh'. Store the file in a subfolder of your working folder with the name 'mssql-dbs'.
mssql-dbs/import-data.sh
# see https://github.com/microsoft/mssql-docker/issues/894
# The sqlcmd folder has been moved from /opt/mssql-tools to /opt/mssql-tools18
# see https://stackoverflow.com/questions/71688125/odbc-driver-18-for-sql-serverssl-provider-error1416f086
# Add the -C option to trust the server certificate

for i in {1..50};
do
    /opt/mssql-tools18/bin/sqlcmd -S localhost -U sa -P ${MSSQL_SA_PASSWORD} -v GBS_SQL_USER=${MSSQL_USER} -v GBS_SQL_PASSWORD=${MSSQL_PASSWORD} -d master -i setup.sql -C
    if [ $? -eq 0 ]
    then
        echo "setup.sql completed"
        break
    else
        echo "not ready yet..."
        sleep 10
    fi
done
The 'docker-compose.yml' file defines the default values for all involved user names and passwords. If you want to define your own user names and passwords copy the following text and create a file with the name '.env'. Adapt the values of the environment variables as desired. Store the file in your working folder next to the 'docker-compose.yml' file. The passwords for the Microsoft SQL Server needs to have a sufficient length and strength.
.env
TAG=latest
MSSQL_USER=root
MSSQL_PASSWORD=changeit4MSSQLUser
MSSQL_SA_PASSWORD=changeit4MSSQLAdmin
WILDFLY_ADMIN_PASSWORD=changeit
MONGODB_USER=root
MONGODB_PASSWORD=changeit
SYSTEM_TENANT_USER=root
SYSTEM_TENANT_PASSWORD=changeit
Open a command prompt window from your working folder and run the Docker Compose command:
docker-compose up -d
Corresponding Docker containers will be created with the help of the configured and downloaded images.
First Steps
After start of the GBS Workflow Manager you should navigate to http://localhost:8080 to use it. Then, you should see the initial login page.
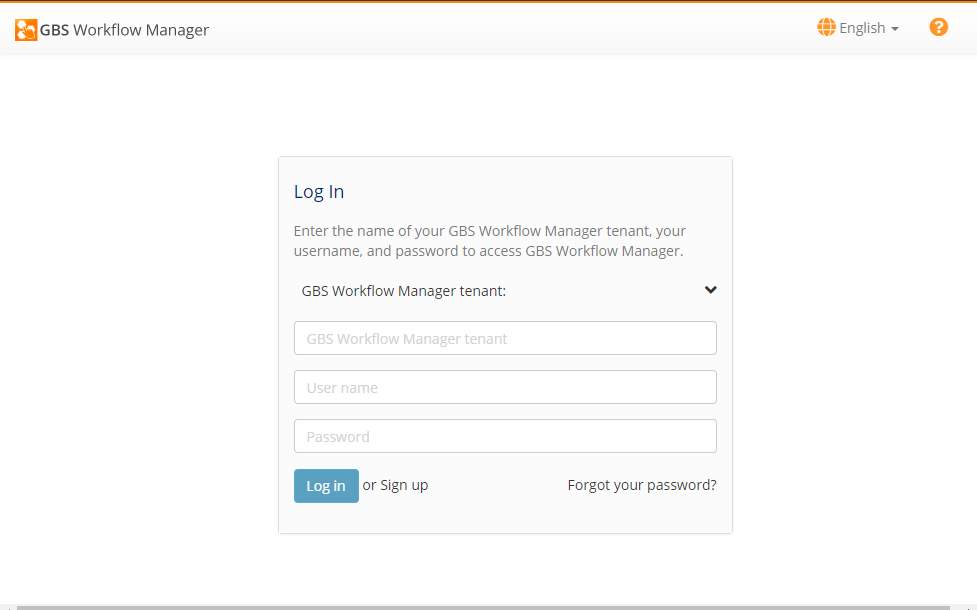
On the login page you can click on "Sign up" to create a new tenant. With this tenant and the created administration account you can sign in to the tenant and can create the first workflow.
The GBS Workflow Manager provides a few example applications and workflows. These are a contact directory, a document library, a project board and a complaint manager application.
The management console of WildFly is available at http://localhost:9990/.
License
By default, the GBS Workflow Manager is not restricted regarding to the functionality. It only contains limitations on the number of users (up to 25), the number of applications (up to 4), the workflow types for each application (up to 4) and a limit on the storage space for data attachments (up to 100 MB for each tenant ).
If you want to get a license, you can contact us by email at [email protected].
Tag summary
Content type
Image
Digest
sha256:ddad3b483…
Size
551.2 MB
Last updated
about 1 year ago
docker pull gbseuropagmbh/workflowmanager