izdock/izpbx-asterisk
izPBX Telephony System - Turnkey Asterisk engine with FreePBX GUI
100K+
izdock/izpbx-asterisk repository overview
Name
 izPBX Cloud Native VoIP Telephony System
Description
izPBX is a Turnkey Cloud Native VoIP Telephony System powered by Asterisk Engine and FreePBX Management GUI
Supported tags
Production Branch:
20.16,20.16.X,20.16.X-BUILD,20,latest(Asterisk 20 LTS + FreePBX 16)18.16,18.16.X,18.16.X-BUILD,18(Asterisk 18 LTS + FreePBX 16)18.15,18.15.X,18.15.X-BUILD(Asterisk 18 LTS + FreePBX 15)16.15,16.15.X,16.15.X-BUILD(Asterisk 16 LTS + FreePBX 15)
Development Branches:
- Asterisk 20 LTS:
dev-20,dev-20.X,dev-20.X.X-BUILD - Asterisk 18 LTS:
dev-18,dev-18.X,dev-18.X.X-BUILD
Version notes:
Tags format: Z.Y.X-[BUILD]
where:
- Z = Asterisk release (PBX engine)
- Y = FreePBX release (PBX GUI)
- X = izPBX release (this project)
- BUILD = Build number
Look into project Tags page to discover the latest versions
Dockerfile
Targets of this project
Cloud and On-Premise, Fast, Automatic and Repeatable deploy of VoIP PBX systems
Features
- Fast initial bootstrap to deploy a full features PBX system (60 secs install time from zero to a running turnkey PBX system)
- Built-in PBX Engine based on Asterisk® project (compiled from scratch)
- Built-in WEB Management GUI based on FreePBX® project (with default predownloaded modules for quicker initial deploy)
- No vendor lock-in, you can migrare to izPBX and away izPBX simply importing/exporting FreePBX Backups
- Based on Rocky Linux 8 64bit OS (RHEL derivate with long term support)
- Small container image footprint (~450 MB vs 2300 MB of official FreePBX ISO distro file)
- Multi-Tenant PBX System Support (look into Advanced Production Configuration Examples section)
- Automatic Remote XML PhoneBook support for compatible VoIP Phones
- Persistent storage mode for configuration and not volatile data
- Fail2ban as security monitor to block SIP and HTTP brute force attacks
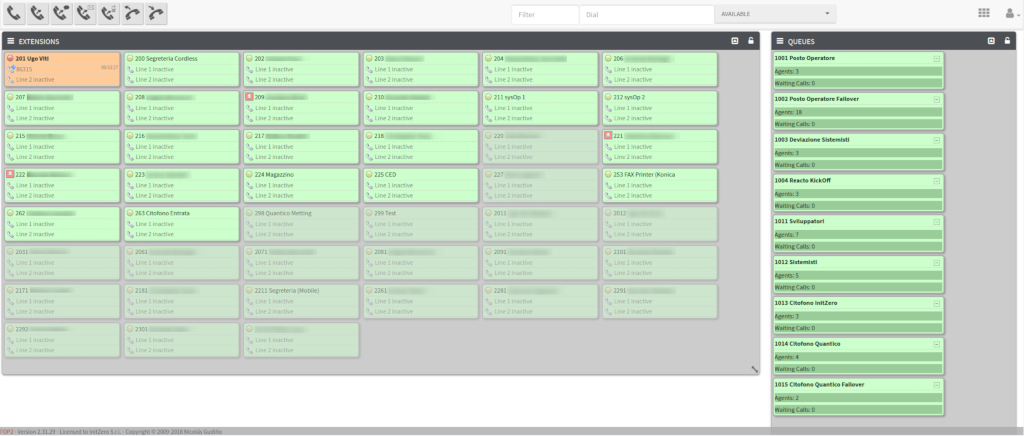
- FOP2 Operator Panel
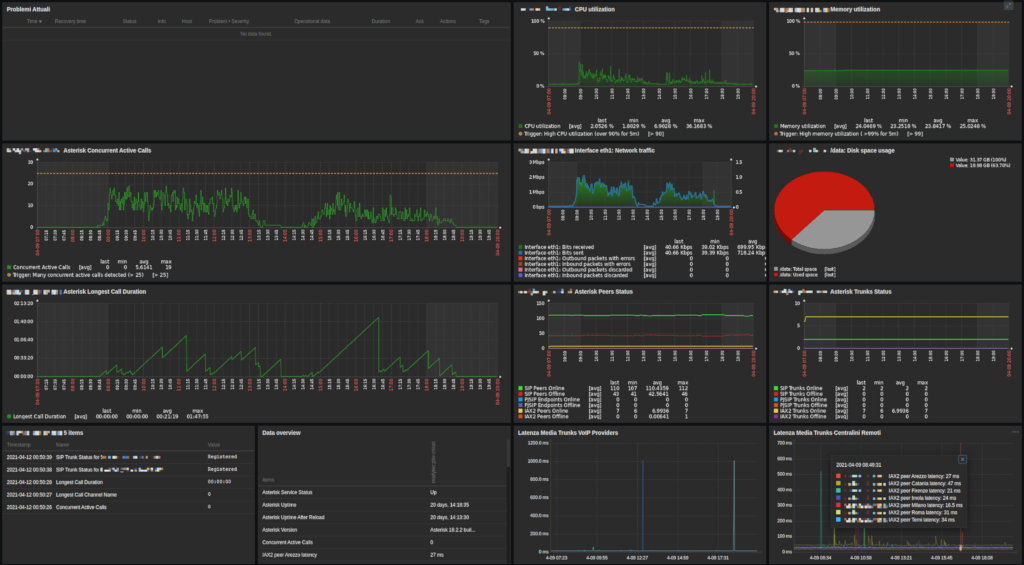
- Integrated Asterisk Zabbix agent for services health monitoring
- Misc
izpbx-*tools scripts (likeizpbx-callstats) izsynthutility - TTS/Text To Speech synthesizer, background music overlay assembler and audio file converter for PBX and Home Automation Systemstcpdumpandsngreputility to debug VoIP calls- supervisord as services management with monitoring and automatic restart when services fail
- postfix MTA daemon for sending mails (notifications, voicemails and FAXes)
- Integrated cron daemon for running scheduled tasks
- Integrated TFTP and DHCP server powered by DNSMasq for autoprovisioning VoIP Phones
- Integrated NTP Server
- Apache 2.4 and PHP 7.2 (mpm_prefork+mod_php configuration mode)
- Automatic Let's Encrypt HTTPS certificate management for exposed PBXs to Internet
- Custom commercial SSL Certificates support
- Logrotating of service logs
- All configurations made via single central
.envfile - Many customizable variables to use (look inside
default.envfile) - Only two containers setup: (Antipattern container design but needed by the FreePBX ecosystem to works)
- izpbx (izpbx-asterisk container: Asterisk Engine + FreePBX Frontend + others services)
- izpbx-db (mariadb container: Database Backend)
Screenshots
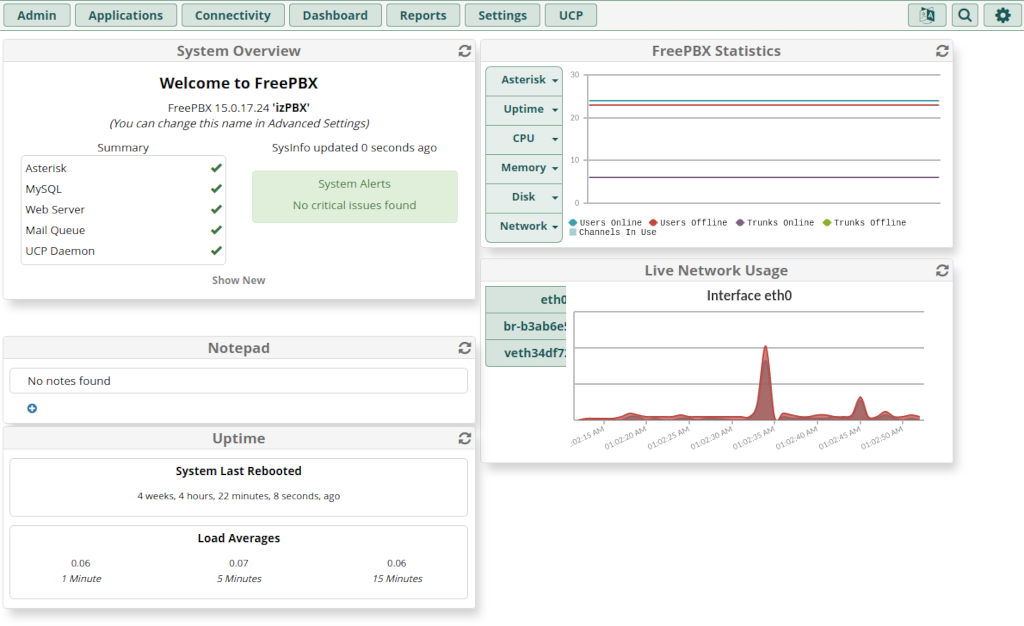
izPBX Dashboard (FreePBX):
izPBX Operator Panel (FOP2):
izPBX Monitoring Dashboard (Zabbix):
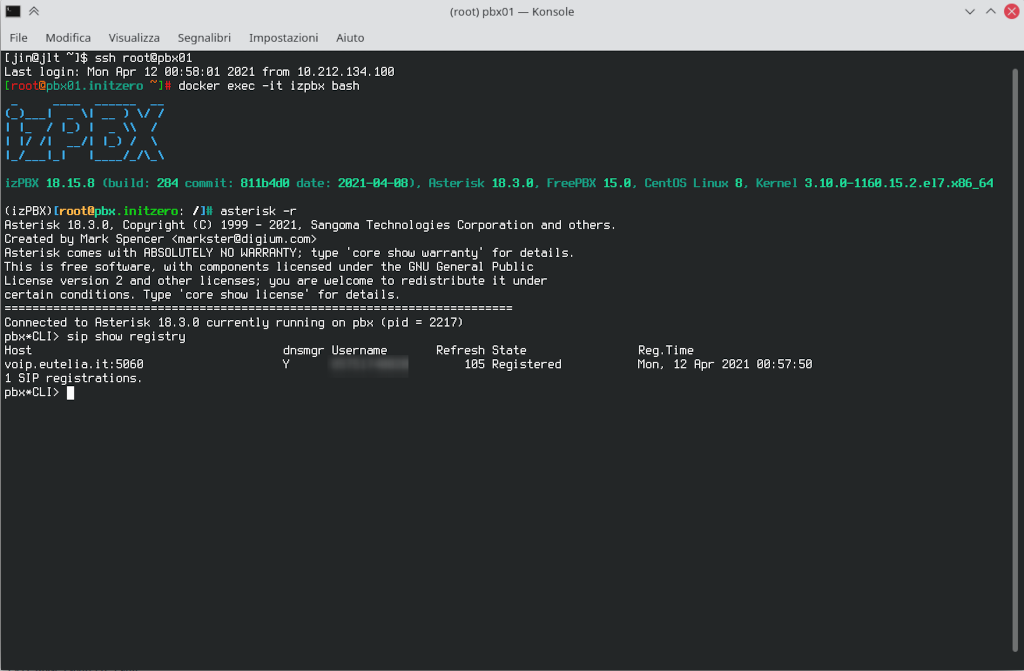
izPBX CLI (Asterisk):
Deploy izPBX
Using docker compose is the suggested method:
-
Install your prefered Linux OS into VM or Baremetal Server
-
Install Docker Runtime with
docker composeplugin for your Operating System from https://www.docker.com/get-started- RHEL8 based distro Quick&Dirty commands (skip if you use other distribution):
sudo dnf config-manager --add-repo=https://download.docker.com/linux/centos/docker-ce.repo
sudo dnf install docker-ce docker compose-plugin -y
sudo systemctl enable --now docker
-
Create a
compose.yml, or clone git repository, or download latest tarbal release from: https://github.com/ugoviti/izpbx/releases and unpack it into a directory (ex./opt/izpbx), faster method with git:git clone https://github.com/ugoviti/izpbx.git /opt/izpbxcd /opt/izpbx
-
Checkout into latest official release:
git checkout tags/$(git tag | sort --version-sort | tail -1)
-
Copy default configuration file
default.envinto.env:cp default.env .env
-
Customize
.envvariables, specially the security section of default passwords:vim .env
-
Deploy and start izpbx using
docker composecommand:docker compose up -d
-
Wait the pull to finish (~60 seconds with fast internet connections) and point your web browser to the IP address of your docker host and follow initial setup guide
Note: by default, to correctly handle SIP NAT and SIP-RTP UDP traffic, the izpbx container will use the network_mode: host, so the izpbx container will be exposed directly to the outside network without using docker internal network range (network_mode: host will prevent multiple izpbx containers from running inside the same host).
Modify compose.yml and comment #network_mode: host if you want run multiple izpbx containers in the same host (not production tested. There will be problems with RTP traffic).
Another available option is to disable network_mode: host and use macvlan network mode used for running izPBX into multi-tenant mode.
Customizing compose.yml
If you need to customize the default compose.yml, don't edit it, but create an override file:
docker compose.override.yml
and specify the options you want to override, for example:
version: '3'

services:
  db:
    image: docker.io/mariadb:10.11.4
  izpbx:
    image: docker.io/izdock/izpbx-asterisk:20.16.7
and start the deploy with the same command docker compose up -d
Alternative deploy method via 'docker run' command (not suggested)
If you want test izPBX without using docker compose command, you can use the following docker commands:
-
Start MySQL:
docker run --rm -ti -v ./data/db:/var/lib/mysql -e MYSQL_ROOT_PASSWORD=CHANGEM3 -e MYSQL_PASSWORD=CHANGEM3 --name izpbx-db mariadb:10.4 -
Start izPBX:
docker run --rm -ti --network=host --privileged --cap-add=NET_ADMIN -v ./data/izpbx:/data -e MYSQL_ROOT_PASSWORD=CHANGEM3 -e MYSQL_PASSWORD=CHANGEM3 -e MYSQL_SERVER=127.0.0.1 -e MYSQL_DATABASE=asterisk -e MYSQL_USER=asterisk -e APP_DATA=/data --name izpbx izpbx-asterisk:latest
Upgrade izPBX
- Upgrade the version of izpbx by downloading a new tgz release, or changing image tag into compose.yml file (from git releases page, verify if upstream docker compose was updated), or if you cloned directly from GIT, use the following commands as quick method:
cd /opt/izpbx
git checkout main
git pull
git fetch --tags --all -f
git checkout tags/$(git tag | sort --version-sort | tail -1)
- Upgrade the izpbx deploy with:
(NB. First verify ifcompose.ymlanddefault.envwas updated a make the same changes in your.envfile)
docker compose pull
docker compose up -d
-
If the mariadb database version was changed, rememeber to update tables schema with command
source .env ; docker exec -it izpbx-db mysql_upgrade -u root -p$MYSQL_ROOT_PASSWORD -
Open FreePBX Web URL and verify if exist any modules updates from FreePBX Menu: Admin --> Modules Admin --> Check Online --> Upgade all --> Process
That's all
Upgrade path to a major FreePBX release
FreePBX will be installed into persistent data dir on initial deploy only (when no installations already exist).
Successive container updates on the same release (example from 18.15.1 to 18.15.2) will not upgrade the FreePBX Framework (only Asterisk engine will be updated).
If you want upgrade FreePBX Framework/Core to a major release (example from 15 to 16), you have 2 options:
- Automatic upgrade using izPBX container release (example, switching from 18.15.x to 18.16.x release)
- Manual upgrade using FreePBX Upgrader tool
method 1: Automatic upgrade using izPBX container release (suggested)
- Make sure before switching izPBX to a new major release, all FreePBX modules are updated to the latest release
- Make sure you made a full backup of
datadir (IMPORTANT!) - Make sure you enabled
FREEPBX_AUTOUPGRADE_CORE=truein the.envfile - Deploy the latest version of izPBX (ex. 18.15.x for FreePBX 15, 18.16.x for FreePBX 16, etc...)
- izPBX should be detect an old FreePBX version installed and start the upgrade process
- From the FreePBX / Modules Admin page, check if all modules are been updated and enable again disabled modules
method 2: Manual upgrade using FreePBX Upgrader tool
- Make sure before switching izPBX to a new major release, all FreePBX modules are updated to the latest release
- Make sure you made a full backup of
datadir (IMPORTANT!) - Make sure you disabled
FREEPBX_AUTOUPGRADE_CORE=falsein the.envfile - Deploy the latest version of izPBX (ex. 18.15.x for FreePBX 15, 18.16.x for FreePBX 16, etc...)
- izPBX should start with the old FreePBX release but with all dependences installed and ready to complete the upgrade
- Open FreePBX Menu: Admin --> Modules Admin --> Check Online select FreePBX Upgrader --> Process
- Follow these istructions: https://wiki.freepbx.org/display/FOP/Non+Distro+-+Upgrade+to+FreePBX+16
- From the FreePBX / Modules Admin page, check if all modules are been updated and enable again disabled modules
Advanced Production Configuration Examples
Multi-Tenant VoIP PBX with dedicated Databases
Objective
- Run many izPBX instances into single docker host (you must allocate an external static IP for every izPBX backend/frontend)
- Dedicated Database for every izPBX instances
Configuration
Create a directory where you want deploy izpbx data and create compose.yml and .env files:
Example:
mkdir yourgreatpbx
cd yourgreatpbx
vim compose.yml
vim .env
NOTE:
- Modify
compose.ymlaccording to your environment needs:parent:(must be specified your ethernet card)subnet:(must match you intranet network range)ipv4_address:(every izPBX frontend will must to have a different external IP)
- Modify
.envaccording to your environment needs:MYSQL_SERVER=db(you can't use localhost here)
version: '3'

networks:
  izpbx-0-ext:
    driver: macvlan
    driver_opts:
      parent: eth0
    ipam:
      config:
      - subnet: 10.1.1.0/24
        #ip_range: "10.1.1.221/30"
        #gateway: 10.1.1.1
  izpbx-1:
    driver: bridge

services:
  db:
    image: mariadb:10.5.9
    ## WARNING: if you upgrade image tag enter the container and run mysql_upgrade:
    ## source .env ; docker exec -it izpbx-db mysql_upgrade -u root -p$MYSQL_ROOT_PASSWORD
    command: --sql-mode=ERROR_FOR_DIVISION_BY_ZERO,NO_AUTO_CREATE_USER,NO_ENGINE_SUBSTITUTION
    restart: unless-stopped
    env_file:
    - .env
    environment:
    - MYSQL_ROOT_PASSWORD
    - MYSQL_DATABASE
    - MYSQL_USER
    - MYSQL_PASSWORD
    ## database configurations
    volumes:
    - ./data/db:/var/lib/mysql
    networks:
      izpbx-1:

  izpbx:
    #hostname: ${APP_FQDN}
    image: izdock/izpbx-asterisk:18.15.11
    restart: unless-stopped
    depends_on:
    - db
    env_file:
    - .env
    volumes:
    - ./data/izpbx:/data
    cap_add:
    - SYS_ADMIN
    - NET_ADMIN
    privileged: true
    networks:
      izpbx-0-ext:
        ipv4_address: 10.1.1.221
      izpbx-1:
Repeat the procedure for every izPBX you want deploy. Remember to create a dedicated directory for every izpbx deploy.
Deploy
Enter in every directory containig configuration files and run:
docker compose up -d
Multi-Tenant VoIP PBX with shared global Database and single compose.yml file
Objective
- Run many izPBX instances into single docker host (you must allocate an external static IP for every izPBX backend/frontend)
- Single Global Shared Database used by all izPBX instances
Configuration
Create a directory where you want deploy all izpbx data and create compose.yml and a PBXNAME.env file for every izpbx deploy:
Example:
mkdir izpbx
cd izpbx
vim compose.yml
vim izpbx1.env
vim izpbx2.env
vim izpbx3.env
etc...
NOTE:
- Modify
compose.ymlaccording to your environment needs, changing:parent:(must be specified your ethernet card)subnet:(must match you intranet network range)ipv4_address:(every izPBX frontend will must to have a different external IP)
- Remember to modify every
PBXNAME.envfile and set different variables forMYSQL(for best security use a different password for every deploy), example:MYSQL_SERVER=db(all deployes will use the same db name)MYSQL_DATABASE=izpbx1_asteriskMYSQL_DATABASE_CDR=izpbx1_asteriskcdrdbMYSQL_USER=izpbx1_asteriskMYSQL_PASSWORD=izpbx1_AsteriskPasswordV3ryS3cur3- so on...
version: '3'

networks:
  izpbx-0-ext:
    driver: macvlan
    driver_opts:
      parent: enp0s13f0u3u1u3
    ipam:
      config:
      - subnet: 10.1.1.0/24
  izpbx-1:
    driver: bridge

services:
  db:
    image: mariadb:10.5.9
    ## WARNING: if you upgrade image tag enter the container and run mysql_upgrade:
    ## source .env ; docker exec -it izpbx-db mysql_upgrade -u root -p$MYSQL_ROOT_PASSWORD
    command: --sql-mode=ERROR_FOR_DIVISION_BY_ZERO,NO_AUTO_CREATE_USER,NO_ENGINE_SUBSTITUTION
    restart: unless-stopped
    env_file:
    - db.env
    environment:
    - MYSQL_ROOT_PASSWORD
    - MYSQL_DATABASE
    - MYSQL_USER
    - MYSQL_PASSWORD
    ## database configurations
    volumes:
    - ./data/db:/var/lib/mysql
    networks:
      izpbx-1:

  izpbx1:
    #hostname: ${APP_FQDN}
    image: izdock/izpbx-asterisk:18.15.11
    restart: unless-stopped
    depends_on:
    - db
    env_file:
    - izpbx1.env
    volumes:
    - ./data/izpbx1:/data
    cap_add:
    - NET_ADMIN
    privileged: true
    networks:
      izpbx-0-ext:
        ipv4_address: 10.1.1.221
      izpbx-1:

  izpbx2:
    #hostname: ${APP_FQDN}
    image: izdock/izpbx-asterisk:18.15.11
    restart: unless-stopped
    depends_on:
    - db
    env_file:
    - izpbx2.env
    volumes:
    - ./data/izpbx2:/data
    cap_add:
    - NET_ADMIN
    privileged: true
    networks:
      izpbx-0-ext:
        ipv4_address: 10.1.1.222
      izpbx-1:

  izpbx3:
    #hostname: ${APP_FQDN}
    image: izdock/izpbx-asterisk:18.15.11
    restart: unless-stopped
    depends_on:
    - db
    env_file:
    - izpbx3.env
    volumes:
    - ./data/izpbx3:/data
    cap_add:
    - NET_ADMIN
    privileged: true
    networks:
      izpbx-0-ext:
        ipv4_address: 10.1.1.223
      izpbx-1:
Deploy
Enter the directory containig configuration files and run:
docker compose up -d
Services Management
Command to restart whole izPBX deploy
docker compose restart izpbx
Command to restart izPBX container only
docker restart izpbx
Command to restart DB container only
docker restart izpbx-db
If you want restart single services inside izpbx container
Enter the container:
docker exec -it izpbx bash
Restart izpbx service (Asterisk Engine):
supervisorctl restart izpbx
To restart others available services use supervisorctl restart SERVICE
Available services:
asteriskcronfail2banfop2httpdizpbxtftpdpostfixzabbix-agent
Tested systems and host compatibility
Tested Docker Runtime:
- docker-ce >= 20.0
- docker compose-plugin >= 2.0
Tested Host Operating Systems:
- RHEL 6/7/8/9 based distro
- Fedora Core >30
- Debian 10
- Ubuntu 20.04
Environment default variables
Consult the default.env file:
Zabbix Agent Configuration
Consult official repository page for installation and configuration of Asterisk Zabbix Template in you Zabbix Server:
FreePBX Configuration Best Practices
-
Settings-->Advanced Settings
- CW Enabled by Default: NO
- Country Indication Tones: Italy
- Ringtime Default: 60 seconds
- Speaking Clock Time Format: 24H
- PHP Timezone: Europe/Rome
-
Settings-->Asterisk Logfile Settings
- Security Settings-->Allow Anonymous Inbound SIP Calls: No
- Security Settings-->Allow SIP Guests: No
-
Settings-->Asterisk SIP Settings
- File Name: security
- Security: ON (all others OFF)
-
Settings-->Filestore-->Local
- Path Name: Local Storage
- Path: ASTSPOOLDIR/backup
-
Admin-->Backup & Restore
- Basic Information-->Backup Name: Daily Backup
- Notifications-->Email Type: Failure
- Storage-->Storage Location: Local Storage
- Schedule and Maintinence-->Enabled: Yes
- Schedule and Maintinence-->Scheduling: Every: Day Minute: 00 Hour: 00
- Maintinence-->Delete After Runs: 0
- Maintinence-->Delete After Days: 14
-
Admin-->Contact Manager
- External
- Add New Group
- Name: PhoneBook
- Type: External
- Add New Group
- External
-
Admin-->Caller ID Lookup Sources
- Source Description: ContactManager
- Source type: Contact Manager
- Cache Results: No
- Contact Manager Group(s): All selected
-
Admin-->Sound Languages-->Setttings
- Global Language: Italian
Configuring VoIP XML PhoneBook Lookup
-
Visit http://IZPBX_ADDRESS/pb/ to learn about the supported Phones and XML Address Books.
-
Configure Contact Manager as reported above (create a new contact manager group name like PhoneBook)
Define every PhoneBooks you want to use
- Open your VoIP Phone GUI (example for Yealink Phones):
- Directory-->Remote Phone Book
- Index 1 (URL for Extensions PhoneBook)
- RemoteURL: http://IZPBX_ADDRESS/pb/yealink/ext
- Display Name: Extensions
- Index 2 (URL for Corporate PhoneBook)
- RemoteURL: http://IZPBX_ADDRESS/pb/yealink/PhoneBook
- Display Name: Corporate
- Index 1 (URL for Extensions PhoneBook)
- Directory-->Remote Phone Book
For Yealink / Fanvil phones you can use a single Phonebook Menu: http://IZPBX_ADDRESS/pb/yealink/menu
FAQ / Troubleshooting
-
FOP2 specific version upgrade/downgrade (get latest release number from https://www.fop2.com/download.php): automatic upgrade:
FOP2_VER=2.31.37 curl -fSL --connect-timeout 30 http://download2.fop2.com/fop2-$FOP2_VER-centos-x86_64.tgz | tar xz -C /usr/src cd /usr/src/fop2 make install supervisorctl restart fop2for manual downgrade just copy the fop2_server binary:
cp /usr/src/fop2/server/fop2_server /usr/local/fop2/fop2_server supervisorctl restart fop2 -
FOP2 useful commands: NB. define interface name to associate the license, for example:
eth0- enter into izpbx container:
docker exec -it izpbx bash - register the license:
/usr/local/fop2/fop2_server --rp=http --register --iface eth0 --name "Company Name" --code "LICENSECODE" - get lincese detail:
/usr/local/fop2/fop2_server --rp=http --getinfo --iface eth0 - reactivate the license:
/usr/local/fop2/fop2_server --rp=http --reactivate --iface eth0 - revoke the license:
/usr/local/fop2/fop2_server --rp=http --revoke --iface eth0
- enter into izpbx container:
-
FOP2 is running in Demo mode because the license is invalid
- FOP2 soffer from a bug about the lincensing model (already comunicated many times to the FOP2 support without an official solution) to workaround that problem, normally is required to reactivate the license, but some times doesn't works, so the only solution is to contact FOP2 support team
-
FreePBX is slow to reload (https://issues.freepbx.org/browse/FREEPBX-20559)
- As temporary WORKAROUND enter into izpbx container shell and run:
docker exec -it izpbx bash
fwconsole setting SIGNATURECHECK 0
- As temporary WORKAROUND enter into izpbx container shell and run:
-
Factory Reset izPBX (WARNING! your persistent storage will be wiped!):
docker compose downrm -rf datadocker compose up -d
TODO / Future Development
- Add ARM version compatible with Raspberry PI
- Kubernetes deploy via Helm Chart (major problems for RTP UDP ports range... needs further investigation, no valid solutions right now)
- Hylafax+ Server + IAXModem (used for sending FAXes. Receiving FAXes via mail is already possibile using FreePBX FAX Module)
- macOS host support? (edit
compose.ymland comment localtime volume?) - Windows host support (need to use docker volume instead local directory path?)
BUGS and Limits of this project
- izPBX was developed with container antipattern design in mind.
- FreePBX was not designed to run as containerized app, and its ecosystem requires numerous modules to works
- FreePBX modules updates will managed by FreePBX Admin Modules Pages itself not by izPBX container updates
- izPBX must be deployed by 1 instance for every VM or Baremetal host
- No multi deploy works out of the box by default when using
network_mode: host - Look Advanced Production Configuration Examples section for Multi-Tenant Solutions
- No multi deploy works out of the box by default when using
- By default
network_mode: hostis used, so the PBX network is esposed directly in the host interface (no internal container network is used), so the default UDP RTP port range can be set from10000to20000.- If you plan to disable
network_mode: host, tune the port range (forwarding 10000 ports with the docker stack make high cpu usage and longer startup times), for example for 50 concurrent calls:
APP_PORT_RTP_START=10000
APP_PORT_RTP_END=10200
for best security, fine-tune the ports range based on your needs by not using standard port ranges!
- If you plan to disable
- Unpredictable network interface order when running in Multi-Tenant mode. As workaround, used network interface name must be named in lexical order. refs:
- By default FreePBX use Signature Checking for modules packages, but this make very high delays when reloading FreePBX, so by default is been disabled. refs:
- No commercial FreePBX modules can be installed
- sysadmin rpm module is missing. Looking for a solution
- Missing good EndPoint Manager for automatic phone provisioning
- Looking fo a valid solution
Quick reference
-
Developed and maintained by: Ugo Viti @ InitZero S.r.l.
-
Where to file issues: https://github.com/ugoviti/izpbx/issues
-
Where to get commercial help: email: [email protected] - web: InitZero Support
-
Supported architectures: [
amd64] -
Supported Docker versions: the latest release (down to 1.6 on a best-effort basis)
-
License: GPL v3
Tag summary
Content type
Image
Digest
sha256:d5e155ad7…
Size
529.7 MB
Last updated
12 months ago
docker pull izdock/izpbx-asterisk