mahbub1969/biomni-bridge
Biomni Bridge connects Biomni to your own OpenAI-compatible model endpoint.
76
mahbub1969/biomni-bridge repository overview
Biomni Bridge
Github Repository: anondo1969/biomni-bridge
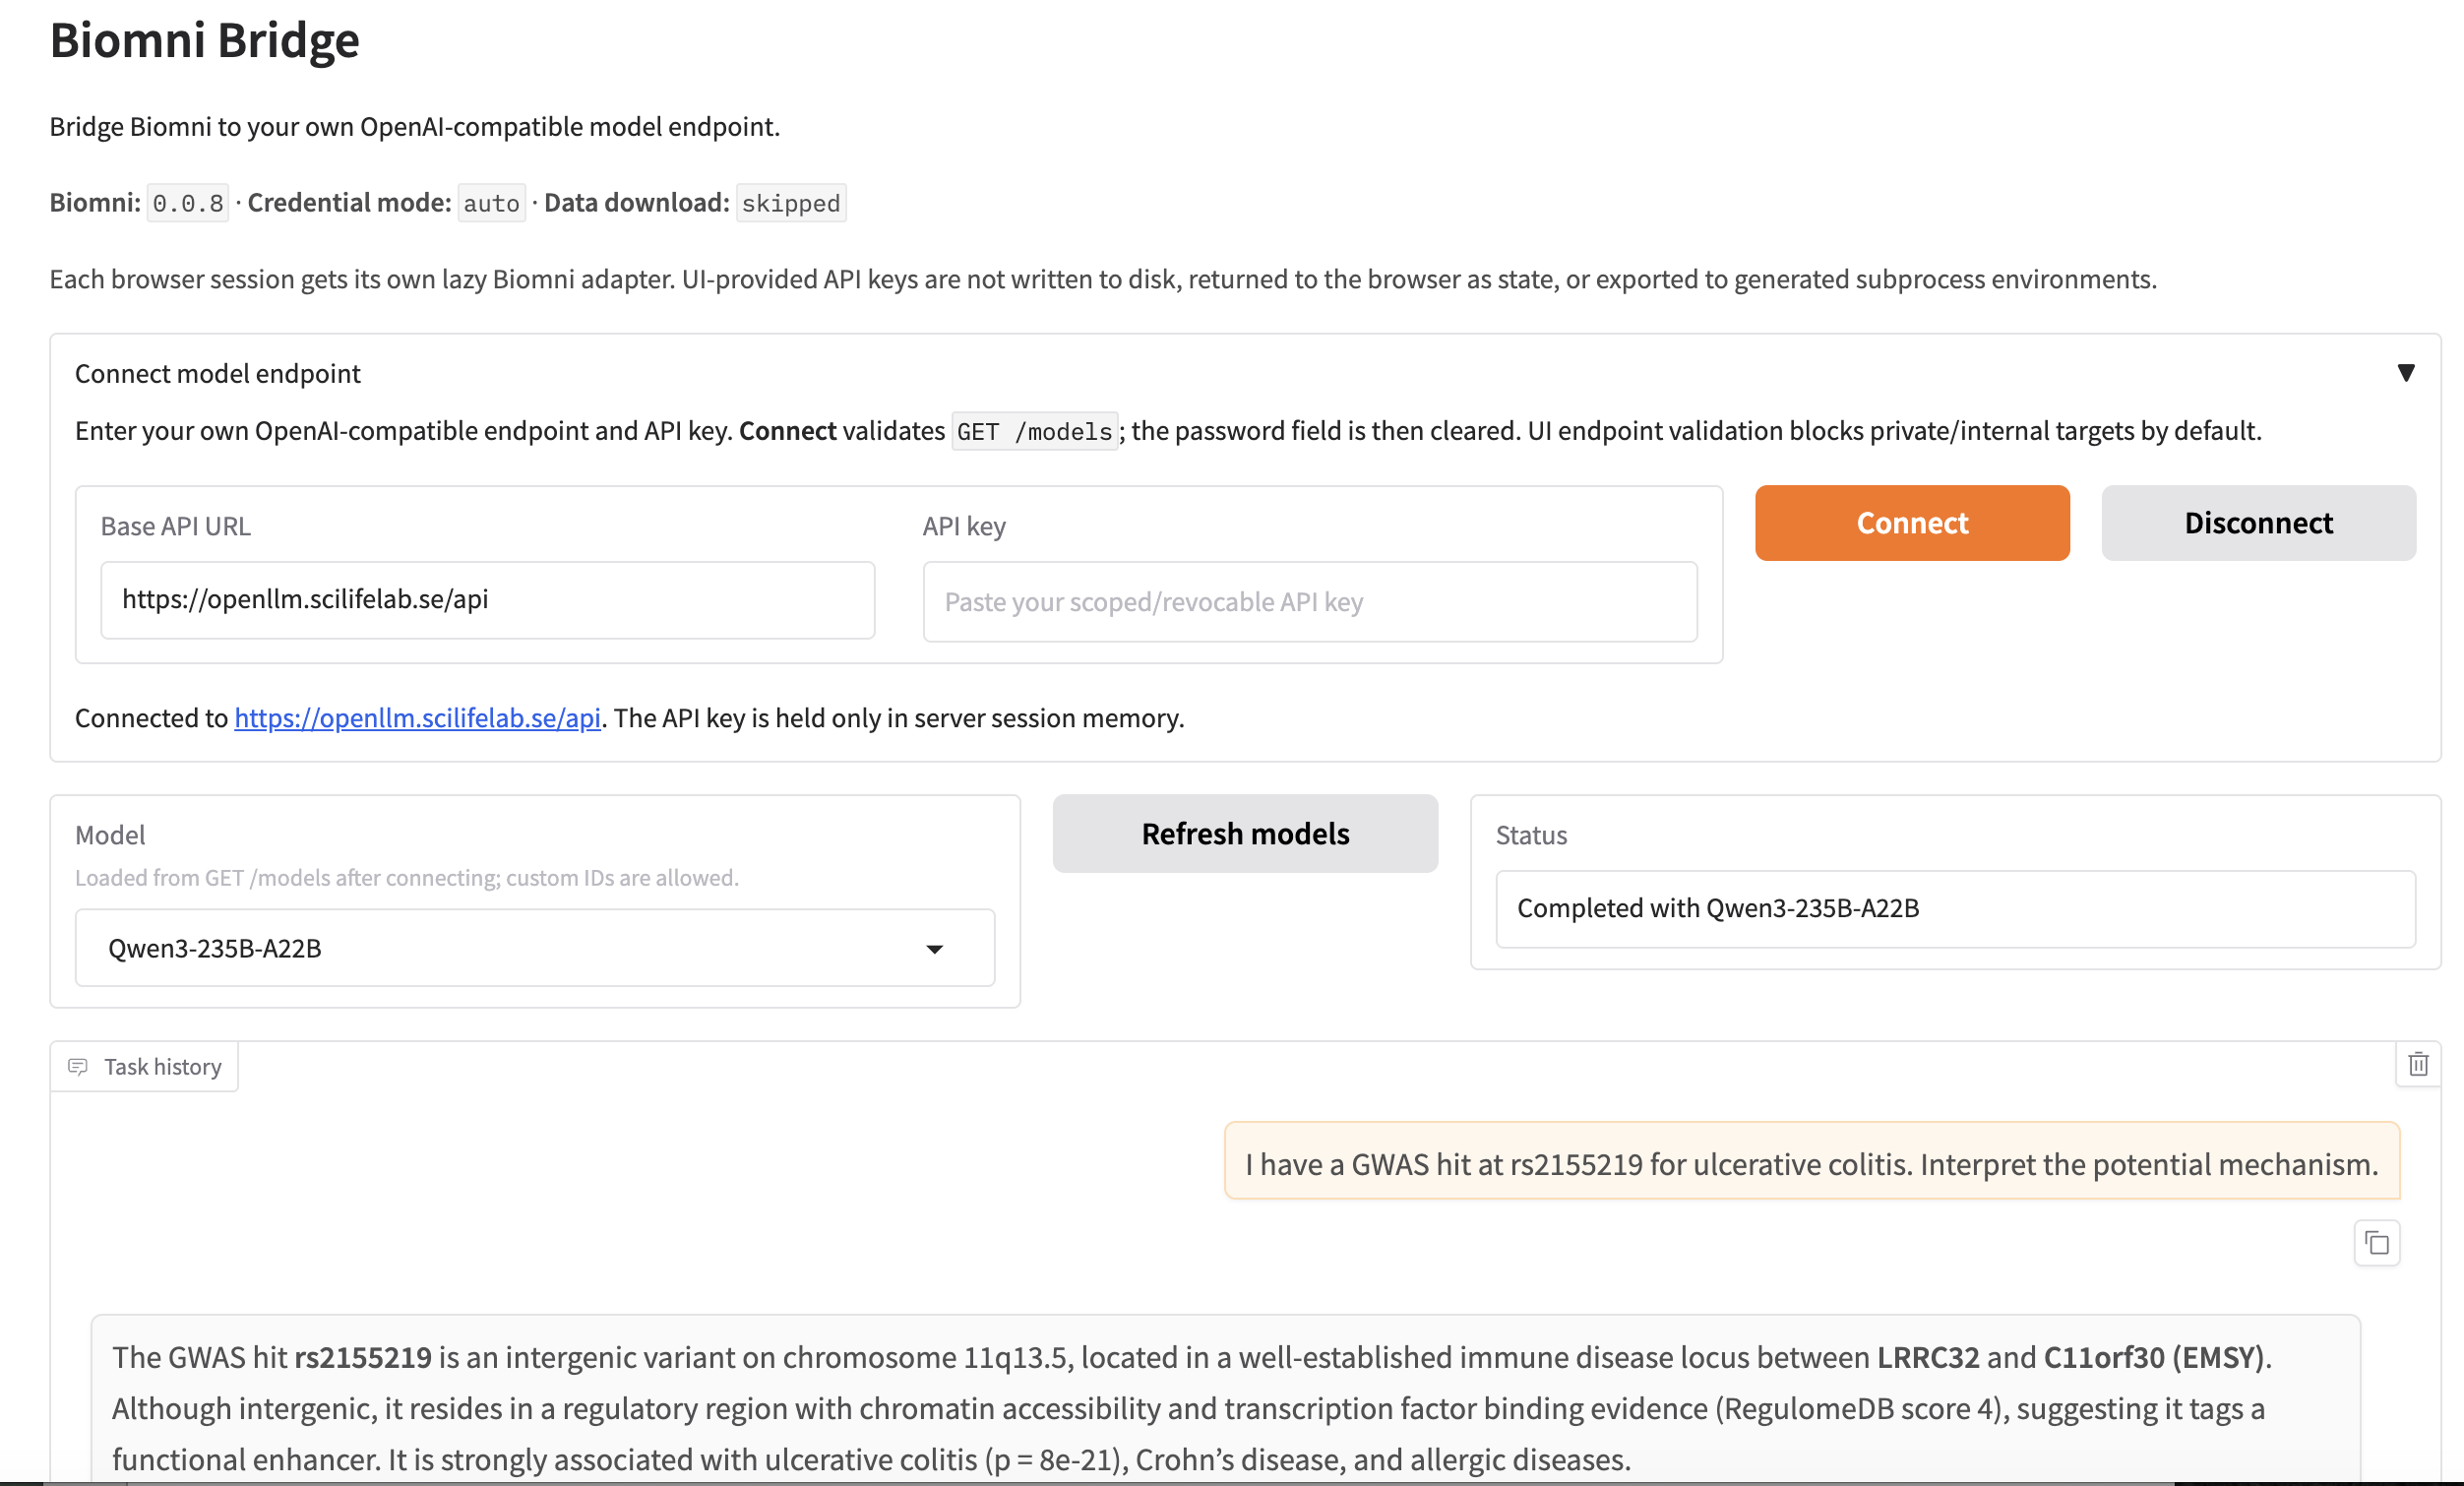
Biomni Bridge connects Biomni to your own OpenAI-compatible model endpoint through a small Gradio UI and a reproducible Docker runtime.
BioMNI Bridge is an independent compatibility and deployment layer for the BioMNI biomedical agent created by the BioMNI team at Stanford. BioMNI provides the underlying biomedical agent, tools, and scientific capabilities; this project adds integration code for self-hosted/OpenAI-compatible inference environments.
It is intentionally a wrapper, not a fork. The project pins biomni==0.0.8 and adds only the integration code needed for custom model endpoints, model discovery, endpoint compatibility, PDF export, diagnostics, container packaging, and session handling.
Independent project: Biomni Bridge is not affiliated with, sponsored by, or endorsed by the Stanford University or by the upstream Biomni project or its authors.
Security: Biomni can execute model-generated Python and shell commands. Biomni Bridge is intended for trusted local or controlled self-hosted use. Do not expose one shared instance as an open public multi-tenant service. A Gradio queue is not a sandbox. Read SECURITY.md before allowing anyone else to reach an instance.
Why this wrapper exists
Upstream Biomni already supports custom model endpoints, so Biomni Bridge is not needed if Biomni's normal provider configuration already fits your workflow. The bridge exists for the harder case: you want a reproducible UI/runtime around arbitrary OpenAI-compatible endpoints and you need that endpoint to remain consistent across the entire Biomni run, including helpers that do not inherit the A1(...) constructor arguments.
The most important reason is explicit in Biomni's own configuration documentation: direct parameters to A1(...) affect that agent's reasoning, but database queries use biomni.config.default_config. That means a custom endpoint can appear to work during planning and then fail—or use different provider configuration—when a database/retrieval tool creates its own LLM client. See the upstream configuration guide. Biomni Bridge coordinates those two configuration paths while keeping the upstream package unmodified.
The remaining wrapper exists for similarly narrow integration problems:
- Custom endpoint configuration is split inside Biomni 0.0.8. Before every active Biomni graph step, the bridge applies the active session's model/base URL to
default_config, temporarily supplies that session's key while the step executes, and clears it afterward. This keeps main-agent and helper-created LLM clients aligned without forking Biomni. - Some OpenAI-compatible gateways enforce strict message-role alternation. Biomni 0.0.8 can represent tool observations in a way that produces adjacent assistant messages. The bridge normalizes only the provider-facing copy while leaving Biomni's internal graph state unchanged.
- Long generations often need streamed HTTP transport. The bridge can consume the provider response as a stream and aggregate it back into the normal message shape Biomni expects. This keeps long-running connections active without rewriting Biomni's public
go_stream()integration. - Qwen3 reasoning controls are provider-specific. For compatible vLLM endpoints, the bridge can send request-scoped
chat_template_kwargs.enable_thinking=falsewithout changing a shared model server globally. - Biomni's PDF helper has a worker-thread edge case. The bridge preserves Biomni's PDF output while avoiding the
SIGALRMlimitation that appears when Gradio callbacks run outside Python's main thread. - The runtime is large and compatibility-sensitive. Docker and pinned dependencies provide a repeatable Python 3.11 / Biomni 0.0.8 environment without copying Biomni source into this repository.
The goal is to keep those compatibility seams small and removable when upstream Biomni no longer needs them.
Features
- Bring your own OpenAI-compatible base URL and API key from the UI.
- Optional environment-variable credentials for trusted local use.
- Model discovery through
GET /models. - Biomni execution trace and final-answer display.
- PDF export of the most recent completed run.
- Strict-role compatibility for OpenAI-compatible gateways.
- Internal streamed transport for long model generations.
- Optional Qwen3
enable_thinking=falserequest control. - Endpoint availability and throughput diagnostics.
- Multi-platform Docker images for
linux/amd64andlinux/arm64. - Non-root Docker runtime with explicit
/dataand/outputmounts. - Regression tests for cross-session configuration/credential isolation.
Install from PyPI
Biomni Bridge targets Python 3.11. Create and activate a virtual environment:
python3.11 -m venv .venv
source .venv/bin/activate
python -m pip install --upgrade pip
python -m pip install biomni-bridge
For the simplest first run, you do not need any environment variables: run:
biomni-bridge
Then open http://127.0.0.1:7860 and enter the endpoint/API key in the UI.
Configure a local Python installation with .env
Biomni Bridge reads normal environment variables. It deliberately does not silently auto-load a .env file.
If you want to keep your local settings in .env, create it and explicitly export its values into your shell before starting the app.
Create .env in the directory from which you will run biomni-bridge:
cat > .env <<'EOF'
BIOMNI_CUSTOM_BASE_URL=https://models.example.org/v1
BIOMNI_CUSTOM_API_KEY=YOUR_API_KEY
BIOMNI_CREDENTIAL_MODE=env

BIOMNI_MODEL=
BIOMNI_MODELS=

BIOMNI_DATA_PATH=./data
BIOMNI_OUTPUT_PATH=./output
BIOMNI_SKIP_DATA_DOWNLOAD=true
BIOMNI_TIMEOUT_SECONDS=1200
BIOMNI_TEMPERATURE=0.7
BIOMNI_USE_TOOL_RETRIEVER=true
BIOMNI_COMMERCIAL_MODE=false
BIOMNI_DISCOVER_MODELS=true
BIOMNI_DEBUG_LLM_REQUESTS=false
BIOMNI_LLM_STREAM_TRANSPORT=true
BIOMNI_QWEN_DISABLE_THINKING=true
BIOMNI_UI_PUBLIC_ENDPOINTS_ONLY=true
BIOMNI_ALLOWED_API_HOSTS=
BIOMNI_SESSION_TTL_SECONDS=3600
EOF
Load it into the current Bash/Zsh shell and start the app:
set -a
source .env
set +a
biomni-bridge
set -a makes variables read from .env exported to child processes. set +a returns the shell to normal afterward.
The repository .gitignore excludes .env; keep real API keys out of Git.
For native/local execution, if BIOMNI_DATA_PATH and BIOMNI_OUTPUT_PATH are not set, Biomni Bridge now defaults to:
./data
./output
On systems where PDF export needs native Pango/WeasyPrint libraries, install those system packages separately or use Docker.
For development from a clone, install with python -m pip install -e '.[dev]' instead.
Quick start with Docker
Docker is the recommended way to run Biomni Bridge.
Create local directories:
mkdir -p data output
Run the published image:
docker run --rm \
  --security-opt=no-new-privileges:true \
  --cap-drop=ALL \
  -p 127.0.0.1:7860:7860 \
  -v "$(pwd)/data:/data" \
  -v "$(pwd)/output:/output" \
  ghcr.io/anondo1969/biomni-bridge:latest
Open:
http://127.0.0.1:7860
Enter your model endpoint and API key, press Connect, choose a model, and run a task.
Example base URL:
https://models.example.org/v1
Pass the API prefix only. Do not include /models or /chat/completions.
How Docker configuration works
There are two different times to think about environment variables:
- Image build time: the Dockerfile contains only safe defaults such as
/data,/output, timeout values, and the Gradio bind address. API keys are not built into the image. - Container run time: values supplied with
docker run -e ...or Docker Compose override those image defaults for that container.
For example:
docker run --rm \
  -p 127.0.0.1:7860:7860 \
  -v "$(pwd)/data:/data" \
  -v "$(pwd)/output:/output" \
  -e BIOMNI_CUSTOM_BASE_URL="https://models.example.org/v1" \
  -e BIOMNI_CUSTOM_API_KEY="YOUR_API_KEY" \
  -e BIOMNI_CREDENTIAL_MODE=env \
  ghcr.io/anondo1969/biomni-bridge:latest
If you do not pass credentials, the container starts normally and you can enter them in the UI.
The Docker image intentionally uses:
BIOMNI_DATA_PATH=/data
BIOMNI_OUTPUT_PATH=/output
and the documented volume mounts connect those paths to ./data and ./output on your host. This is separate from the native-Python defaults of ./data and ./output.
For that reason, prefer docker compose up when using the repository .env. Do not pass the same .env wholesale with docker run --env-file .env unless you also override BIOMNI_DATA_PATH=/data and BIOMNI_OUTPUT_PATH=/output.
Apple Silicon and Intel/AMD
The release workflow publishes one OCI image containing:
linux/amd64
linux/arm64
Docker normally selects the correct architecture automatically. You should not need to pass --platform for the published image.
Biomni data
The large Biomni data lake is not included in this repository or Docker image. Upstream Biomni downloads it separately; the full data lake is currently about 11 GB.
Biomni Bridge expects:
data/
└── biomni_data/
    ├── data_lake/
    └── benchmark/
When using Docker, mount the host data/ directory at /data.
Option 1: let upstream Biomni download it
In a Python 3.11 environment with Biomni installed, initialize a normal Biomni agent without expected_data_lake_files=[]:
export BIOMNI_CUSTOM_BASE_URL="https://models.example.org/v1"
export BIOMNI_CUSTOM_API_KEY="YOUR_API_KEY"
export BIOMNI_MODEL="YOUR_MODEL"

python - <<'PY'
import os
from biomni.agent import A1

A1(
    path="./data",
    llm=os.environ["BIOMNI_MODEL"],
    source="Custom",
    base_url=os.environ["BIOMNI_CUSTOM_BASE_URL"],
    api_key=os.environ["BIOMNI_CUSTOM_API_KEY"],
)
PY
Biomni will populate ./data/biomni_data/ on first initialization.
Biomni Bridge defaults to:
BIOMNI_SKIP_DATA_DOWNLOAD=true
so normal application starts do not unexpectedly download the large data lake.
Option 2: copy an existing Biomni data directory
If you already have the data elsewhere:
mkdir -p data
rsync -av /path/to/existing/biomni_data/ ./data/biomni_data/
Verify that this exists:
./data/biomni_data/data_lake/
Option 3: use the Docker image as a one-time downloader
mkdir -p data

docker run --rm \
  -v "$(pwd)/data:/data" \
  -e BIOMNI_CUSTOM_BASE_URL="https://models.example.org/v1" \
  -e BIOMNI_CUSTOM_API_KEY="YOUR_API_KEY" \
  -e BIOMNI_MODEL="YOUR_MODEL" \
  ghcr.io/anondo1969/biomni-bridge:latest \
  python -c 'import os; from biomni.agent import A1; A1(path="/data", llm=os.environ["BIOMNI_MODEL"], source="Custom", base_url=os.environ["BIOMNI_CUSTOM_BASE_URL"], api_key=os.environ["BIOMNI_CUSTOM_API_KEY"])'
The downloaded data stays in the host-side ./data directory after the temporary container exits.
Data licensing
Biomni combines data from multiple external biomedical resources. Individual datasets have their own licenses, and some have non-commercial or other usage restrictions. Review upstream Biomni's data-license information before redistribution or commercial use:
https://github.com/snap-stanford/Biomni/blob/main/license_info.md
Basic LLM interaction can work without the complete data lake, but Biomni tools that rely on reference resources require the corresponding files.
Docker Compose
Docker Compose is the easiest way to use a .env file with the container. Compose automatically reads a file named .env in the project directory and uses its values for the ${VARIABLE} expressions in docker-compose.yml.
Create it from the template:
cp .env.example .env
mkdir -p data output
Edit .env, for example:
BIOMNI_CUSTOM_BASE_URL=https://models.example.org/v1
BIOMNI_CUSTOM_API_KEY=YOUR_API_KEY
BIOMNI_CREDENTIAL_MODE=env
BIOMNI_MODEL=
BIOMNI_TEMPERATURE=0.7
Then start:
docker compose up
Open:
http://127.0.0.1:7860
For Docker Compose, ./data and ./output are mounted to /data and /output inside the container. The Compose file explicitly keeps those internal paths fixed even though .env.example also documents ./data and ./output for native Python use.
Credentials are optional. If they are empty, the app starts in UI-credential mode.
Stop with:
docker compose down
Build locally with Docker
Build for the current machine:
docker build -t biomni-bridge:local .
Run:
mkdir -p data output

docker run --rm \
  --security-opt=no-new-privileges:true \
  --cap-drop=ALL \
  -p 127.0.0.1:7860:7860 \
  -v "$(pwd)/data:/data" \
  -v "$(pwd)/output:/output" \
  biomni-bridge:local
Explicit architecture builds
make build-amd64
make build-arm64
Validate both release architectures:
make build-multi
Build and push one multi-platform manifest:
docker login ghcr.io

make build-multi-push \
  MULTI_IMAGE=ghcr.io/anondo1969/biomni-bridge:0.3.1
Inspect it:
docker buildx imagetools inspect \
  ghcr.io/anondo1969/biomni-bridge:0.3.1
Run directly with Python
Python 3.11 is required. Local/native execution uses ./data and ./output by default, so it does not try to create root-level /data or /output directories.
macOS
Install Python and the native PDF dependency:
brew install [email protected] pango
From a repository clone:
python3.11 -m venv .venv
source .venv/bin/activate
python -m pip install --upgrade pip
python -m pip install -e '.[dev]'
Create local directories and configuration:
mkdir -p data output
cp .env.example .env
Edit .env, then load it into your shell:
set -a
source .env
set +a
Verify the development checkout:
make check
Start:
biomni-bridge
Open:
http://127.0.0.1:7860
If you prefer UI credentials, leave BIOMNI_CUSTOM_BASE_URL and BIOMNI_CUSTOM_API_KEY empty and keep BIOMNI_CREDENTIAL_MODE=auto.
Linux
Install Python 3.11 plus the native libraries required by WeasyPrint/Pango using your distribution's package manager, then:
python3.11 -m venv .venv
source .venv/bin/activate
python -m pip install --upgrade pip
python -m pip install -e '.[dev]'
mkdir -p data output
cp .env.example .env
Edit .env, then:
set -a
source .env
set +a
make check
biomni-bridge
Docker is recommended if you do not want to manage the native PDF dependencies yourself.
Credential modes
The default is:
BIOMNI_CREDENTIAL_MODE=auto
| Mode | Behavior |
|---|---|
auto | Use environment credentials when both are present; otherwise ask in the UI |
ui | Ignore environment API keys and require endpoint/key entry in the UI |
env | Require endpoint/key environment variables at startup and disable UI credential input |
Environment credentials
You can export values directly:
export BIOMNI_CUSTOM_BASE_URL="https://models.example.org/v1"
export BIOMNI_CUSTOM_API_KEY="YOUR_API_KEY"
export BIOMNI_CREDENTIAL_MODE="env"
or keep them in .env and explicitly source it before local Python execution:
set -a
source .env
set +a
biomni-bridge
Docker Compose reads .env automatically for the variables mapped in docker-compose.yml; native Python does not. Never commit API keys to Git.
Private/local model endpoints
UI-entered endpoints default to public HTTPS only as an SSRF protection. For a trusted local/private endpoint, prefer environment credential mode, or explicitly disable the UI restriction only if you understand the network exposure:
export BIOMNI_UI_PUBLIC_ENDPOINTS_ONLY=false
An optional exact hostname allowlist is also available:
export BIOMNI_ALLOWED_API_HOSTS="models.example.org,other.example.org"
Configuration
| Variable | Default | Purpose |
|---|---|---|
BIOMNI_CREDENTIAL_MODE | auto | auto, ui, or env |
BIOMNI_CUSTOM_BASE_URL | empty | OpenAI-compatible API prefix |
BIOMNI_CUSTOM_API_KEY | empty | API key for environment mode |
BIOMNI_MODEL | empty | Preferred model ID |
BIOMNI_MODELS | empty | Comma-separated fallback model IDs |
BIOMNI_DATA_PATH | local: ./data; Docker: /data | Biomni data root |
BIOMNI_OUTPUT_PATH | local: ./output; Docker: /output | PDF/debug output root |
BIOMNI_SKIP_DATA_DOWNLOAD | true | Skip automatic data-lake download |
BIOMNI_TIMEOUT_SECONDS | 1200 | Biomni generated-code/tool timeout |
BIOMNI_TEMPERATURE | 0.7 | Model temperature |
BIOMNI_USE_TOOL_RETRIEVER | true | Enable Biomni tool retrieval |
BIOMNI_COMMERCIAL_MODE | false | Ask Biomni to filter incompatible data sources |
BIOMNI_DISCOVER_MODELS | true | Query GET /models |
BIOMNI_DEBUG_LLM_REQUESTS | false | Save sanitized provider request captures |
BIOMNI_LLM_STREAM_TRANSPORT | true | Stream provider HTTP responses internally |
BIOMNI_QWEN_DISABLE_THINKING | true | Send request-level Qwen3 non-thinking option where supported |
BIOMNI_UI_PUBLIC_ENDPOINTS_ONLY | true | Reject UI URLs targeting private/non-HTTPS addresses |
BIOMNI_ALLOWED_API_HOSTS | empty | Optional exact hostname allowlist |
BIOMNI_SESSION_TTL_SECONDS | 3600 | Expire inactive in-memory session runtimes |
BIOMNI_BASE_URL and BIOMNI_API_KEY are accepted as shorter aliases. Generic OPENAI_BASE_URL and OPENAI_API_KEY are deliberately ignored so unrelated shell configuration cannot silently redirect the bridge.
Qwen3 and long-running models
The defaults are:
BIOMNI_LLM_STREAM_TRANSPORT=true
BIOMNI_QWEN_DISABLE_THINKING=true
With streamed transport, the HTTP response is consumed incrementally but aggregated into the normal message object Biomni expects.
For model IDs containing qwen3, the bridge can send:
{
  "chat_template_kwargs": {
    "enable_thinking": false
  }
}
through the provider-specific request body. This is request-scoped.
If your endpoint rejects that field:
export BIOMNI_QWEN_DISABLE_THINKING=false
If a provider has problems with streamed responses:
export BIOMNI_LLM_STREAM_TRANSPORT=false
See MODEL_SERVER_TUNING.md for proxy and vLLM tuning notes.
Endpoint diagnostics
Configure environment credentials first:
export BIOMNI_CUSTOM_BASE_URL="https://models.example.org/v1"
export BIOMNI_CUSTOM_API_KEY="YOUR_API_KEY"
export BIOMNI_MODEL="YOUR_MODEL"
Basic check:
make endpoint-check
or:
biomni-bridge-endpoint-check --model YOUR_MODEL --timeout 120
Deeper output-cap, Qwen-control, and throughput test:
make endpoint-diagnose
or:
biomni-bridge-endpoint-diagnose \
  --model YOUR_MODEL \
  --timeout 300 \
  --proxy-idle-timeout 60
Capture and replay an exact model request
For debugging only:
export BIOMNI_DEBUG_LLM_REQUESTS=true
Run the failing task once. The bridge writes a sanitized request and metadata under:
output/llm-debug/
Typical files:
latest-request.json
latest-request.meta.json
The capture strips authentication/API-key fields, but it contains the real user task and full provider prompt. Treat it as private diagnostic data and never commit it.
Replay with:
curl -sS \
  "$BIOMNI_CUSTOM_BASE_URL/chat/completions" \
  -H "Authorization: Bearer $BIOMNI_CUSTOM_API_KEY" \
  -H "Content-Type: application/json" \
  --data-binary @output/llm-debug/latest-request.json
Disable capture afterward:
unset BIOMNI_DEBUG_LLM_REQUESTS
PDF export
After a Biomni task completes, use Export last run PDF in the UI.
Docker includes the Pango/Harfbuzz/font libraries required by WeasyPrint. For a direct Python installation, run:
make smoke
if PDF generation fails.
Multiple browser sessions
Each browser session has its own:
- endpoint;
- API key;
- selected model;
- lazy
BiomniAdapter; - run state;
- output directory.
Biomni 0.0.8 also uses process-global configuration internally. Biomni Bridge therefore serializes active Biomni graph steps and reapplies the active session's model, endpoint, and key while that step runs.
The regression suite includes the exact cross-session credential-race test:
pytest -q tests/test_session_global_config_isolation.py
That protects against accidental configuration mixing between queued sessions. It does not make one shared Python/container process a secure isolation boundary. Model-generated code can access process/container resources, and code that deliberately persists beyond a normal task can defeat assumptions that are safe for trusted queued use.
For mutually untrusted users or high-value credentials, use separate processes/containers or a purpose-built execution sandbox.
Development
Install development dependencies:
python -m pip install -e '.[dev]'
Run the complete local check:
make check
Individual commands:
make lint
make test
make smoke
Format source/tests:
make fmt
Clean caches/build artifacts:
make clean
Security
Read SECURITY.md before sharing an instance.
License
Biomni Bridge is released under the Apache License 2.0. See LICENSE and NOTICE.
Biomni is an external dependency and is also distributed under Apache-2.0. Its integrated datasets, tools, and other dependencies may have different licenses or usage restrictions; consult the upstream project before redistribution or commercial use.
Acknowledgements
Biomni Bridge builds on:
Tag summary
Content type
Image
Digest
sha256:ed6bb8526…
Size
453.9 MB
Last updated
24 days ago
docker pull mahbub1969/biomni-bridge