mdrideout/junjo-ai-studio-backend
The backend container image for Junjo AI Studio
9.0K
mdrideout/junjo-ai-studio-backend repository overview
Junjo AI Studio
Junjo (順序) - order, sequence, procedure
Junjo AI Studio is an open source, self-hostable AI Agent and Workflow debugging and eval platform for any OpenTelemetry instrumented AI application.
The Junjo Python Library is a framework for structuring AI logic and enhancing Otel span data to improve observability and developer velocity. Junjo remains decoupled from your LLM implementations and business logic, providing a layer of organization, execution, and telemetry to your existing application.
Gain complete visibility to the state of the application, and every change LLMs make to the application state. Complex, mission critical AI workflows are made transparent and understandable with Junjo.
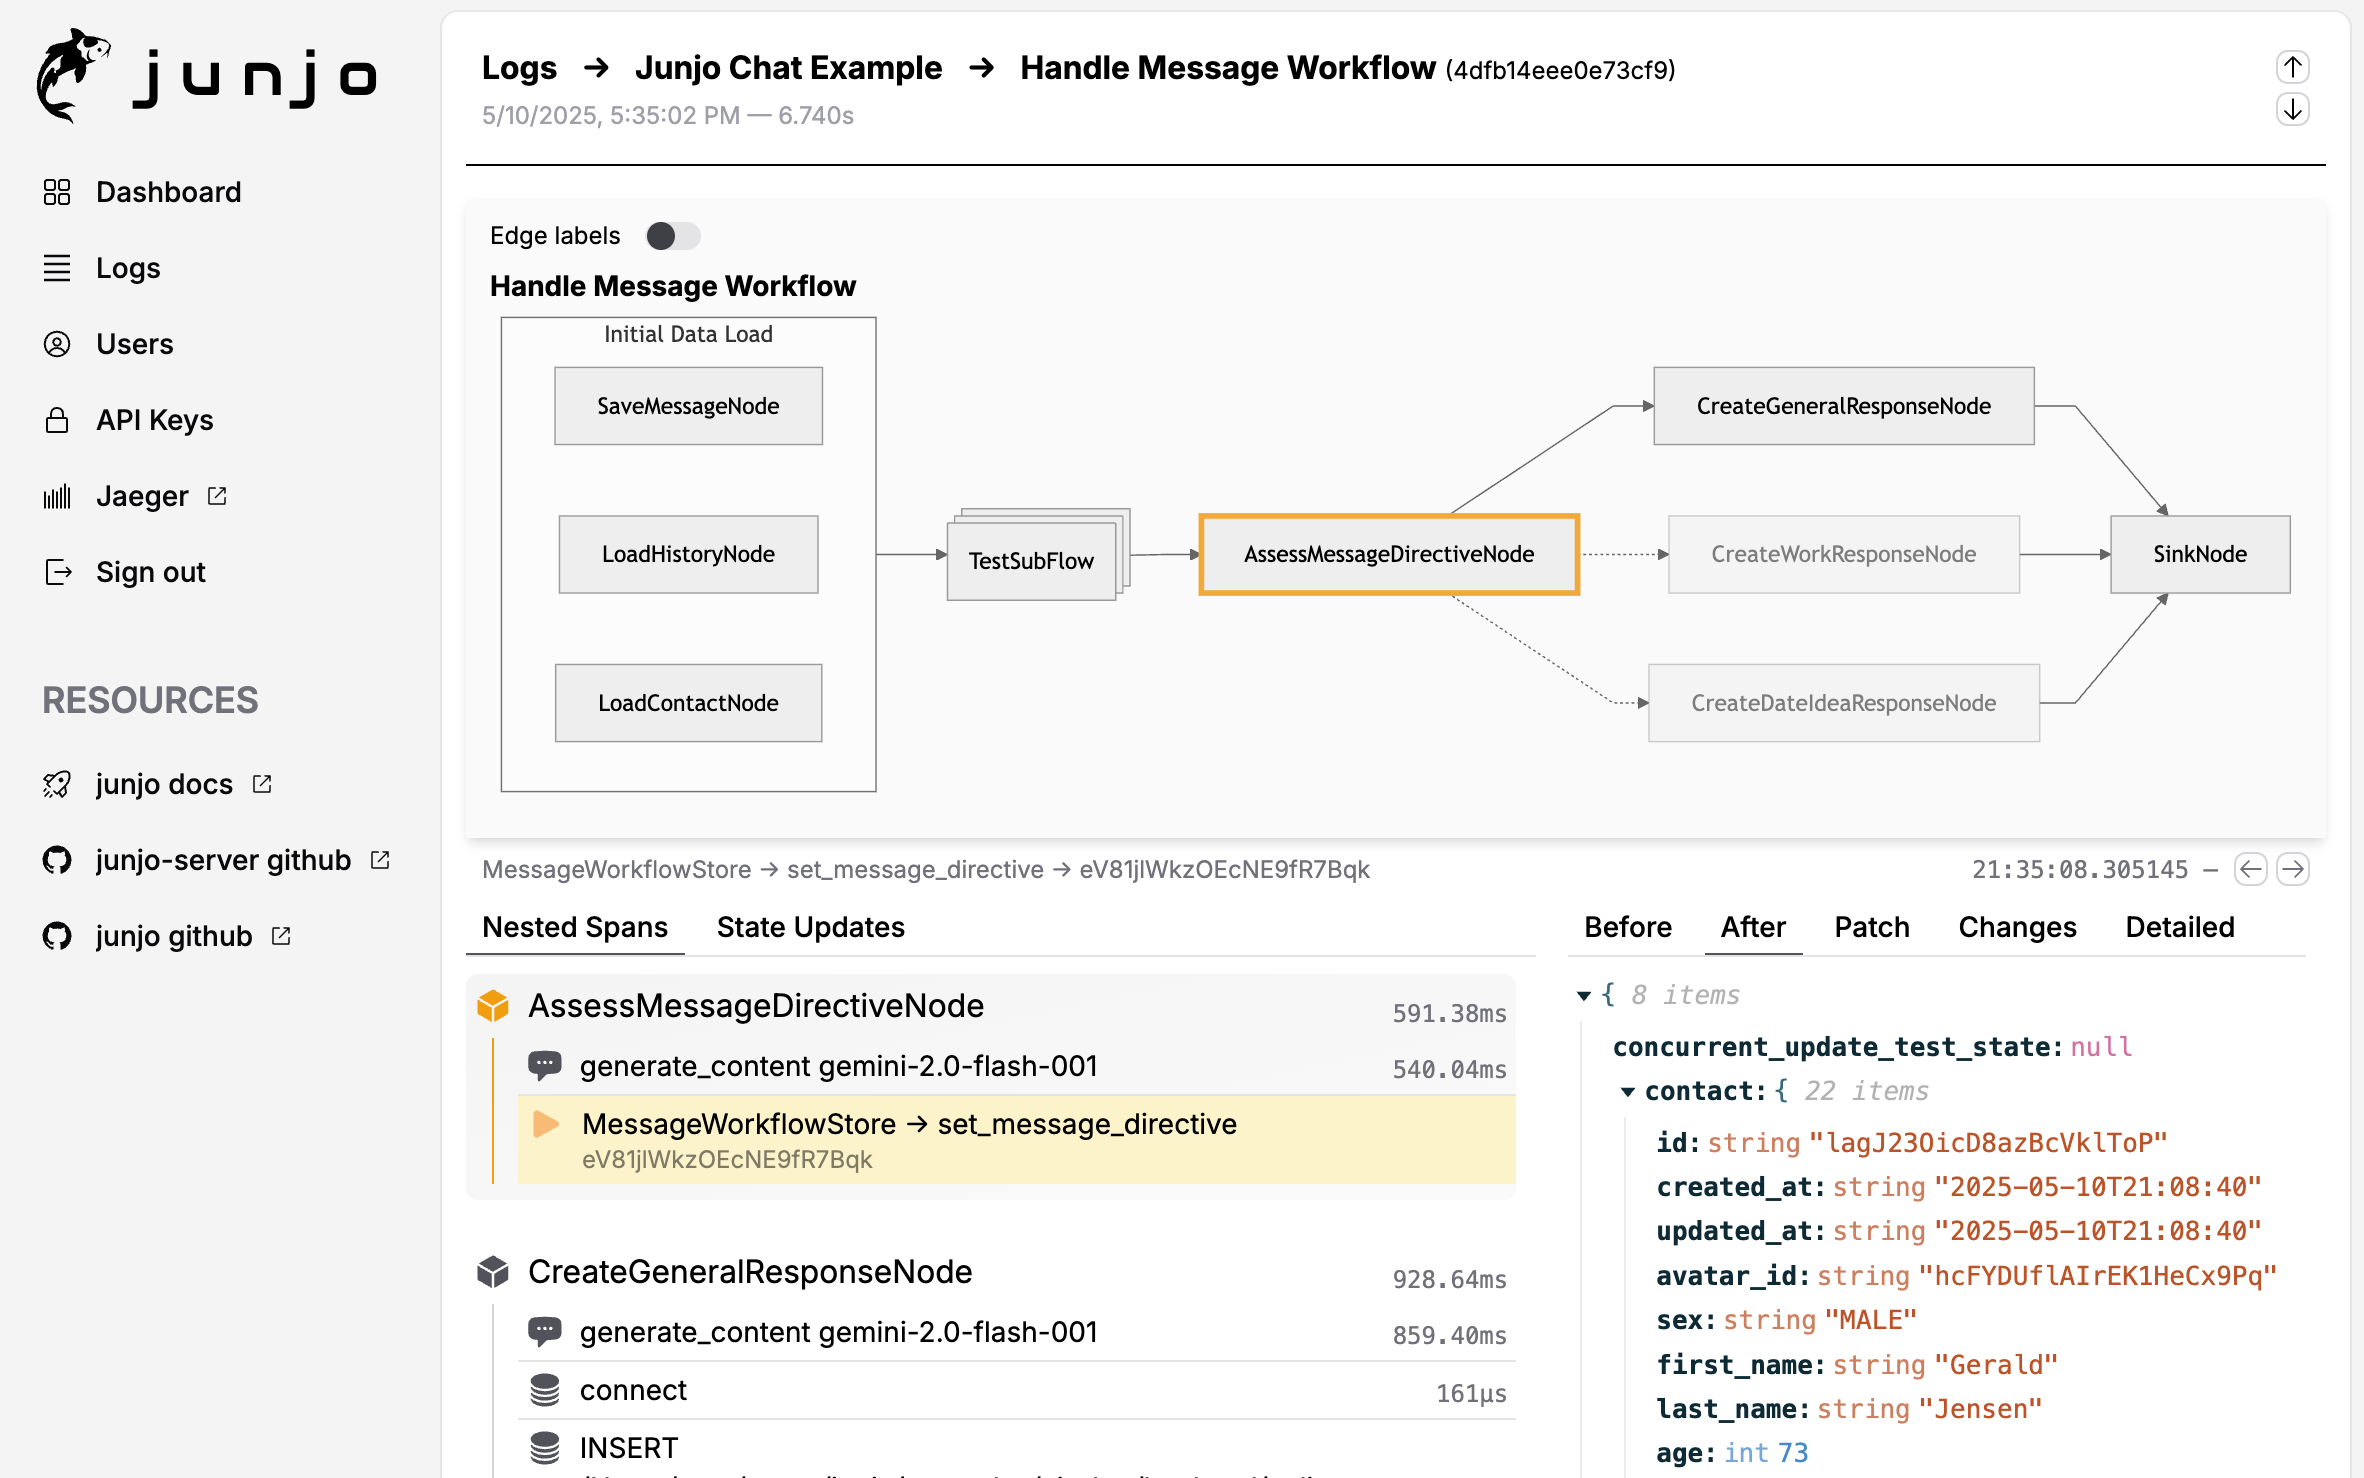
Junjo AI Studio Workflow Debugging Screenshot
Key Features
- 🔍 Real-time LLM Decision Visibility - See every decision your LLM makes and the data it uses
- 🔀 Transparent Concurrency - Debug state changes from concurrently executed AI workflow steps
- 📊 OpenTelemetry Native - Standards-based telemetry ingestion via gRPC
- 🎯 Workflow Debugging Interface - Visual step-by-step debugging of AI graph workflows
- 🪶 Prompt Playground - Experiment with different models and prompt tweaks while you debug
- 🔒 Production-Ready Security - Authentication, user accounts, and encrypted sessions
- 🚀 Low Resource, High-Performance Ingestion - Designed for high-throughput in low resource environments
- 💾 Shared vCPU, 1GB RAM - Production grade telemetry on a $5 / month virtual machine
Table of Contents
- Quick Start
- Source Development
- Features
- Architecture
- Prerequisites
- Configuration
- Production Deployment
- Advanced Topics
- Testing
- Troubleshooting
- Resources
Quick Start
If you want to use Junjo AI Studio rather than modify its source code, start with the Junjo AI Studio Minimal Build repository.
Steps
-
Clone the minimal build repository
git clone https://github.com/mdrideout/junjo-ai-studio-minimal-build.git cd junjo-ai-studio-minimal-build -
Choose setup mode
Recommended:
./scripts/junjo setupManual:
cp .env.example .envThen generate and set secrets:
openssl rand -base64 32 openssl rand -base64 32Open
.envand replace the placeholder values:- Replace
your_base64_secret_hereinJUNJO_SESSION_SECRETwith the first generated value - Replace
your_base64_key_hereinJUNJO_SECURE_COOKIE_KEYwith the second generated value
For production deployments, also configure:
JUNJO_ENV=production JUNJO_PROD_FRONTEND_URL=https://app.example.com JUNJO_PROD_BACKEND_URL=https://api.example.com JUNJO_PROD_INGESTION_URL=https://ingestion.example.com - Replace
-
Start all services
docker compose up -
Access Junjo AI Studio
- Follow the exact URL and port guidance in the minimal build README.
-
Create your first user
- Navigate to your frontend URL
- Follow the setup wizard to create your admin account
-
Create an API key (for sending telemetry from your Junjo app)
- Sign in to the web UI
- Open the API Keys page from the sidebar
- Click Create API Key
- Copy the 64-character key from the API Keys page (use the copy button)
- Use this key in your Junjo Python Library application
Useful Docker Compose Commands
# View logs from all services
docker compose logs -f

# View logs from specific service
docker compose logs -f backend
docker compose logs -f ingestion
docker compose logs -f frontend

# Stop services (keeps data)
docker compose down

# Restart a specific service
docker compose restart backend

# View running containers and their status
docker compose ps

# Stop and remove all data (fresh start)
docker compose down -v
Next Steps
Configure your Junjo Python Library application using the setup and endpoint guidance from the minimal build repository.
Version compatibility: Junjo AI Studio and the Junjo Python Library must run releases that share the same telemetry contract. Mismatched pairings can still ingest spans, but Junjo AI Studio will not be able to render workflow graphs or match spans to their nodes. When upgrading one, upgrade the other to a matching release.
This repository contains the complete open source Junjo AI Studio codebase. If you want to run or modify the source code in this repository, see Source Development below.
This source repository is not the hosted deployment template. For operator-managed deployment behind your own reverse proxy, use the minimal build repository or the deployment example repository, and provide explicit JUNJO_PROD_* public URLs.
Source Development
This repository contains the complete open source Junjo AI Studio codebase.
Use the default hot-reload local stack when you want to develop or modify Junjo AI Studio itself:
./scripts/junjo setup
docker compose up --build
Local URLs use the same port numbers inside Docker and on localhost:
JUNJO_BUILD_TARGET=development: frontendhttp://localhost:26151, backendhttp://localhost:26154, OTLPgrpc://localhost:26155JUNJO_BUILD_TARGET=production: frontendhttp://localhost:26153, backendhttp://localhost:26154, OTLPgrpc://localhost:26155
The port numbers stay the same for same-network containers. Only the hostname changes: use backend:26154 for the backend API and ingestion:26155 for OTLP from another container on this Compose network.
After changing JUNJO_BUILD_TARGET, rerun docker compose up --build so Docker rebuilds the matching image targets. Use -d only when you intentionally want detached containers.
For service-specific development notes, see backend/README.md, frontend/README.md, and ingestion/README.md.
Features
What Can You Do With Junjo AI Studio?
Observability & Debugging:
- View complete execution traces of AI workflows
- Inspect LLM prompts, responses, and reasoning
- Track state changes across workflow nodes
- Monitor performance and latency
LLM Playground:
- Test prompts with multiple providers (OpenAI, Anthropic, Google Gemini)
- Compare responses across models
- Experiment with temperature and reasoning modes
OpenTelemetry Integration:
- Standards-compliant OTLP/gRPC ingestion endpoint
- Automatic trace collection from Junjo Python Library
- Custom span attributes for AI-specific metadata
Multi-Service Architecture:
- Decoupled ingestion for high throughput
- Web UI for visualization
- REST API for programmatic access
Architecture
The Junjo AI Studio is composed of three primary services:
1. Backend (backend)
- Tech Stack: FastAPI (Python), SQLite, DataFusion
- Responsibilities:
- HTTP REST API
- User authentication & session management
- LLM playground
- Span querying & analytics
2. Ingestion Service (ingestion)
- Tech Stack: Rust, gRPC (tonic), Arrow IPC, Parquet
- Responsibilities:
- OpenTelemetry OTLP/gRPC endpoint
- High-throughput span ingestion with backpressure
- Write-Ahead Log using Arrow IPC segments
- Flush WAL to date-partitioned Parquet files (cold storage)
- Prepare hot snapshots for real-time queries
3. Frontend (frontend)
- Tech Stack: React, TypeScript
- Responsibilities:
- Web UI for workflow visualization
- LLM playground interface
- User management
Data Flow (Two-Tier Architecture):
Junjo Python App → Ingestion Service (gRPC) → Arrow IPC WAL
                                                    ↓
                                         ┌─────────┴─────────┐
                                         ↓                   ↓
                                    FlushWAL RPC    PrepareHotSnapshot RPC
                                         ↓                   ↓
                                  Parquet files         Hot snapshot
                                  (COLD tier)          (HOT tier)
                                         ↓                   ↓
                                         └─────────┬─────────┘
                                                   ↓
                                    Backend Service (DataFusion)
                                         ↓
                                  Merged query results
                                         ↓
                                     Frontend UI
How it works:
- Ingestion receives OTLP spans and writes them to Arrow IPC WAL segments
- FlushWAL (periodic/manual) converts WAL segments to date-partitioned Parquet files (COLD tier)
- PrepareHotSnapshot creates an on-demand Parquet file from unflushed WAL data (HOT tier) and returns a bounded list of recently flushed cold Parquet files (
recent_cold_paths) to bridge indexing lag - Backend uses DataFusion to query COLD (SQLite-indexed +
recent_cold_paths) and HOT Parquet files, merging results with deduplication by(trace_id, span_id)(COLD wins)
Prerequisites
Required
- Docker and Docker Compose (for contributor development and local smoke tests)
Optional (Development)
- Rust toolchain (for ingestion service development)
- Python 3.13+ with uv (for backend development)
- Node.js 18+ (for frontend development)
For Production Deployment
- A domain or subdomain for hosting (see Deployment Requirements)
- TLS termination in your chosen reverse proxy or ingress layer
Configuration
Environment Variables
Junjo AI Studio uses a single .env file at the root of the project. All services read from this file.
For a guided setup wizard that writes critical .env values (including memory tuning profiles), run:
./scripts/junjo setup
Key Configuration Variables
# === Build & Environment ===========================================
# Build Target: development | production
JUNJO_BUILD_TARGET="development"

# Running Environment: development | production
# (affects cookie security, logging, etc.)
JUNJO_ENV="development"

# === Security (REQUIRED for production) ============================
# Generate both with: openssl rand -base64 32
JUNJO_SESSION_SECRET=your_base64_secret_here
JUNJO_SECURE_COOKIE_KEY=your_base64_key_here

# === CORS ==========================================================
# IMPORTANT: Cannot use "*" with session cookies (credentials=True)
# Default: http://localhost:26151,http://localhost:26153
# Production: Auto-derived from JUNJO_PROD_FRONTEND_URL if not set
# Explicitly set for multiple frontends:
# JUNJO_ALLOW_ORIGINS=https://app.example.com,https://admin.example.com

# === Database Storage ==============================================
# Where database files are stored on your host machine/VM
JUNJO_HOST_DB_DATA_PATH=./.dbdata

# === Logging =======================================================
JUNJO_LOG_LEVEL=info        # debug | info | warn | error
JUNJO_LOG_FORMAT=json       # json | text

# === LLM API Keys (optional) =======================================
OPENAI_API_KEY=sk-...
ANTHROPIC_API_KEY=sk-ant-...
GEMINI_API_KEY=...
See .env.example for complete configuration with detailed comments.
Database Storage Configuration
Junjo AI Studio stores all database files in a single location that you configure. Simply set where you want the data stored on your host machine, and Docker handles the rest.
Development Setup
For local development, use a relative path:
# .env file
JUNJO_HOST_DB_DATA_PATH=./.dbdata
JUNJO_BUILD_TARGET=development
This stores databases in ./.dbdata directory next to your compose.yaml. Docker creates this directory automatically.
Benefits:
- Easy to reset by deleting the directory
- No special setup required
- Works out of the box
Production Setup with Block Storage
For production deployments with persistent storage (DigitalOcean Volumes, AWS EBS, Google Persistent Disk):
1. Mount your block storage:
# DigitalOcean Droplet example
sudo mount /dev/disk/by-id/scsi-0DO_Volume_junjo /mnt/junjo-data

# AWS EC2 example
sudo mount /dev/xvdf /mnt/junjo-data

# Google Cloud example
sudo mount /dev/disk/by-id/google-junjo-data /mnt/junjo-data
2. Update your .env file:
JUNJO_HOST_DB_DATA_PATH=/mnt/junjo-data
JUNJO_BUILD_TARGET=production
3. Start services:
docker compose up --build
Benefits:
- Data persists across container restarts
- Data survives even if you delete and recreate containers
- Easy to backup by snapshotting the volume
- Can detach and reattach to different instances
Important Notes
- The
JUNJO_HOST_DB_DATA_PATHvariable is the ONLY path you need to configure - Container-internal paths are set automatically in
compose.yaml - If
JUNJO_HOST_DB_DATA_PATHis not set, it defaults to./.dbdata - The backend and ingestion services share the same storage location (the frontend is stateless and mounts no storage)
Database & Storage Types
Junjo AI Studio uses embedded databases and file-based storage:
| Storage | Purpose | Type |
|---|---|---|
| SQLite | User data, API keys, sessions | Single file |
| Parquet | Span analytics (COLD tier) | Date-partitioned files |
| Arrow IPC WAL | Ingestion buffer (HOT tier) | Directory of IPC segments |
| Hot Snapshot | Real-time query cache | Single Parquet file |
All are stored under JUNJO_HOST_DB_DATA_PATH on your host machine. The backend uses DataFusion to query Parquet files directly.
Creating API Keys
After starting Junjo AI Studio:
- Sign in to the web UI exposed by your active build target (
http://localhost:26151for development,http://localhost:26153for production) - Open the API Keys page from the sidebar
- Click Create API Key
- Copy the 64-character key from the API Keys page (use the copy button)
- Use this key in your Junjo Python Library application
Production Deployment
This source repository does not define a complete hosted deployment topology. It defines the production runtime contract:
- explicit public URLs via
JUNJO_PROD_FRONTEND_URL,JUNJO_PROD_BACKEND_URL, andJUNJO_PROD_INGESTION_URL - the frontend/backend same-domain requirement for session cookies
Bring your own reverse proxy, ingress, or load balancer. For a production compose.yaml example, see the minimal build repository.
If you route directly to this source repository's Compose services, target frontend:26153, backend:26154, and ingestion:26155.
Deployment Requirements
⚠️ IMPORTANT: The backend API and frontend MUST be deployed on the same domain (sharing the same registrable domain).
Supported configurations:
- ✅
api.example.com+app.example.com(subdomain + subdomain) - ✅
api.example.com+example.com(subdomain + apex) - ✅
example.com+api.example.com(apex + subdomain) - ❌
app.example.com+service.run.app(different domains - will NOT work)
Why? Junjo AI Studio uses session cookies with SameSite=Strict for security (CSRF protection). Cross-domain deployments will cause authentication to fail.
Turn-Key Example Repositories
Junjo AI Studio Minimal Build
https://github.com/mdrideout/junjo-ai-studio-minimal-build
A minimal, standalone repository with just the core Junjo AI Studio components using pre-built Docker images.
Best for:
- Quick testing of Junjo AI Studio
- Simple production deployments with explicit public URLs
- Integration into existing infrastructure
Junjo AI Studio Deployment Example
https://github.com/mdrideout/junjo-ai-studio-deployment-example
A complete, production-ready example that includes a Junjo Python Library application alongside the server infrastructure.
Best for:
- End-to-end deployment examples
- Learning how to configure your Junjo app with the server
- VM deployment guide (Digital Ocean Droplet, AWS EC2, etc.)
- One complete reverse-proxy/TLS example
The README provides step-by-step deployment instructions.
Docker Compose - Production Images
Junjo AI Studio is built and deployed to Docker Hub with each GitHub release:
- Backend: mdrideout/junjo-ai-studio-backend
- Ingestion Service: mdrideout/junjo-ai-studio-ingestion
- Frontend: mdrideout/junjo-ai-studio-frontend
Example compose.yaml: junjo-ai-studio-minimal-build/compose.yaml
Use these images in the deployment stack you own. For complete working examples, start from the minimal-build or deployment-example repositories.
VM Resource Requirements
Junjo AI Studio is designed to be low resource:
- Minimum: Shared vCPU + 1GB RAM
- Databases: SQLite (embedded, low overhead)
- Recommended: 1 vCPU + 2GB RAM for production workloads
Advanced Topics
Database & Storage Access
Inspecting Parquet Files (Span Data)
The ingestion service stores spans in Parquet files. You can inspect them using Python.
import pyarrow.parquet as pq

# Read cold tier
table = pq.read_table('.dbdata/spans/parquet/')
print(f"Cold tier spans: {table.num_rows}")

# Read hot snapshot
hot = pq.read_table('.dbdata/spans/hot_snapshot.parquet')
print(f"Hot tier spans: {hot.num_rows}")
Accessing SQLite (User Data)
# SQLite (user data, API keys, sessions)
sqlite3 ./.dbdata/sqlite/junjo.db
Performance Tuning
- Ingestion throughput: Adjust ingestion tunables in
.env(see.env.example, e.g.BATCH_SIZE,FLUSH_MAX_MB,FLUSH_MAX_AGE_SECS,BACKPRESSURE_MAX_MB) - Database performance: SQLite uses WAL mode for better concurrency
- Container resources: Increase memory limits if processing high span volumes
Testing
Junjo AI Studio has comprehensive test coverage across all services. Tests are organized to support both local development and CI/CD pipelines.
Quick Start: Run All Tests
# Run all tests (backend, frontend, contract validation, proto validation)
./run-all-tests.sh
This script runs: 0. Proto version checking - Warns if protoc version doesn't match required v30.2
- Python linting - Runs ruff check on backend code (matches pre-commit validation)
- Backend tests - Unit, integration, and gRPC tests (Python/pytest)
- Ingestion tests - Rust unit/integration tests (Cargo)
- Frontend tests - Unit, integration, and component tests (TypeScript/Vitest)
- Contract tests - Validates frontend ↔ backend API schema compatibility
- Proto validation - Regenerates protos and validates staleness
Test Scripts Organization
Run everything:
./run-all-tests.sh- Complete test suite for all services
Backend-specific:
./backend/scripts/run-backend-tests.sh- All backend tests (unit, integration, gRPC)./backend/scripts/validate_rest_api_contracts.sh- Contract tests (schema validation)
Frontend-specific:
cd frontend && npm run test:run- All frontend tests (exits after completion)cd frontend && npm test- Frontend tests in watch modecd frontend && npm run test:contracts- Contract tests only
Individual services:
- Backend: See backend/README.md for detailed test categories
- Frontend: See frontend/README.md for component testing
- Ingestion: See ingestion/README.md for Rust tests
Version Management
Junjo AI Studio uses a centralized root VERSION file for release/app metadata synchronization.
# Sync all managed version fields from VERSION
./scripts/sync-version.sh

# Set a new version and sync everything
./scripts/sync-version.sh 0.80.0

# Verify all managed files are in sync with VERSION
./scripts/check-version-sync.sh
Managed files include backend (pyproject, FastAPI metadata, OpenAPI), ingestion (Cargo.toml/Cargo.lock), and frontend (package.json/package-lock.json).
Release guardrail: Docker publish workflow validates that the GitHub release tag exactly matches VERSION.
Development Workflow & Validation
Understanding what each validation tool does helps avoid surprises at commit time.
What Each Tool Does
| Validation | run-all-tests.sh | pre-commit hook | CI (GitHub Actions) |
|---|---|---|---|
| Proto version check | ✅ Warns | ✅ Warns | ✅ Enforces |
| Python linting (ruff) | ✅ Fails | ✅ Auto-fixes + fails | ✅ Enforces |
| Backend tests | ✅ Runs all | ❌ | ✅ Enforces |
| Ingestion tests | ✅ Runs all | ❌ | ✅ Enforces |
| Frontend tests | ✅ Runs all | ❌ | ✅ Enforces |
| Contract tests | ✅ Validates | ❌ | ✅ Enforces |
| Proto regeneration | ✅ Regenerates | ✅ Regenerates + stages | ✅ Checks staleness |
| Proto staleness check | ✅ Fails on diff | ❌ (auto-fixes) | ✅ Enforces |
Recommended Workflow
During development (before committing):
# Option 1: Run everything at once (recommended)
./run-all-tests.sh

# Option 2: Run individual validations
cd backend && uv run ruff check app/          # Linting
./backend/scripts/run-backend-tests.sh        # Backend tests
cd ingestion && cargo test                    # Ingestion tests
cd frontend && npm run test:run              # Frontend tests
./backend/scripts/validate_rest_api_contracts.sh  # Contracts
At commit time:
git commit
# Pre-commit hook runs automatically:
# - Checks proto versions (warns if wrong)
# - Regenerates proto files (stages changes)
# - Runs orphan detection (blocks if missing .proto files)
# - Runs ruff format (auto-fixes Python style)
# - Runs ruff check (blocks if linting errors)
Philosophy:
- run-all-tests.sh: Comprehensive validation during development - catches issues early
- pre-commit hook: Safety net + auto-fixes - ensures commit quality
- CI: Final enforcement - prevents merging broken code
Why run-all-tests.sh matches pre-commit:
Previously, run-all-tests.sh could pass but pre-commit would fail (orphaned schemas, linting errors). This wasted developer time debugging at commit stage. Now both tools perform the same core validations, with pre-commit adding auto-fixes.
Result: No surprises at commit time. If run-all-tests.sh passes, pre-commit will too (except for auto-fixable style issues).
Contract Testing
Junjo AI Studio uses contract testing to prevent frontend/backend API drift. Backend Pydantic schemas are the single source of truth, validated against frontend TypeScript/Zod schemas using OpenAPI-generated mocks.
How it works:
- Backend exports OpenAPI schema from Pydantic models
- Frontend tests generate mocks from OpenAPI spec
- Zod schemas validate they can parse the mocks
- Tests fail if schemas drift
Run contract tests:
./backend/scripts/validate_rest_api_contracts.sh
See backend/scripts/README_SCHEMA_VALIDATION.md for detailed documentation.
GitHub Actions
Tests run automatically on all PRs via GitHub Actions:
.github/workflows/backend-tests.yml- Backend test suite.github/workflows/rest-api-contract-validation.yml- REST API contract tests.github/workflows/proto-staleness-check.yml- Proto file validation.github/workflows/version-sync-check.yml- Version drift validation againstVERSION
Troubleshooting
Sess
Tag summary
Content type
Image
Digest
sha256:d1fbc4f01…
Size
147.4 MB
Last updated
16 days ago
docker pull mdrideout/junjo-ai-studio-backend