peterthecoon/cronicle
A simple, distributed task scheduler and runner with a web based UI.
651
peterthecoon/cronicle repository overview
Overview
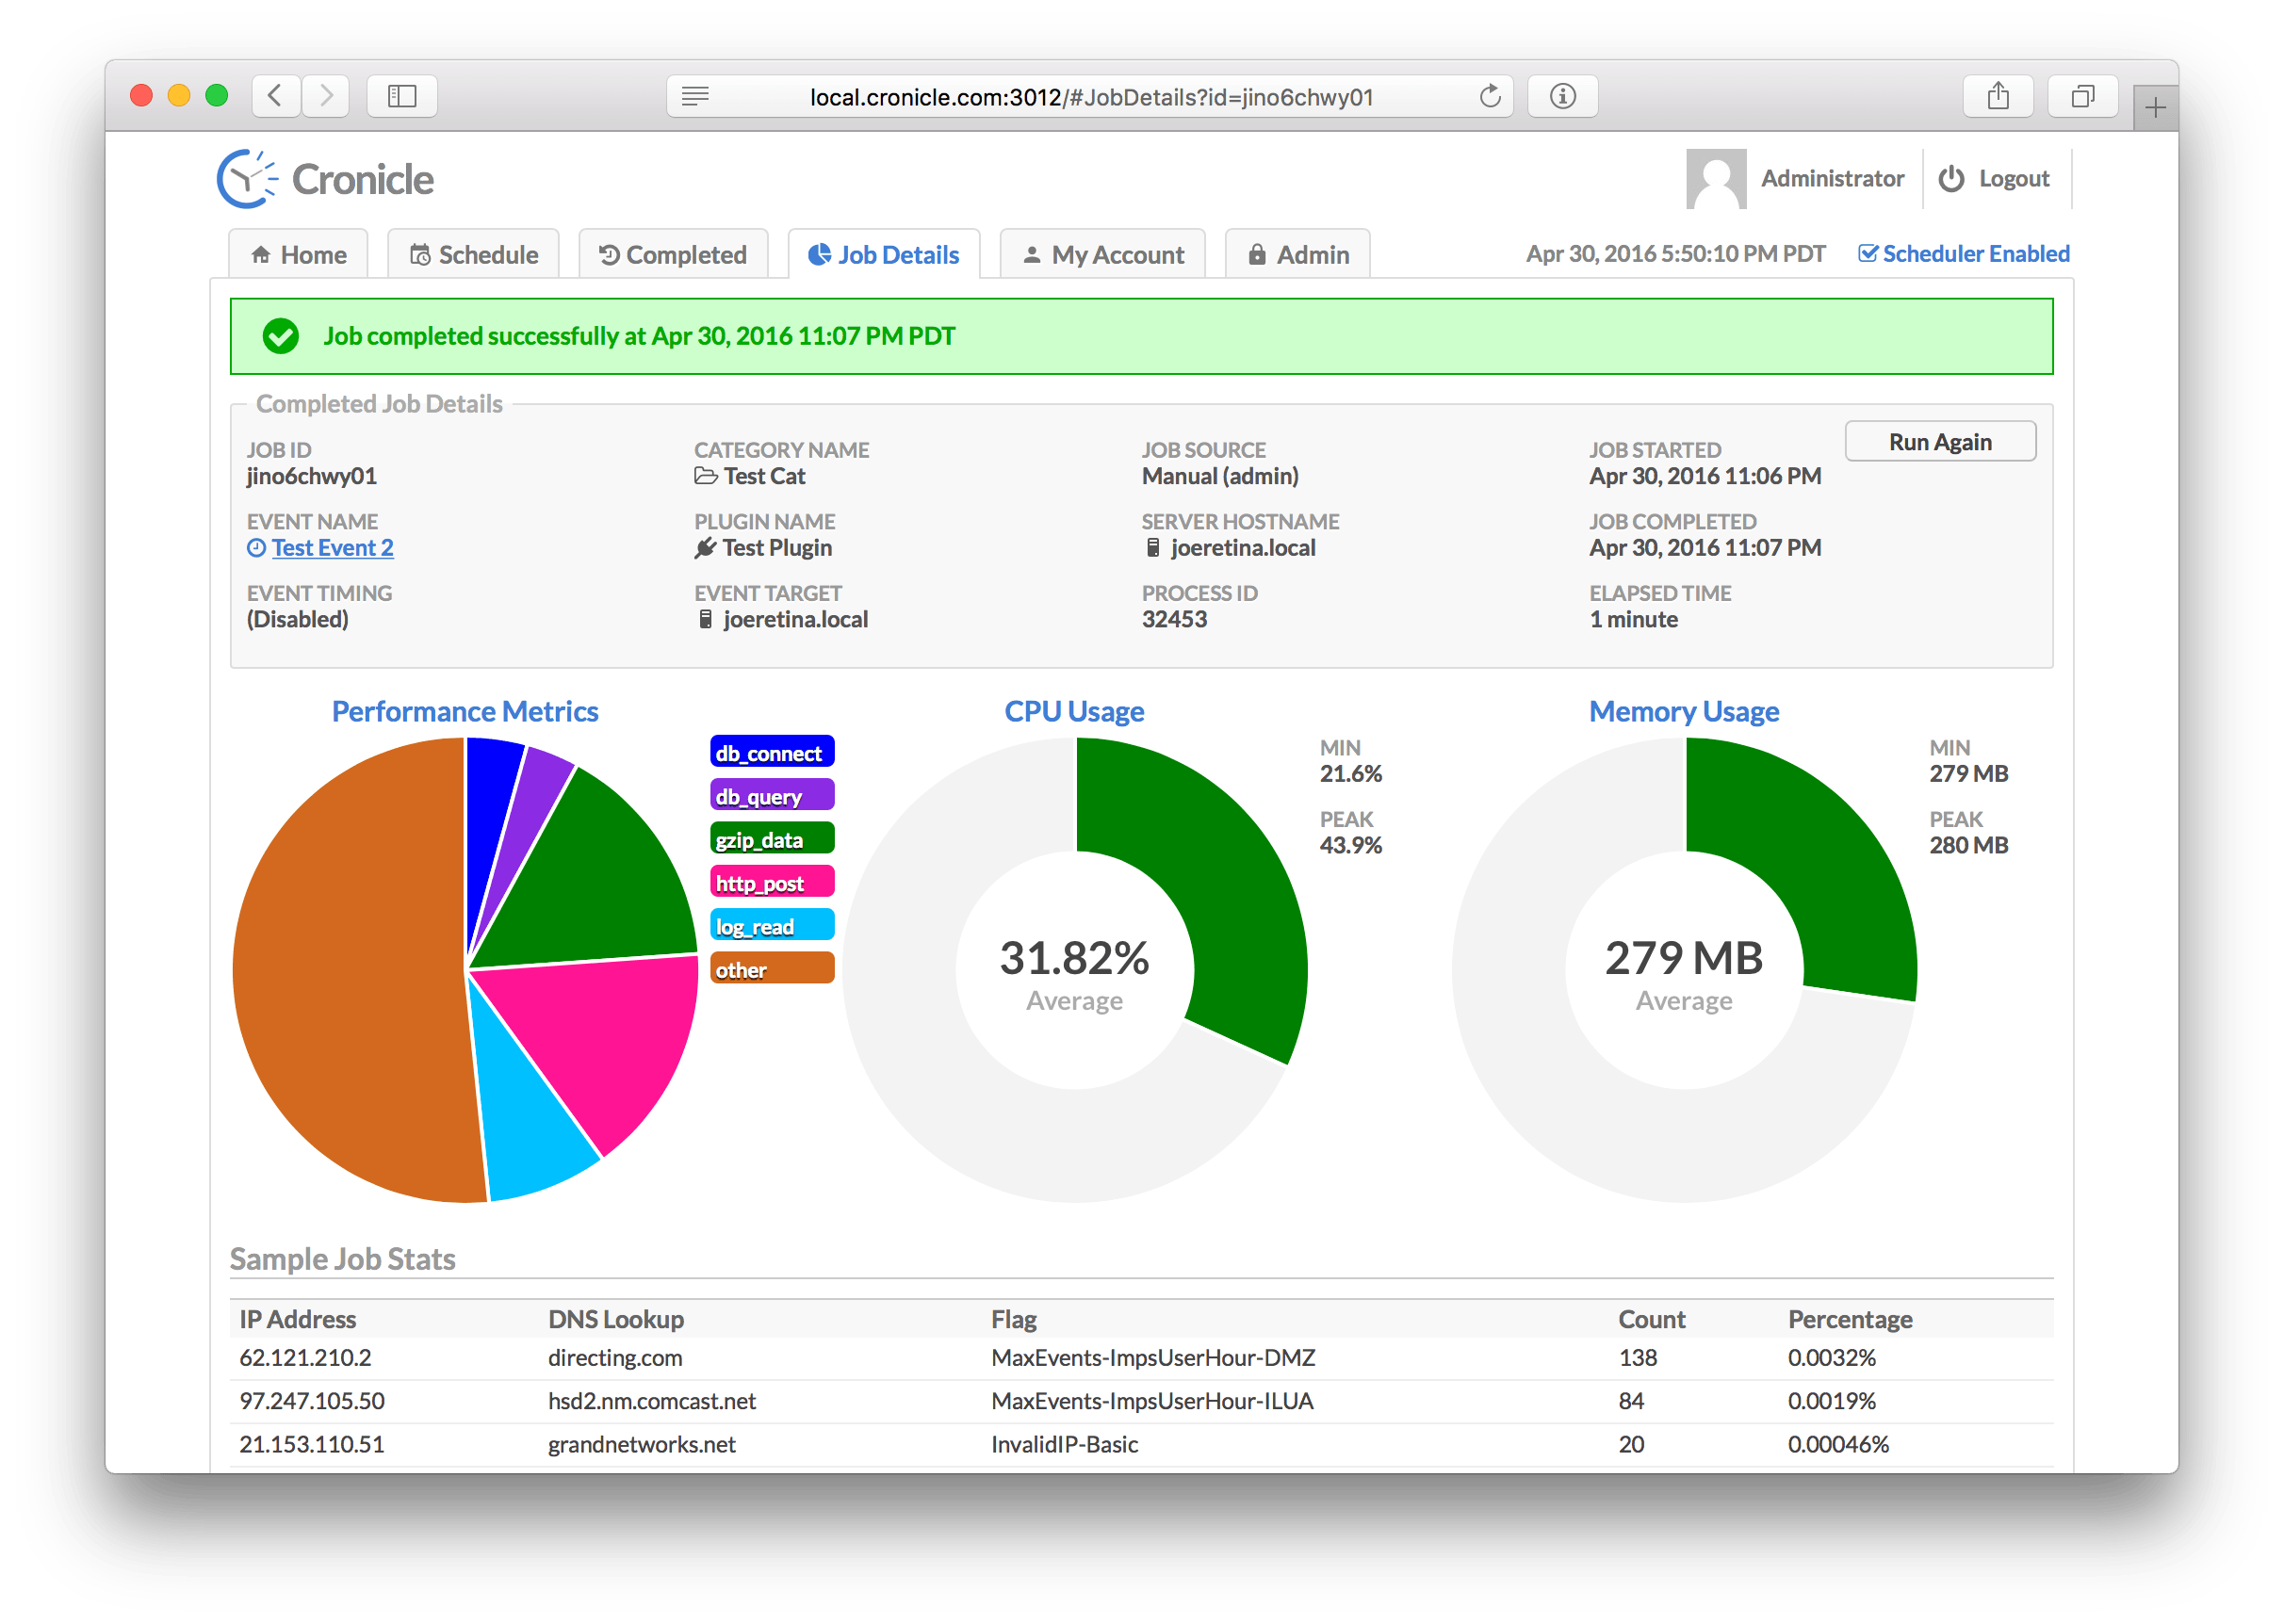
Cronicle is a multi-server task scheduler and runner, with a web based front-end UI. It handles both scheduled, repeating and on-demand jobs, targeting any number of slave servers, with real-time stats and live log viewer. It's basically a fancy Cron replacement written in Node.js. You can give it simple shell commands, or write Plugins in virtually any language.
Features at a Glance
- Single or multi-server setup.
- Automated failover to backup servers.
- Auto-discovery of nearby servers.
- Real-time job status with live log viewer.
- Plugins can be written in any language.
- Schedule events in multiple timezones.
- Track CPU and memory usage for each job.
- Historical stats with performance graphs.
- Simple JSON messaging system for Plugins.
- Web hooks for external notification systems.
- Simple REST API for scheduling and running events.
- API Keys for authenticating remote apps.
Table of Contents
- Installation
- Setup
- Configuration
- Web UI
- Plugins
- Command Line
- Inner Workings
- API Reference
- Development
- Colophon
- License
Glossary
A quick introduction to some common terms used in Cronicle:
| Term | Description |
|---|---|
| Master Server | The primary server which keeps time and runs the scheduler, assigning jobs to other servers, and/or itself. |
| Backup Server | A slave server which will automatically become master and take over duties if the current master dies. |
| Slave Server | A server which sits idle until it is assigned jobs by the master server. |
| Server Group | A named group of servers which can be targeted by events, and tagged as "master eligible", or "slave only". |
| API Key | A special key that can be used by external apps to send API requests into Cronicle. Remotely trigger jobs, etc. |
| User | A human user account, which has a username and a password. Passwords are salted and hashed with bcrypt. |
| Plugin | Any executable script in any language, which runs a job and reads/writes JSON to communicate with Cronicle. |
| Schedule | The master list of events, which are scheduled to run at particular times, on particular servers. |
| Category | Events can be assigned to categories which define defaults and optionally a color highlight in the UI. |
| Event | An entry in the schedule, which may run once or many times at any interval. Each event points to a Plugin, and a server or group to run it. |
| Job | A running instance of an event. If an event is set to run hourly, then a new job will be created every hour. |
Installation
Please note that Cronicle currently only works on POSIX-compliant operating systems, which basically means Unix/Linux and OS X. If there is enough interest, I'll look into making it work on Windows.
You'll need to have Node.js pre-installed on your server. Then become root and type this:
curl -s https://raw.githubusercontent.com/jhuckaby/Cronicle/master/bin/install.js | node
This will install the latest stable release of Cronicle and all of its dependencies under: /opt/cronicle/
If you'd rather install it manually (or something went wrong with the auto-installer), here are the raw commands:
	mkdir -p /opt/cronicle
	cd /opt/cronicle
	curl -L https://github.com/jhuckaby/Cronicle/archive/v1.0.0.tar.gz | tar zxvf - --strip-components 1
	npm install
	node bin/build.js dist
Replace v1.0.0 with the desired Cronicle version from the release list, or master for the head revision (unstable).
Setup
If this is your first time installing, please read the Configuration section first. You'll likely want to customize a few configuration parameters in the /opt/cronicle/conf/config.json file before proceeding. At the very least, you should set these properties:
| Key | Description |
|---|---|
base_app_url | A fully-qualified URL to Cronicle on your server, including the http_port if non-standard. This is used in e-mails to create self-referencing URLs. |
email_from | The e-mail address to use as the "From" address when sending out notifications. |
smtp_hostname | The hostname of your SMTP server, for sending mail. This can be 127.0.0.1 or localhost if you have sendmail running locally. |
secret_key | For multi-server setups (see below) all your servers must share the same secret key. Any randomly generated string is fine. |
job_memory_max | The default maximum memory limit for each job (can also be customized per event and per category). |
http_port | The web server port number for the user interface. Defaults to 3012. |
Now then, the only other decision you have to make is what to use as a storage back-end. Cronicle can use local disk (easiest setup), Couchbase or Amazon S3. For single server installations, or even single master with multiple slaves, local disk is probably just fine, and this is the default setting. But if you want to run a true multi-server cluster with automatic master failover, please see Multi-Server Cluster for details.
With that out of the way, run the following script to initialize the storage system. You only need to do this once, and only on the master server. Do not run this on any slave servers:
/opt/cronicle/bin/control.sh setup
Among other things, this creates an administrator user account you can use to login right away. The username is admin and the password is admin. It is recommended you change the password as soon as possible, for security purposes (or just create your own administrator account and delete admin).
At this point you should be able to start the service and access the web UI. Enter this command:
/opt/cronicle/bin/control.sh start
Give it a minute to decide to become master, then send your browser to the server on the correct port:
http://YOUR_SERVER_HOSTNAME:3012/
You only need to include the port number in the URL if you are using a non-standard HTTP port (see Web Server Configuration).
See the Web UI section below for instructions on using the Cronicle web interface.
Single Server
For a single server installation, there is nothing more you need to do. After installing the package, running the bin/control.sh setup script and starting the service, Cronicle should be 100% ready to go. You can always add more servers later (see below).
Single Master with Slaves
The easiest multi-server Cronicle setup is a single "master" server with one or more slaves. This means that one server is the scheduler, so it keeps track of time, and assigns jobs for execution. Jobs may be assigned to any number of slave servers, and even the master itself. Slave servers simply sit idle and wait for jobs to be assigned by the master server. Slaves never take over master scheduling duties, even if the master server goes down.
This is the simplest multi-server setup because the master server can use local disk for all its storage. Slaves do not need access to the file storage. This is the default configuration, so you don't have to change anything at all. What it means is, all the scheduling data, event categories, user accounts, sessions, plugins, job logs and other data is stored as plain JSON files on local disk. Cronicle can also be configured to use a NoSQL database such as Couchbase or Amazon S3, but this is not required.
So by default, when you run the setup script above, the current server is placed into a "Master Group", meaning it is the only server that is eligible to become master. If you then install Cronicle on additional servers, they will become slaves only. You can change all this from the UI, but please read the next section before running multiple master backup servers.
When installing Cronicle onto slave servers, please do not run the bin/control.sh setup script. Instead, simply copy over your conf/config.json file, and then start the service.
Multi-Server Cluster
Cronicle also has the ability to run with one or more "backup" servers, which can become master if need be. Failover is automatic, and the cluster negotiates who should be master at any given time. But in order for this to work, all the master eligible servers need access to the same storage data. This can be achieved in one of three ways:
- Use a shared filesystem such as NFS.
- Use a Couchbase server.
- Use an Amazon S3 bucket.
See the Storage Configuration section below for details on these.
The other thing you'll need to do is make sure all your master backup servers are in the appropriate server group. By default, a single "Master Group" is created which only contains your primary master server. Using the UI, you can simply change the hostname regular expression so it encompasses all your eligible servers, or you can just add additional groups that match each backup server. More details can be found in the Servers Tab section below.
Load Balancers
You can run Cronicle behind a load balancer, as long as you ensure that only the master server and eligible backup servers are in the load balancer pool. Do not include any slave-only servers, as they typically do not have access to the back-end storage system, and cannot serve up the UI.
You can then set the base_app_url configuration parameter to point to the load balancer, instead of an individual server, and also use that hostname when loading the UI in your browser.
Note that Web UI needs to make API calls and open WebSocket connections to the master server directly, so it needs to also be accessible directly via its hostname.
Ops Notes
For teams setting up multi-server clusters, here are some operational concerns to keep in mind:
- All servers should have the same exact configuration file (
/opt/cronicle/conf/config.json). - All servers need to have correct clocks (timezones do not matter, clock sync does).
- Server auto-discovery happens via UDP broadcast on port 3014 (by default). This is not required.
- The master server will also open TCP WebSocket connections to each slave on the web server port.
- Each server in the cluster needs to have a fully-qualified hostname that resolves in DNS.
- The server hostnames determine priority of which server becomes master (alphabetical sort).
- All servers need to have unique hostnames (very bad things will happen otherwise).
- All servers need to have at least one active IPv4 interface.
- For the "live log" feature in the UI to work, the user needs a network route to the server running the job, via its hostname.
- If you have to change any server IP addresses, they'll have to be removed and re-added to the cluster.
Configuration
The main Cronicle configuration file is in JSON format, and can be found here:
/opt/cronicle/conf/config.json
Please edit this file directly. It will not be touched by any upgrades. A pristine copy of the default configuration can always be found here: /opt/cronicle/sample_conf/config.json.
Basics
Here are descriptions of the top-level configuration parameters:
base_app_url
This should be set to a fully-qualified URL, pointing to your Cronicle server, including the HTTP port number if non-standard. Do not include a trailing slash. This is used in e-mails to create self-referencing URLs. Example:
http://local.cronicle.com:3012
If you are running Cronicle behind a load balancer, this should be set to the load balanced virtual hostname.
email_from
The e-mail address to use as the "From" address when sending out notifications. Most SMTP servers require this to be a valid address to accept mail.
smtp_hostname
The hostname of your SMTP server, for sending mail. This can be set to 127.0.0.1 or localhost if you have sendmail running locally.
smtp_port
The port number to use when communicating with the SMTP server. The default is 25.
secret_key
For multi-server setups, all your Cronicle servers need to share the same secret key. Any randomly generated string is fine.
The install script will automatically set to this to a random string for you, but you are free to change it to anything you want. Just make sure all your servers have the same shared secret key. This is used to authenticate internal server-to-server API requests.
log_dir
The directory where logs will be written, before they are archived. This can be a partial path, relative to the Cronicle base directory (/opt/cronicle) or a full path to a custom location. It defaults to logs (i.e. /opt/cronicle/logs).
log_filename
The filename to use when writing logs. You have three options here: a single combined log file for all logs, multiple log files for each component, or multiple log files for each category (debug, transaction, error). See the Logs section below for details.
log_columns
This is an array of column IDs to log. You are free to reorder or remove some of these, but do not change the names. They are specific IDs that match up to log function calls in the code. See the Logs section below for details.
log_archive_path
Every night at midnight (local server time), the logs can be archived (gzipped) to a separate location. This parameter specifies the path, and the directory naming / filenaming convention of the archive files. It can utilize date placeholders including [yyyy], [mm] and [dd].
This can be a partial path, relative to the Cronicle base directory (/opt/cronicle) or a full path to a custom location. It defaults to logs/archives/[yyyy]/[mm]/[dd]/[filename]-[yyyy]-[mm]-[dd].log.gz.
copy_job_logs_to
Your job logs (i.e. the output from Plugins) are stored separately from the main Cronicle log files. They are actually written to the Cronicle storage system, and made available in the UI. This parameter allows you to copy them to a separate directory on disk, presumably for some kind of log processing system (such as Splunk) to then pick them up, index them, etc. It is optional, and defaults to disabled.
This can be a partial path, relative to the Cronicle base directory (/opt/cronicle) or a full path to a custom location.
queue_dir
The queue directory is used internally for misc. background tasks, such as handling detached jobs sending messages back to the daemon. You shouldn't ever have to deal with this directly, and the directory is auto-created on install.
This can be a partial path, relative to the Cronicle base directory (/opt/cronicle) or a full path to a custom location.
pid_file
The PID file is simply a text file containing the Process ID of the main Cronicle daemon. It is used by the control.sh script to stop the daemon, and detect if it is running. You should never have to deal with this file directly, and it defaults to living in the logs directory which is auto-created.
This can be a partial path, relative to the Cronicle base directory (/opt/cronicle) or a full path to a custom location. However, it should probably not be changed, as the control.sh script expects it to live in logs/cronicled.pid.
debug_level
The level of verbosity in the debug logs. It ranges from 1 (very quiet) to 10 (extremely loud). The default value is 9.
maintenance
Cronicle needs to run storage maintenance once per day, which generally involves deleting expired records and trimming lists which have grown too large. This only runs on the master server, and typically only takes a few seconds, depending on the number of events you have. The application is still usable during this time, but UI performance may be slightly impacted.
By default the maintenance is set to run at 4:00 AM (local server time). Feel free to change this to a more convenient time for your server environment. The format of the parameter is HH:MM.
list_row_max
This parameter controls how many items are kept in historical lists such as the Activity Log, Completed Jobs, and Event History. When this limit is exceeded, the oldest entries are removed during the nightly maintenance run. The default limit is 10000 items.
This has no real effect on performance -- only space on disk (or Couchbase / S3).
job_data_expire_days
Completed job data is only kept around for this number of days. This includes job logs and the metadata for each completed job (stats, etc.). The default value is 180 days, but feel free to tune this for your own environment.
This has no real effect on performance -- only space on disk (or Couchbase / S3).
child_kill_timeout
This is the number of seconds to allow child processes to exit after sending a TERM signal (for aborted jobs, server shutdown, etc.). If they do not exit within the specified timeout, a KILL signal is sent. The default value is 10 seconds.
dead_job_timeout
When the master server loses connectivity with a slave that had running jobs on it, they go into a "limbo" state for a period of time, before they are finally considered lost. The dead_job_timeout parameter specifies the amount of time before these wayward jobs are aborted (and possibly retried, depending on the event settings). The default value is 30 seconds.
This parameter exists because certain networks may have unreliable connections between servers, and it is possible a server may drop for a few seconds, then come right back. If a short hiccup like that occurs, you probably don't want to abort all the running jobs right away.
The worst case scenario is that a remote server with running jobs goes MIA for longer than the dead_job_timeout, the master server aborts all the jobs, then the server reappears and finishes the jobs. This creates a bit of a mess, because the jobs are reported as both errors and successes. The latter success prevails in the end, but the errors stay in the logs and event history.
master_ping_freq
For multi-server clusters, this specifies how often the master server should send out pings to slave servers, to let them know who is the boss. The default is 20 seconds.
master_ping_timeout
For multi-server clusters, this specifies how long to wait after receiving a ping, before a backup server considers the master server to be dead. At this point a new master server will be chosen. The default value is 60 seconds.
udp_broadcast_port
For auto-discovery of nearby servers, this specifies the UDP port to use for broadcasting. Do not worry if your network doesn't support UDP broadcast, as this is just an optional feature where nearby servers will show up in the UI. The default port is 3014.
scheduler_startup_grace
When the scheduler first starts up on the master server, it waits for a few seconds before actually assigning jobs. This is to allow all the servers in the cluster to check in and register themselves with the master server. The default value is 10 seconds, which should be plenty of time.
Once a server becomes master, it should immediately attempt to connect to all remote servers right away. So in theory this grace period could be as short as 1 second or less, but a longer delay allows for any random network connectivity errors to work themselves out.
universal_web_hook
While you can specify a web hook in the UI per each category and/or per each event, this parameter allows you to define a universal one, which is always fired for every job regardless of UI settings. It should be a fully-qualified URL to an API endpoint that accepts an HTTP POST containing JSON data.
Web hooks are fired at the start and the end of each job (success or fail). A JSON record is sent in the HTTP POST body, which contains all the relevant information about the job, including an action property, which will be set to job_start at the start and job_complete at the end of the job. See the Web Hooks section below for more on the data format.
job_memory_max
This parameter allows you to set a default memory usage limit for jobs, specified in bytes. This is measured as the total usage of the job process and any sub-processes spawned or forked by the main process. If the memory limit is exceeded, the job is aborted. The default value is 1073741824 (1 GB). To disable set it to 0.
Memory limits can also be customized in the UI per each category and/or per each event (see Event Resource Limits below). Doing either overrides the master default.
job_memory_sustain
When using the job_memory_max feature, you can optionally specify how long a job is allowed exceed the maximum memory limit until it is aborted. For example, you may want to allow jobs to spike over 1 GB of RAM, but not use it sustained for more a certain amount of time. That is what the job_memory_sustain property allows, and it accepts a value in seconds. It defaults to 0 (abort instantly when exceeded).
Memory limits can also be customized in the UI per each category and/or per each event (see Event Resource Limits below). Doing either overrides the master default.
job_cpu_max
This parameter allows you to set a default CPU usage limit for jobs, specified in percentage of one CPU core. This is measured as the total CPU usage of the job process and any sub-processes spawned or forked by the main process. If the CPU limit is exceeded, the job is aborted. The default value is 0 (disabled). For example, to allow jobs to use up to 2 CPU cores, specify 200 as the limit.
CPU limits can also be customized in the UI per each category and/or per each event (see Event Resource Limits below). Doing either overrides the master default.
job_cpu_sustain
When using the job_cpu_max feature, you can optionally specify how long a job is allowed exceed the maximum CPU limit until it is aborted. For example, you may want to allow jobs to use up to 2 CPU cores, but not use them sustained for more a certain amount of time. That is what the job_cpu_sustain property allows, and it accepts a value in seconds. It defaults to 0 (abort instantly when exceeded).
CPU limits can also be customized in the UI per each category and/or per each
Tag summary
Content type
Image
Digest
Size
362.3 MB
Last updated
almost 10 years ago
docker pull peterthecoon/cronicle