qgis/feed
This is the engine behind our news feed that pushes news to the QGIS desktop.
1.2K
qgis/feed repository overview

QGIS Home Page News Feed
This application is the backend part that manages and serves news for the QGIS welcome page.
Installation
-
create a virtual env
$ virtualenv qgisfeedvenv -
activate the virtual env:
$ source qgisfeedvenv/bin/activate -
install dependencies:
$ pip install -r REQUIREMENTS.txt -
create a postgresql DB:
$ createdb qgisfeed -
enable postgis:
$ psql qgisfeed -c 'CREATE EXTENSION postgis;' -
create
settings_local.pyand put your DB configuration as in the example below:DATABASES = { 'default': { 'ENGINE': 'django.contrib.gis.db.backends.postgis', 'NAME': 'qgisfeed', 'USER': 'your_username', 'PASSWORD': 'your_password', 'HOST': 'localhost', 'PORT': '5432' } } -
run migrations, from the
qgisfeedprojectdirectory:python manage.py migrate -
create an admin user and set a password:
$ python manage.py createsuperuser -
start the development server:
python manage.py runserver
Settings
To prevent DDOS attacks there is limit in the number of returned records (defaults to 20): it can be configured by overriding the settings in settings_local.py with:
QGISFEED_MAX_RECORDS=40 # default value is 20
For email notifications, the sender address can be configured with:
QGISFEED_FROM_EMAIL='[email protected]'` # default value is '[email protected]'
See https://docs.djangoproject.com/en/2.2/topics/email/#module-django.core.mail for further email configuration.
Control panel and permissions
Users with staff flag can enter the control panel at /admin and add feed entries, by default entries are not published.
Users with superadmin flag will be notified by email when an entry is added to the feed and will be able to publish the entry.
Endpoint and accepted parameters
The application has a single endpoint available at the web server root / the reponse is in JSON format.
Example call: http://localhost:8000/
Returned data:
[
  {
    "pk": 1,
    "title": "QGIS acquired by ESRI",
    "image": "http://localhost:8000/media/feedimages/image.png",
    "content": "<p>QGIS is finally part of the ESRI ecosystem, it has been rebranded as CrashGIS to better integrate with ESRI products line.</p>",
    "url": "https://www.qgis.com",
    "sticky": true,
    "publish_from": 1557419128
  },
  {
    "pk": 2,
    "title": "Null Island QGIS Meeting",
    "image": "",
    "content": "<p>Let's dive in the ocean together!</p>",
    "url": null,
    "sticky": false,
    "publish_from": 1557419128
  },
  {
    "pk": 3,
    "title": "QGIS Italian Meeting",
    "image": "",
    "content": "<p>Ciao from Italy!</p>",
    "url": null,
    "sticky": false,
    "publish_from": 1557419128
  }
]
Available parameters for filters
The following parameters can be passed by the client to filter available records.
Parameters are validated and in case they are not valid a Bad Request HTTP error code 400 is returned.
after
When after is passed, only the records that have been published after the given value will be returned.
Accepted values: unix timestamp (UTC)
Example call: http://localhost:8000/?after=1557419013
lang
When lang is passed, the records that have a different lang will be excluded from the results. Only the records with null lang and the records with a matching lang will be returned.
Accepted values: ISO-939-1 two letters language code
Example call: http://localhost:8000/?lang=de
lat lon (location)
When lat and lon are passed, the records that have a location filter set will be returned only if the point defined by lat and lon is within record's location.
Accepted values: ESPG:4326 latitude and longitude
Example call: http://localhost:8000/?lat=44.5&lon=9.23
Docker for testing
For development purposes only, you can run this application in debug mode with docker compose:
$ docker-compose -f docker-compose-testing.yml up
A set of test data will be automatically loaded and the application will be available at http://localhost:8000
To enter the control panel http://localhost:8000/admin, two test users are available:
- Super Admin: the credentials are
admin/admin - Staff (News Entry Author): the credentials are
staff/staff
Docker for production
For production, you can run this application with docker compose:
Docker configuration should be present in .env file in the main directory,
an example is provided in env.template:
# This file can be used as a template for .env
# The values in this file are also the default values.

# Host machine persistent storage directory, this path
# must be an existent directory with r/w permissions for
# the users from the Docker containers.
QGISFEED_DOCKER_SHARED_VOLUME=/shared-volume

# Number of Gunicorn workers (usually: number of cores * 2 + 1)
QGISFEED_GUNICORN_WORKERS=4

# Database name
QGISFEED_DOCKER_DBNAME=qgisfeed
# Database user
QGISFEED_DOCKER_DBUSER=docker
# Database password
QGISFEED_DOCKER_DBPASSWORD=docker
$ docker-compose -f docker-compose-production.yml up
A set of test data will be automatically loaded and the application will be available at http://localhost:80
To enter the control panel http://localhost:80/admin, two test users are available:
- Super Admin: the credentials are
admin/admin - Staff (News Entry Author): the credentials are
staff/staff
Enable SSL Certificate on production using Docker
- Generate key using openssl in dhparam directory
openssl dhparam -out /home/web/qgis-feed/dhparam/dhparam-2048.pem 2048
- Run docker-compose using
docker-compose-production-ssl.yml
$ docker-compose -f docker-compose-production-ssl.yml up
- Update
config/nginx/qgisfeed.confto include the new config file inconfig/nginx/ssl/qgisfeed.conf
include conf.d/ssl/*.conf;
- Restart nginx service
nginx -s reload
- To enable a cronjob to automatically renew ssl cert, add
scripts/renew_ssl.shto crontab file.
Troubleshooting SSL in production
Sometimes it seems our cron does not refresh the certificate. We can fix like this:
Gentle Way
ssh feed.qgis.org
cd /home/web/qgis-feed
scripts/renew_ssl.sh
Now check if your browser is showing the site opening with no SSL errors: https://feed.qgis.org
More crude way
ssh feed.qgis.org
cd /home/web/qgis-feed
docker-compose -f docker-compose-production-ssl.yml up certbot
docker-compose -f docker-compose-production-ssl.yml restart nginx
Now check if your browser is showing the site opening with no SSL errors: https://feed.qgis.org
Backups
If something goes terribly wrong, we keep 7 nights of backups on hetzner
If those are also not useful there are a collection of snapshot backups on hetzner
Last resort: Tim makes backups to his local machine on a semi-regular basis.
Deploying on Rancher
This repository contains a rancher template directory (the template folder in the root of the repo)
which can be used to deploy this site onto a host using Rancher. Currently ony Rancher v1.6
(i.e. not v2) is supported.
This guide serves as a quick setup guide to spin up a one of our Rancher catalogue packages.
Prerequisites
This guide assumes that the following steps have been done:
-
Install Docker: Docker is installed on your server. Use Ubuntu 16.04 for the best results because that is what we are testing on. For quick installation, use the convenience scripts provided by Rancher (make sure you choose a supported version).
-
Install Rancher: The stable version of Rancher v1 Server has been set up.
If it's not, refer to Rancher quickstart guide. Here is an example of how to run the latest stable release with a persistent mysql database stored on the file system:
mkdir /home/mysql
docker run -d -v /home/mysql:/var/lib/mysql --restart=unless-stopped -p 8080:8080 rancher/server:stable
-
Create an environment: Once rancher server has been set up. Create an environment. You can create an Rancher environment
<rancher url>/settings/env/add. -
Set up the Hetzner Machine Driver: This only applies if you are using Hetzner Cloud as your hosting provider. You can automatically manage and deploy hosts on Hetzner using the Admin -> Machine Drivers menu and then enable the Hetzner driver.
-
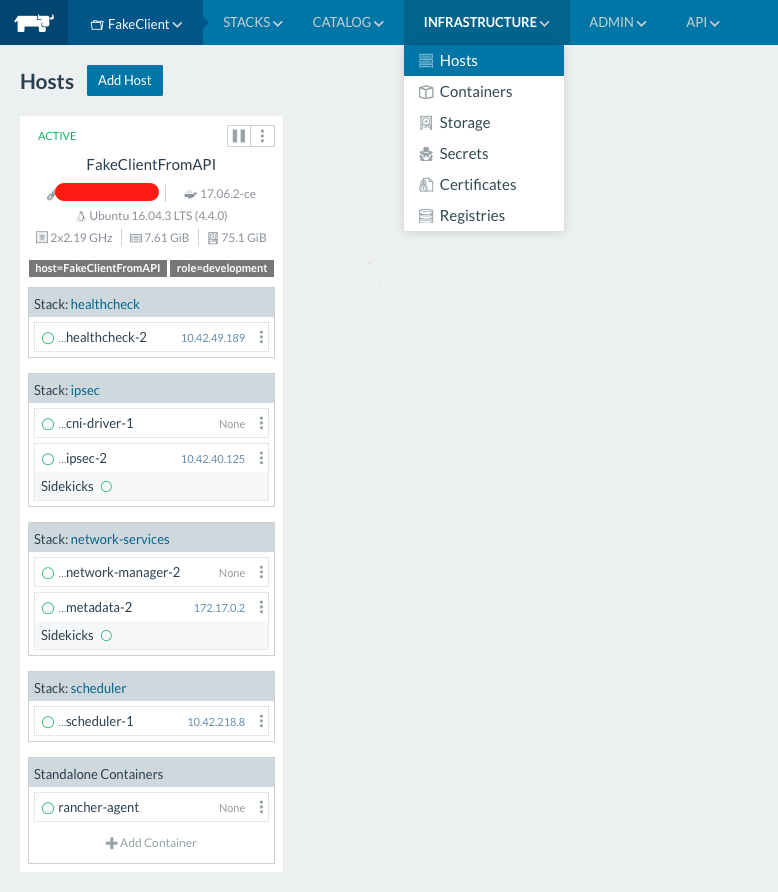
Add a host: You need to add a host to the environment has been set up to actually run the instance (the agent could be on the same host as the rancher server but it is not recommended). You can do this by ensuring your chosen environment is active and then from the menu do
Environment -> Hosts. If you running on hetzner cloud, choose the Hetzner machine driver and then enter the API key for your Hetzner Cloud project (you can get this key from the Hetzner Cloud admin ui). Alternatively manually set up a linux host with docker on it and then use the manual host setup as directed by theInfrastructure -> Hosts -> Add Hostpage in Rancher. The process is quite logical and simple and involves pasting a single line of code onto the host that will run the agent. Once the host is set up with a running agent, you should see it join the environment as shown below:
- ** Installing from the catalogue:** Once Rancher is installed, your environment and host are set up, use the Admin -> Settings menu to add our Rancher catalogue using this URL:
https://github.com/qgis/qgis-feed
Once your settings are saved open a Rancher environment and set up a stack from the catalogue's 'QGIS' section - you will see QGIS-Feed listed there.
Now you can add items from the QGIS catalogue to your stack.
Tag summary
Content type
Image
Digest
Size
406.7 MB
Last updated
over 5 years ago
docker pull qgis/feed