reginleif88/proxtagger
A web interface to bulk manage Proxmox tags with backup and automated conditional tagging rules
10K+
reginleif88/proxtagger repository overview
🧩 ProxTagger
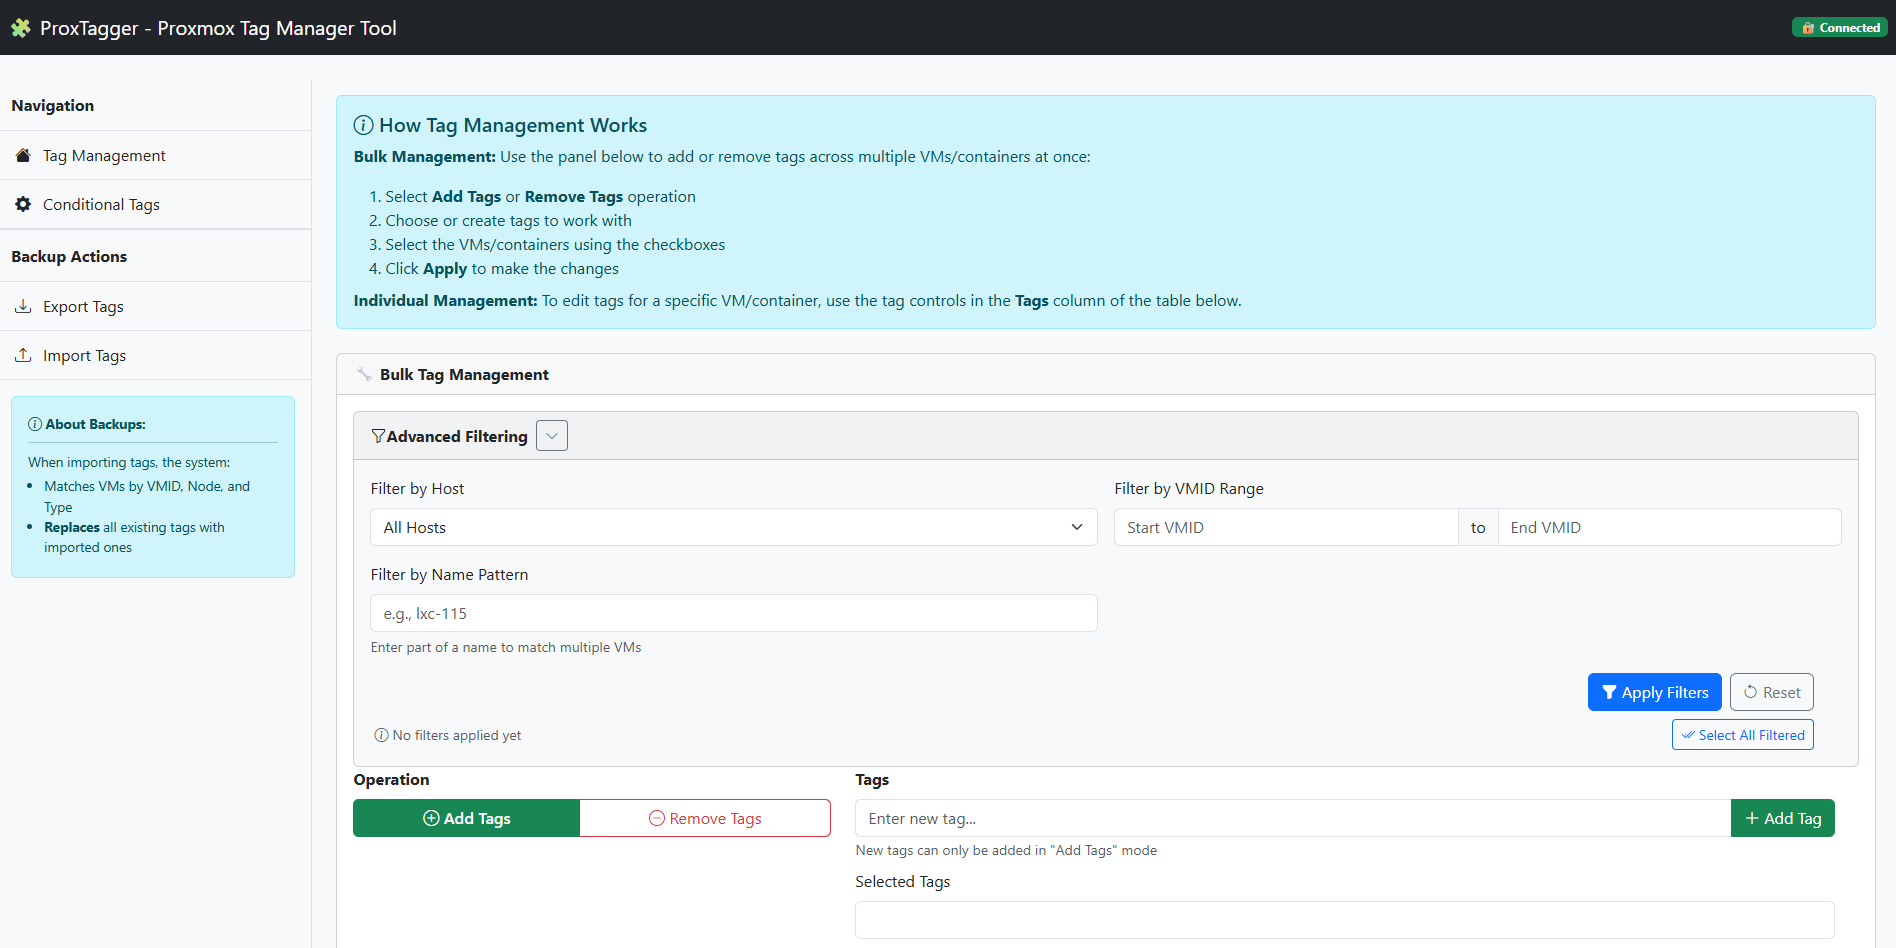
A lightweight, open-source web interface to bulk manage Proxmox VM and container tags with backup and restore functionality, featuring automated conditional tagging rules.


Overview
ProxTagger provides a simple yet powerful web interface to manage tags for your Proxmox VMs and containers. It simplifies tag management with individual and bulk operations, automated conditional tagging rules, while also offering backup and restore functionality to safeguard your tagging system which is currently not backed up by Promox Backup Server.
Features
- Comprehensive Tag Management
- View all VMs and containers with their tags in an interactive table (powered by DataTables) supporting sorting and pagination.
- Add/remove tags to individual VMs with a clean, intuitive interface and improved visual feedback.
- Perform bulk operations to add or remove tags across multiple VMs, with selection persisting across pages/filters.
- Button to easily clear the current VM selection in the bulk panel.
- Advanced Filtering & Search
- Filter VMs/Containers by Host, VMID range, and Name pattern using the dedicated filter panel.
- Select all VMs/Containers that match the current filter criteria with a single click.
- Global search bar supporting regular expressions for powerful table filtering across all columns.
- Conditional Tag Management
- Create automated rules that apply or remove tags based on VM/container properties.
- Advanced condition builder with AND/OR logic operators for complex filtering.
- THEN/ELSE actions - different behaviors for matching vs non-matching VMs.
- Schedule rules to run automatically via cron expressions or execute manually.
- Test mode with dry-run capabilities to preview changes.
- Rule execution history and comprehensive logging.
- Backup & Restore
- Download tag configurations as JSON files.
- Restore tags from previous backups.
- Interactive UI
- Dynamic table to browse large numbers of VMs/Containers.
- Consistent toast notifications provide feedback for user actions.
- Security & Flexibility
- Uses Proxmox API tokens for secure authentication.
- Uses official Promox APIs.
Getting Started
Prerequisites
- A Proxmox VE server
- API token with appropriate permissions (see API Token Setup section for details)
- Docker (if running in a container)
- Python 3.6+ (if building locally)
Running with Docker
You can run ProxTagger using pre-built Docker images available on Docker Hub.
Using docker compose
To use Docker compose you need to create a docker-compose.yml or use the one in the repository to run the ProxTagger container.
services:
  proxtagger:
    image: reginleif88/proxtagger:latest
    container_name: proxtagger_app
    ports:
      - "5660:5660"
    environment:
      - PORT=5660
    volumes:
      - proxtagger_config:/app
    restart: unless-stopped

volumes:
  proxtagger_config:
    name: proxtagger_config
    driver: local
Execute docker compose up -d and then open your browser and navigate to http://localhost:5660
Using docker run
This command starts the container, maps host port 5660 to the application's port 8080 inside the container, sets the internal port using an environment variable, uses a persistent volume for configuration, and runs the latest image.
# Pull the latest image
docker pull reginleif88/proxtagger:latest

# Run the container
docker run --detach --name proxtagger_app \
  --publish 5660:5660 \
  --env PORT=5660 \
  --volume proxtagger_config:/app \
  --restart unless-stopped \
  reginleif88/proxtagger:latest
Open your browser and navigate to http://localhost:5660
Installation
-
Clone the repository:
git clone https://github.com/reginleif88/proxtagger.git cd proxtagger -
Install dependencies or do it in virtual env:
pip install -r requirements.txt -
Run the application:
python app.py -
Access the web interface: Open your browser and navigate to
http://localhost:5660(it also binds to other interfaces, you can change it inapp.py)
Configuration
API Token Setup
You'll need a Proxmox API token with the following permissions:
Required permissions:
VM.Audit(to list VMs and containers)VM.Config.Options(to read and modify tags)
Optional permissions (for conditional tagging features):
Sys.Audit(to get HA status and cluster resources)VM.Backup(to check backup status)VM.Snapshot(to check snapshot information)Datastore.Audit(may be needed for backup information)
Note: Without the optional permissions, basic tagging functionality will work, but some conditional tagging rules based on HA status, backups, or snapshots may not function properly.
To create an API token:
- Log in to your Proxmox web interface
- Navigate to Datacenter → Permissions → API Tokens
- Click "Add" and follow the prompts
- Important: Note down both the token ID/name and secret - the secret is only shown once!
- Ensure the token has the required privileges (VM.Audit, VM.Config.Options)
First-time Setup
-
On first launch, you'll be prompted to enter your Proxmox connection details:
- Host (IP or domain)
- Port (default: 8006)
- User (e.g., root@pam)
- Token name and value
- SSL verification toggle (disable for self-signed certificates)
-
After successful connection, the system automatically creates an initial tag backup
Usage Guide
VM/Container Table
- Use the search bar (top right) to filter the table. Regex is supported. Use the 'X' button to clear the search.
- Click column headers to sort the table.
- Use the pagination controls at the bottom to navigate through pages if you have many VMs/Containers.
Tag Management
- Individual Tags: Click the "+" button in the "Tags" column for any VM/Container to add tags individually. Click the 'x' on a tag chip to remove it.
- Bulk Operations: Use the "Bulk Tag Management" panel to perform actions on multiple VMs/Containers:
- Select VMs/Containers using the checkboxes in the first column. Your selections are remembered even if you change pages or apply filters.
- Use the "Filter VMs" section within the bulk panel to narrow down the list by Host, VMID range, or Name pattern. Click "Select All Filtered" to quickly select all VMs matching your filters.
- Click "Clear Selected VMs" to deselect all currently checked VMs/Containers.
- Choose "Add Tags" or "Remove Tags" operation.
- Select existing tags or create new ones (new tags only possible in "Add" mode).
- Click "Apply" to execute the changes on all selected VMs/Containers.
Conditional Tags
- Access: Click "Conditional Tags" in the navigation menu to access the automated tagging system.
- Quick Templates: Use pre-built templates for common tagging scenarios:
- Debian LXC Tagging: Automatically tag all Debian-based containers as "deb-lxc"
- HA Validation: Add "HA" tag to VMs with both replication and HA enabled, remove from others
- High-Resource VMs: Tag VMs with more than 4 cores and 8GB RAM as "high-resource"
- Custom Rules: Create your own rules using the rule builder:
- Add conditions based on VM properties (CPU, memory, OS type, HA status, etc.)
- Use AND/OR logic to combine multiple conditions
- Set THEN actions (tags to add/remove for matching VMs)
- Set ELSE actions (tags to add/remove for non-matching VMs)
- Configure scheduling with cron expressions for automatic execution
- Testing: Use "Test Rule" to perform a dry-run and preview which VMs would be affected.
- Management: View, edit, delete, and execute rules from the rules table. Monitor execution history and results.
Backup & Restore
- Export Tags: Click "Export Tags" in the sidebar to download a backup JSON file.
- Import Tags: Click "Import Tags" and select a previously exported backup file.
- Note: When restoring tags, the system matches VMs by VMID, Node, and Type, and replaces all existing tags with imported ones. Feedback is provided if VMs from the backup file cannot be found.
Troubleshooting
Common Issues
- No VMs Visible: Ensure your API token has
VM.AuditandVM.Config.Optionspermissions at the appropriate level (/ or node-specific). - Conditional Tagging Issues: If certain conditional tagging properties don't work:
- HA properties: Requires
Sys.Auditpermission - Backup status: Requires
VM.Backupand possiblyDatastore.Auditpermissions - Snapshot information: Requires
VM.Snapshotpermission
- HA properties: Requires
- Connection Failed: Check your hostname, port and network connectivity.
- SSL Errors: Toggle off SSL verification if you're using self-signed certificates.
- Regex Search Issues: Ensure you are using valid JavaScript regex syntax in the search bar. Invalid patterns may cause errors or unexpected results (check dev console).
Technical Details
ProxTagger is built using:
- Backend: Python with Flask web framework. Uses Jinja2 for templating.
- Frontend: Bootstrap 5 for styling, DataTables for table interactivity, and custom JavaScript organized into ES Modules.
- Storage: Local .json files for connection details and data.
Contributing
Contributions are welcome! Please feel free to submit a Pull Request.
- Fork the Project
- Create your Feature Branch
- Commit your Changes
- Push to the Branch
- Open a Pull Request
License
This project is licensed under the MIT License - see the LICENSE file for details.
Acknowledgements
- Flask - The web framework used
- Bootstrap - UI framework
- Bootstrap Icons - Icon set
- DataTables - Table enhancement library
- Proxmox Team - For their amazing virtualization platform
Tag summary
Content type
Image
Digest
sha256:d49bf244e…
Size
53.6 MB
Last updated
5 months ago
docker pull reginleif88/proxtagger