sdcplatform/django-oauth2-test
Django oauth2 server for RAS
10K+
sdcplatform/django-oauth2-test repository overview

Django OAuth2 Server
Implementation of OAuth2 Server for Django. Feel free to fork this repository and contribute.
This code is taken from a git clone of: https://github.com/RichardKnop/django-oauth2-server/blob/master/README.md#scope
Written for Django 1.9 Python 2.7 :)
Quick Start on docker
docker-compose up -d
This runs up the oauth2 server and a postgres database. Check the logs for the oauth2-service as it may require the restart of the oauth2-service
docker restart oauth2-service
This is due to race conditions in the start up of the database and migration of the database tables, these need to be handled at application level and are not controlled by docker compose.
Quick Start on localhost
- Use pipenv to create a virtual environment. Note that this service runs on python version 2.7.10. You can manage python versions using pyenv
$ pip install pipenv
$ pipenv install
- Edit the settings in the below file to point at a local PostgreSQL instance
./oauth2server/proj/settings/local.py
- Migrate the model's tables into the above database
pipenv run ./oauth2server/manage.py migrate
- Add the default oauth2 client credentials and HTTP basic auth credentials
pipenv run ./oauth2server/manage.py loaddata ons_credentials
- Create a Django super user
    export OAUTH2_SUPER_USER=admin
    export OAUTH2_SUPER_USER_PASSWORD=password
    export [email protected]
    bash ./init_db.sh
- Index the web app's UI static files (css, js, jpeg etc)
pipenv run ./oauth2server/manage.py collectstatic --noinput
-
Start the server on your dev default port with either;
- the django development web server
pipenv run oauth2server/manage.py runserver 0.0.0.0:8040- or the gunicorn web server
pipenv run gunicorn --bind 0.0.0.0:8040 --workers 4 proj.wsgi --pythonpath 'oauth2server' -
Navigate to the management UI for the running server (u: admin p: password)
http://localhost:8040/admin/
Admin API
The OAuth2 server now has an admin interface. This has it's own REST endpoint to allow a client with the correct client_id and client_secret to interact with the Interface.
The endpoint is at /api/account/create and accepts [POST],[PUT] and [DELETE] but [GET] is not implemented yet.
HTTP POST Message
- Mandatory Parameters [POST] In other words to create a new user
HTTP Basic Authentication client_id: client_secret username: This should be the username to populate the users of the OAuth2 server. It should be in an email format and will be checked to be unique password: This is a password for that user. client_id: This is the client_id making the request to use the admin interface API. This should be the same as the user in the authentication header client_secret: This is the password of the client_id.
curl -X POST http://localhost:8040/api/account/create/ -u [email protected]:password -d '[email protected]&password=password&[email protected]@client_secret=password'
- Optional Parameters
scope: This is a list of coma delimited scopes used to provision this user. This would look like: account_verified This is a boolean flag in the database so should be either 'true' or 'false'
"scope": "foo bar respondent.read respondent.write" "account_verified":"true"
-d '[email protected]&password=password&scope=foo&scope=bar&scope=respondent.read&scope=respondent.wirte.....&account_verified=true'
HTTP DELETE Message
- Mandatory Parameters [DELETE] This will delete a user.
HTTP Basic Authentication client_id: client_secret username: This should be the username to populate the users of the OAuth2 server. It should be in an email format and will be checked to be unique client_id: This is the client_id making the request to use the admin interface API. This should be the same as the user in the authentication header client_secret: This is the password of the client_id.
curl -X DELETE http://localhost:8040/api/account/create/ -u [email protected]:password -d '[email protected]&[email protected]&client_secret=password'
HTTP PUT Message
- Mandatory Parameters [PUT] This allows the client to update user accounts. HTTP Basic Authentication client_id: client_secret username: This should be the username to target the change on the OAuth2 server. It should be in an email format and will be checked to exist. client_id: This is the client_id making the request to use the admin interface API. This should be the same as the user in the authentication header client_secret: This is the password of the client_id.
curl -X PUT http://localhost:8008/api/account/create/ -u [email protected]:password -d '[email protected]&[email protected]&client_secret=password'
Note, the above PUT curl command will not actually change anything for that user. To change anything you need to specifiy one or all of the optional parameters.
- Optional Parameters
password: The password of the user. If it's not present the password will not be changed. scope: This is a list of coma delimited scopes used to provision this user. This would look like: account_verified This is a boolean flag in the database so should be either 'true' or 'false'. new_username This is the new user ID of a user if they are to be updated. In this case the new_username has to be unique to the database or will fail with a duplicate user error. "scope": "foo bar respondent.read respondent.write" "account_verified":"true"
Some examples are:
- To update the account_verified to be true:
curl -X PUT http://localhost:8008/api/account/create/ -u [email protected]:password -d '[email protected]&[email protected]&client_secret=password&account_verified=true'
- To update the account_verified and password:
curl -X PUT http://localhost:8008/api/account/create/ -u [email protected]:password -d '[email protected]&[email protected]&client_secret=password&password=Passw0rd.&account_verified=true'
- To update the password, account_verified and change the user name to a new email address:
curl -X PUT http://localhost:8008/api/account/create/ -u [email protected]:password -d '[email protected]&password=password&[email protected]&client_secret=password&account_verified=true&[email protected]'
Good Version of CURL for grant_type = password
curl -X POST localhost:8000/api/v1/tokens/ -d 'grant_type=password&username=[email protected]&password=password&client_id=[email protected]&client_secret=password'
For this to work you need to populate tables in admin to have : client_id client_secret username userpassword
Good Version of CURL for grant_type = authorization_code
curl localhost:8000/api/v1/tokens/ -d 'grant_type=authorization_code&client_id=[email protected]&client_secret=password&code=263c9414-4709-4964-8ba1-91782cde6335'
For this to work you need to populate tables in admin to have : client_id client_secret username userpassword
You also need a valid access code to get your token. You could get this with:
Cloud Foundry
The application has manifest, Procfile and an init_db.sh script to allow it to be pushed to cloud foundry easily.
The manifest_develop_cloudfoundry.yml defines a basic server which needs a bouNd service called oauth-db. This will dynamically pick a DB config from Cloud Foundry which are environment variables exposed at run time. You will need to create a CF postgres service with this name.
The Procfile will migrate the database and on first load the init_db.sh script will create a super user. This shell script is idempotent so can be deployed multiple times to the same system. The profile will then call up the runserver command and run the system on default port 8080.
The manifest file also sets the DJANGO_SETTINGS_MODULE to the cloud_foundry_settings.py file which pics up all the dynamic variables.
Grant Types
Authorization Code
http://tools.ietf.org/html/rfc6749#section-4.1
Insert test data:
$ pipenv run oauth2server/manage.py loaddata test_credentials
$ pipenv run oauth2server/manage.py loaddata test_scopes
Run the development web server:
$ pipenv run oauth2server/manage.py runserver
And you can now go to this page in your web browser:
http://localhost:8000/web/authorize/?response_type=code&client_id=testclient&redirect_uri=https://www.example.com&state=somestate
You should see a screen like this:
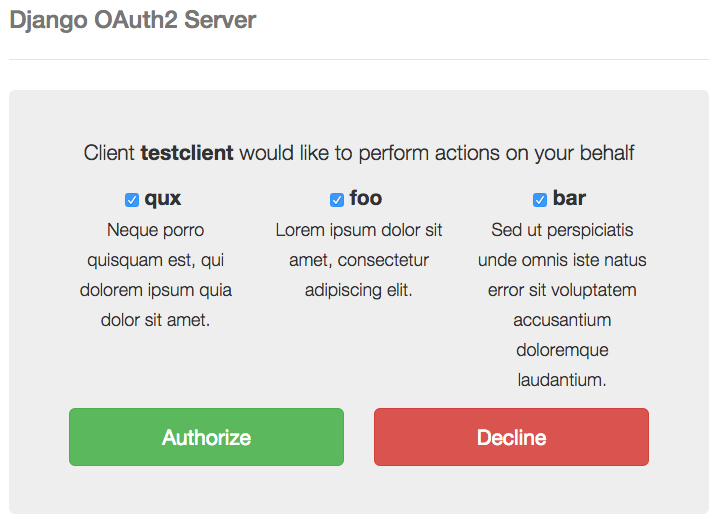
Click yes, you will be redirected to the redirect_uri and the authorization code will be in the query string. For example:
https://www.example.com/?code=cd45169cf6575f76d789f55764cb751b4d08274d&state=somestate
You can use it to get access token:
http://tools.ietf.org/html/rfc6749#section-4.1.3
$ curl -u testclient:testpassword localhost:8080/api/v1/tokens/ -d 'grant_type=authorization_code&code=cd45169cf6575f76d789f55764cb751b4d08274d'
You should get a response like:
{
    "id": 1,
    "access_token": "00ccd40e-72ca-4e79-a4b6-67c95e2e3f1c",
    "expires_in": 3600,
    "token_type": "Bearer",
    "scope": "foo bar qux",
    "refresh_token": "6fd8d272-375a-4d8a-8d0f-43367dc8b791"
}
Implicit
http://tools.ietf.org/html/rfc6749#section-4.2
Very similar to the authorization code but the token is returned in URL fragment.
Insert test data:
$ pipenv run oauth2server/manage.py loaddata test_credentials
$ pipenv run oauth2server/manage.py loaddata test_scopes
Run the development web server:
$ pipenv run oauth2server/manage.py runserver
And you can now go to this page in your web browser:
http://localhost:8080/web/authorize/?response_type=token&client_id=testclient&redirect_uri=https://www.example.com&state=somestate
You should see a screen like this:
Click yes, you will be redirected to the redirect_uri and the access token code will be in the URL fragment. For example:
https://www.example.com#access_token=66b80fb9d6630705bcea1c9be0df2a5f7f7a52bf&expires_in=3600&token_type=Bearer&state=somestate
User Credentials
http://tools.ietf.org/html/rfc6749#section-4.3
Insert test data:
$ pipenv run oauth2server/manage.py loaddata test_credentials
$ pipenv run oauth2server/manage.py loaddata test_scopes
Run the development web server:
$ pipenv run oauth2server/manage.py runserver
And you can now get a new access token:
$ curl -u testclient:testpassword localhost:8080/api/v1/tokens/ -d 'grant_type=password&[email protected]&password=testpassword'
You should get a response like:
{
    "id": 1,
    "access_token": "00ccd40e-72ca-4e79-a4b6-67c95e2e3f1c",
    "expires_in": 3600,
    "token_type": "Bearer",
    "scope": "foo bar qux",
    "refresh_token": "6fd8d272-375a-4d8a-8d0f-43367dc8b791"
}
Client Credentials
http://tools.ietf.org/html/rfc6749#section-4.4
Insert test data:
$ pipenv run oauth2server/manage.py loaddata test_credentials
$ pipenv run oauth2server/manage.py loaddata test_scopes
Run the development web server:
$ pipenv run oauth2server/manage.py runserver
And you can now get token either using HTTP Basic Authentication:
$ curl -u testclient:testpassword localhost:8080/api/v1/tokens/ -d 'grant_type=client_credentials'
Or using POST body:
$ curl localhost:8000/api/v1/tokens/ -d 'grant_type=client_credentials&client_id=testclient&client_secret=testpassword'
You should get a response like:
{
    "id": 1,
    "access_token": "00ccd40e-72ca-4e79-a4b6-67c95e2e3f1c",
    "expires_in": 3600,
    "token_type": "Bearer",
    "scope": "foo bar qux",
    "refresh_token": "6fd8d272-375a-4d8a-8d0f-43367dc8b791"
}
Refresh Token
Let's say you have created a new access token using the user credentials grant type. The response included a refresh token which you can use to get a new access token before your current access token expires.
$ curl -u testclient:testpassword localhost:8080/api/v1/tokens/ -d 'grant_type=refresh_token&refresh_token=55697efd4b74c980f2c638602556115bc14ca931'
And you get a new access token:
{
    "id": 1,
    "access_token": "00ccd40e-72ca-4e79-a4b6-67c95e2e3f1c",
    "expires_in": 3600,
    "token_type": "Bearer",
    "scope": "foo bar qux",
    "refresh_token": "6fd8d272-375a-4d8a-8d0f-43367dc8b791"
}
Scope
http://tools.ietf.org/html/rfc6749#section-3.3
Scope is quite arbitrary. Basically it is a space delimited case-sensitive string where each part defines a specific access range.
You can define your scopes and insert them into tokens_oauthscope table, is_default flag can be used to specify default scope.
Authentication
Now that you have obtained an access token, you can make requests to protected resources.
In order to require authentication for a view, wrap it in the authentication_required decorator:
from apps.tokens.decorators import authentication_required

@authentication_required("some_scope")
def some_view(request, *args, **kwargs):
    ...
Contributing
In order to contribute to this project, fork it and make a pull request. I will review and accept it.
All tests must be passing in order for the pull request to be accepted.
Installation
Clone the repository:
$ git clone https://github.com/RichardKnop/django-oauth2-server.git
Use pipenv to create a virtual environment. Note that this service runs on python version 2.7.10. You can manage python versions using pyenv
$ pip install pipenv
$ pipenv install
Create a local.py file and insert correct configuration details:
$ cp oauth2server/proj/settings/local.example.py oauth2server/proj/settings/local.py
$ nano cp oauth2server/proj/settings/local.py
Sync the database:
$ pipenv run oauth2server/manage.py syncdb
Configuration
These are the current configuration options:
OAUTH2_SERVER = {
    'ACCESS_TOKEN_LIFETIME': 3600,
    'AUTH_CODE_LIFETIME': 3600,
    'REFRESH_TOKEN_LIFETIME': 1209600,
    'IGNORE_CLIENT_REQUESTED_SCOPE': False,
}
- ACCESS_TOKEN_LIFETIME: lifetime of an access token in seconds
- AUTH_CODE_LIFETIME: lifetime of an authorization code in seconds
- REFRESH_TOKEN_LIFETIME: lifetime of a refresh token in seconds
- IGNORE_CLIENT_REQUESTED_SCOPE: if true, client requested scope will be ignored
Running Tests
$ pipenv run oauth2server/manage.py test
Tag summary
Content type
Image
Digest
Size
302 MB
Last updated
about 8 years ago
docker pull sdcplatform/django-oauth2-test