wangzan18/jenkins-agent
a Jenkins agent (FKA "slave") using JNLP to establish connection.
408
wangzan18/jenkins-agent repository overview
master
主要存放 jenkins master 的 yaml 文件,用于各种云环境
一、背景介绍
目前很多企业应用都已经容器化,版本发布比较多,构建的次数也比较多,相对于之前单台 jenkins 有了很大的挑战 ,传统的 Jenkins Slave 一主多从方式会存在一些痛点:
- 主 Master 发生单点故障时,整个流程都不可用了;
- 每个 Slave 的配置环境不一样,来完成不同语言的编译打包等操作,但是这些差异化的配置导致管理起来非常不方便,维护起来也是比较费劲;
- 资源分配不均衡,有的 Slave 要运行的 job 出现排队等待,而有的 Slave 处于空闲状态;
- 最后资源有浪费,每台 Slave 可能是实体机或者 VM,当 Slave 处于空闲状态时,也不会完全释放掉资源了。 kubernetes 集群之中,我们正是利用这一容器平台来实现 jenkins 的自动扩容。
jenkins集群架构图
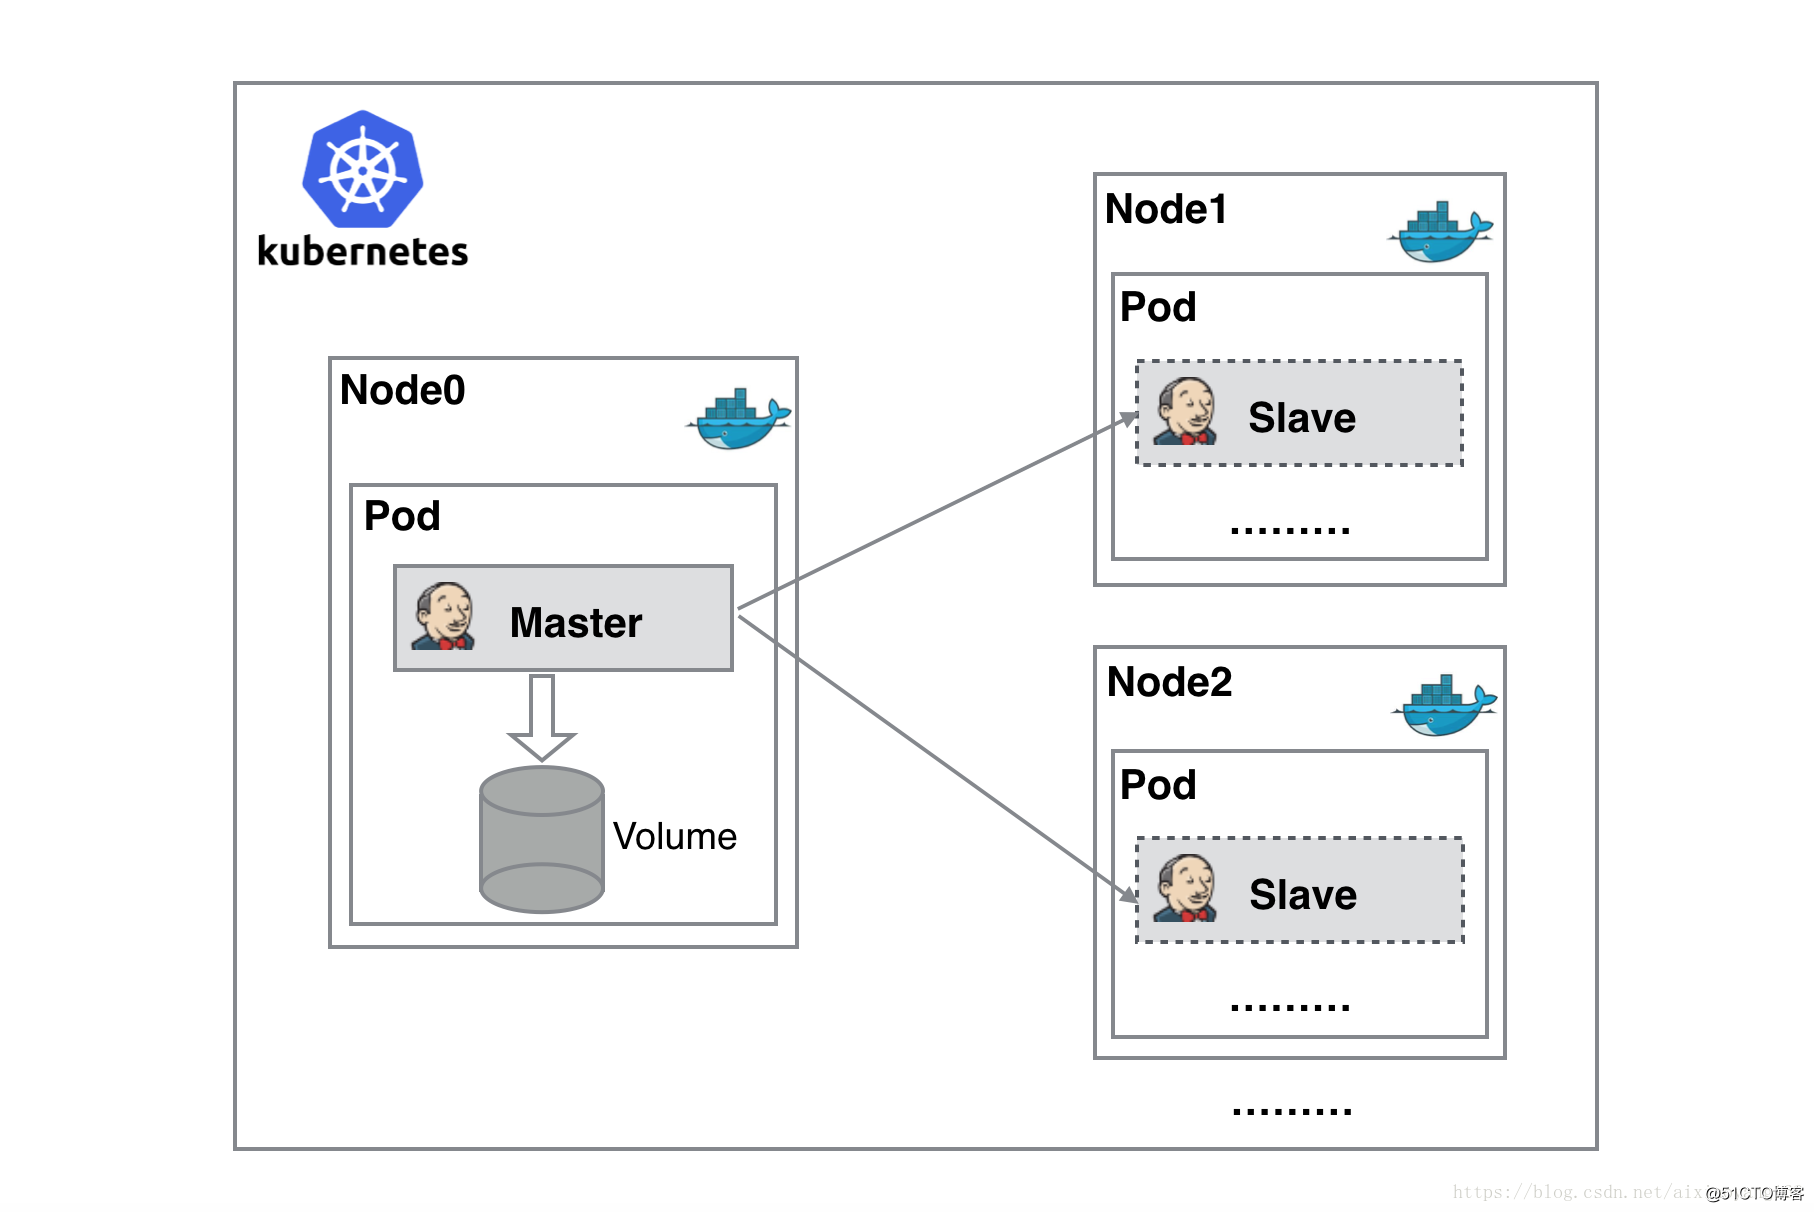
从图上可以看到 Jenkins Master 和 Jenkins Slave 以 Docker Container 形式运行在 Kubernetes 集群的 Node 上,Master 运行在其中一个节点,并且将其配置数据存储到一个 Volume 上去,Slave 运行在各个节点上,并且它不是一直处于运行状态,它会按照需求动态的创建并自动删除。
这种方式的工作流程大致为:当 Jenkins Master 接受到 Build 请求时,会根据配置的 Label 动态创建一个运行在 Docker Container 中的 Jenkins Slave 并注册到 Master 上,当运行完 Job 后,这个 Slave 会被注销并且 Docker Container 也会自动删除,恢复到最初状态。
这种方式带来的好处有很多:
- 服务高可用,当 Jenkins Master 出现故障时,Kubernetes 会自动创建一个新的 Jenkins Master 容器,并且将 Volume 分配给新创建的容器,保证数据不丢失,从而达到集群服务高可用。
- 动态伸缩,合理使用资源,每次运行 Job 时,会自动创建一个 Jenkins Slave,Job 完成后,Slave 自动注销并删除容器,资源自动释放,而且 Kubernetes 会根据每个资源的使用情况,动态分配 Slave 到空闲的节点上创建,降低出现因某节点资源利用率高,还排队等待在该节点的情况。
- 扩展性好,当 Kubernetes 集群的资源严重不足而导致 Job 排队等待时,可以很容易的添加一个 Kubernetes Node 到集群中,从而实现扩展。
二、部署 jenkins
我们把 master 节点部署到 k8s 集群中,大家可以参照 官方 github 文档进行配置,我这里进行了一点简化,我这里使用的是 nfs 来存储 jenkins 的数据,用于进行持久存储。
kubectl apply -f https://raw.githubusercontent.com/wangzan18/jenkins-cicd/master/master/jenkins.yaml
说明一下:这里 Service 我们暴漏了端口 8080 和 50000,8080 为访问 Jenkins Server 页面端口,50000 为创建的 Jenkins Slave 与 Master 建立连接进行通信的默认端口,如果不暴露的话,Slave 无法跟 Master 建立连接。这里使用 NodePort 方式暴漏端口,并未指定其端口号,由 Kubernetes 系统默认分配,当然也可以指定不重复的端口号(范围在 30000~32767)。
2.1、配置 kubernetes plugin
Jenkins 的配置过程我这里不再掩饰,我们直接配置 kubernetes plugin。 管理员账户登录 Jenkins Master 页面,点击 “系统管理” —> “管理插件” —> “可选插件” —> “Kubernetes plugin” 勾选安装即可。
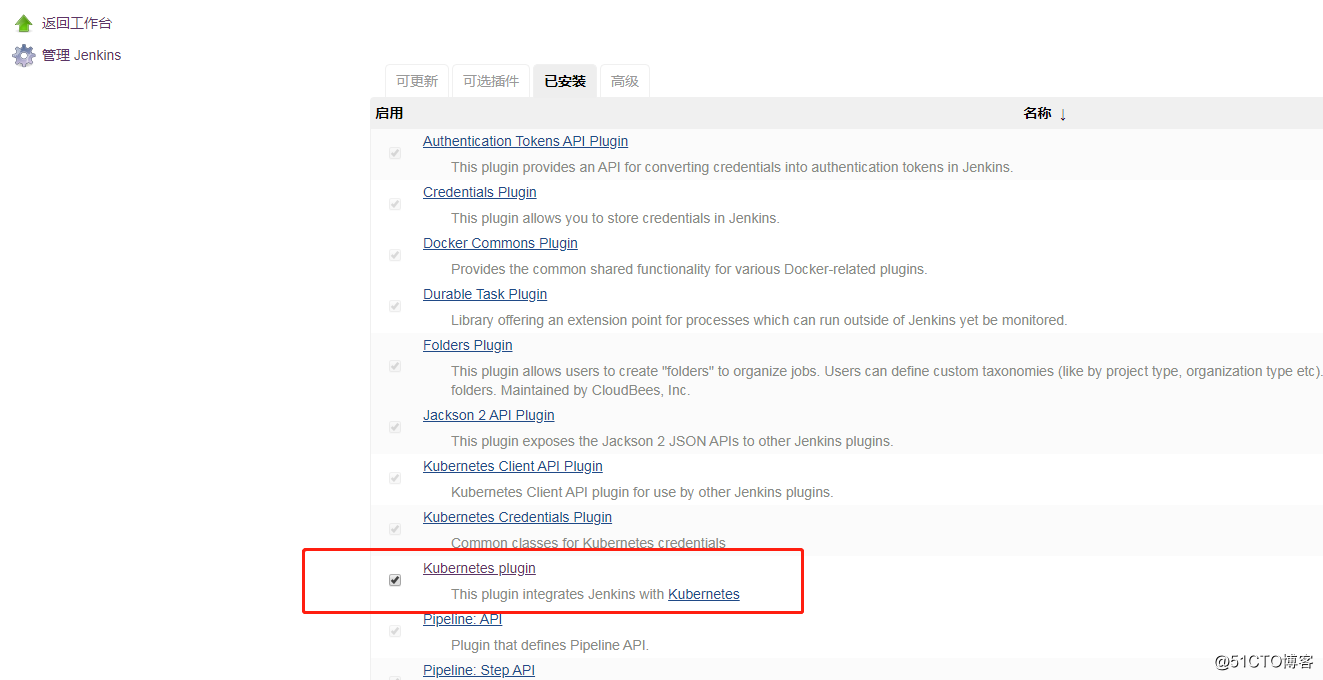
安装完毕后,点击 “系统管理” —> “系统设置” —> “新增一个云” —> 选择 “Kubernetes”,然后填写 Kubernetes 和 Jenkins 配置信息。
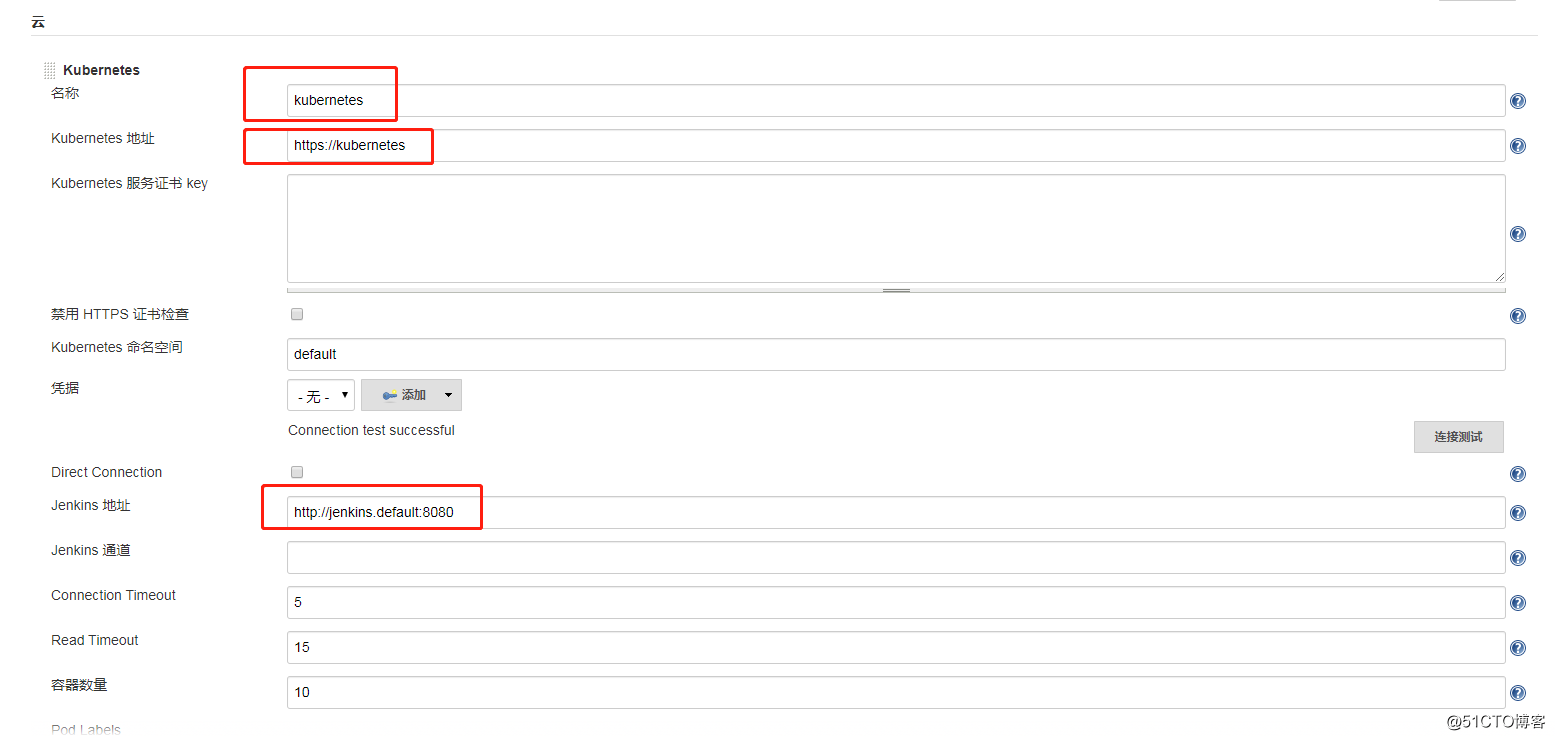
说明一下:
- Name 处默认为 kubernetes,也可以修改为其他名称,如果这里修改了,下边在执行 Job 时指定 podTemplate() 参数 cloud 为其对应名称,否则会找不到,cloud 默认值取:kubernetes。
- **Kubernetes URL **处我填写了 https://kubernetes 这里我填写了 Kubernetes Service 对应的 DNS 记录,通过该 DNS 记录可以解析成该 Service 的 Cluster IP,注意:也可以填写 https://kubernetes.default.svc.cluster.local 完整 DNS 记录,因为它要符合
<svc_name>.<namespace_name>.svc.cluster.local的命名方式,或者直接填写外部 Kubernetes 的地址https://<ClusterIP>:<Ports>。 - Jenkins URL 处我填写了 http://jenkins.default:8080 ,跟上边类似,也是使用 Jenkins Service 对应的 DNS 记录,不过要指定为 8080 端口,因为我们设置暴漏 8080 端口。同时也可以用
http://<ClusterIP>:<Node_Port>方式。
配置完毕,可以点击 “Test Connection” 按钮测试是否能够连接的到 Kubernetes,如果显示 Connection test successful 则表示连接成功,配置没有问题。
因为我们的 jenkins 是集群内部的 pod,所以它是可以直接和 kubernetes api 进行通信,并且我们也赋予了相应的权限,如果说 master 是创建在集群外部的,我们需要提前为 jenkins agent 创建一个 service account,然后把相应的 token 赋予到凭据的 sercet text。
三、pipeline job 验证测试
3.1、pipeline 支持
创建一个 Pipeline 类型 Job 并命名为 jenkins-pipeline,然后在 Pipeline 脚本处填写一个简单的测试脚本如下:
podTemplate {
    node(POD_LABEL) {
        stage('Run shell') {
            sh 'echo hello world'
						sh 'sleep 60'
        }
    }
}
创建还 job 之后,点击构建,我们会在构建队列中发现一个待执行的 job,因为我们在 pipeline 中要求 jenkins agent 节点的名称为 POD_LABEL,没有发现这个 agent,所以会去请求 kubernetes 去创建 agent 节点。
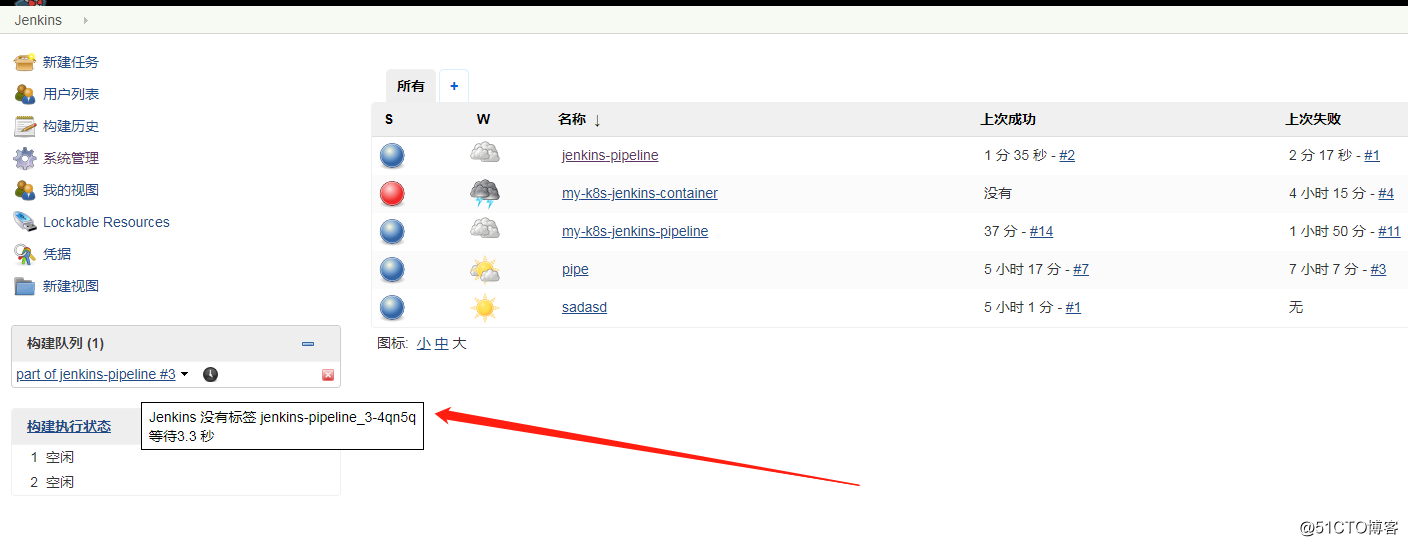
jenkins agent 节点创建好了之后,会去 jenkins master 注册,并去执行队列中的 job,完成之后取消注册,并自行销毁。
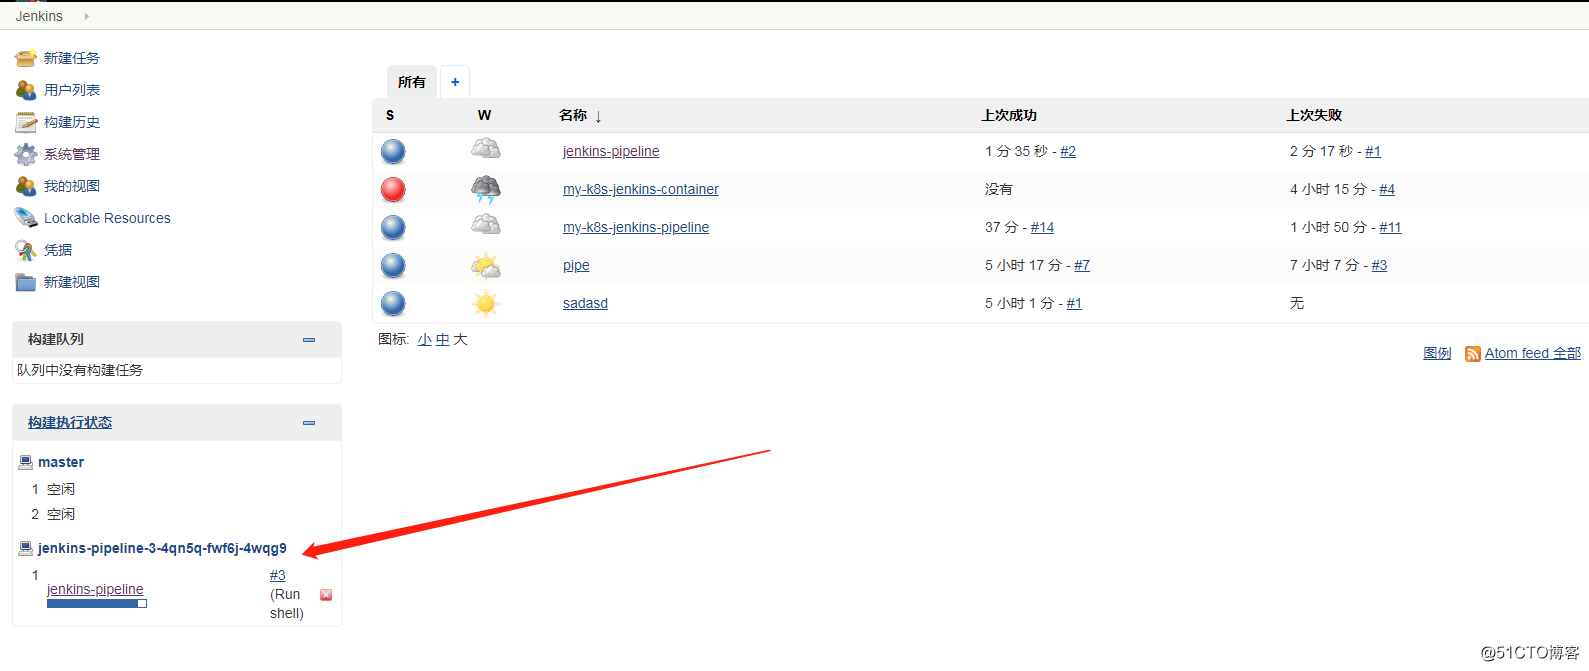
我们还可以去 console 查看构建日志。
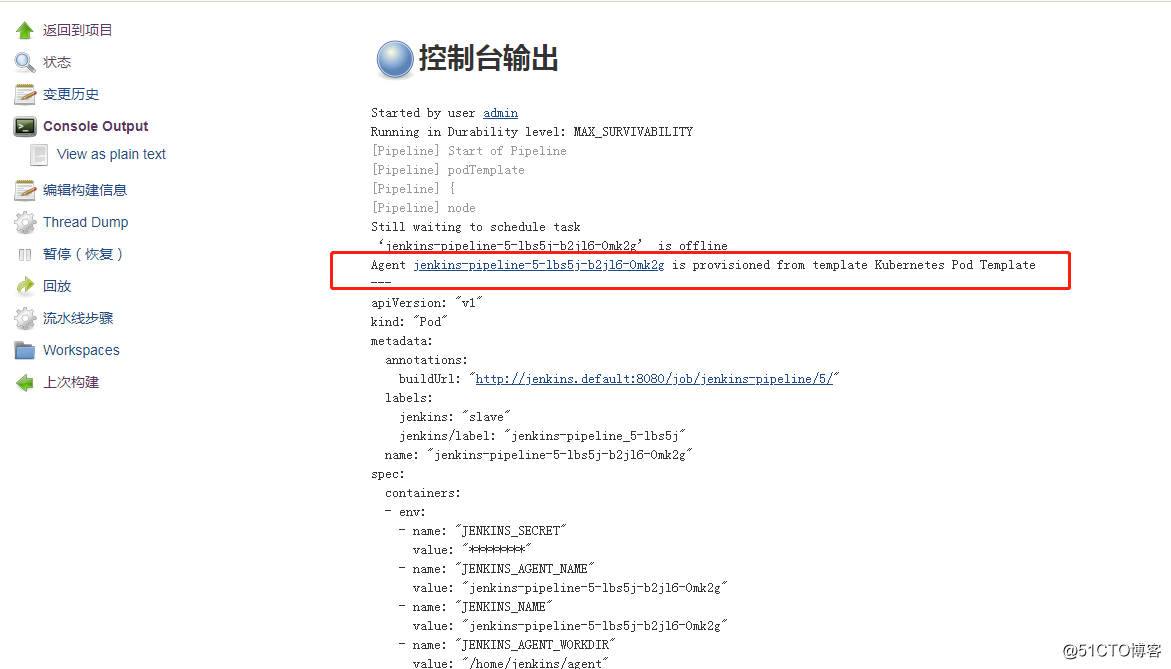
也可以在 k8s 上面看到启动的 agent 容器。
wangzan:~/k8s $ kubectl get pod --show-labels
NAME                                   READY   STATUS    RESTARTS   AGE   LABELS
jenkins-5df4dff655-f4gk8               1/1     Running   0          25m   app=jenkins,pod-template-hash=5df4dff655
jenkins-pipeline-5-lbs5j-b2jl6-0mk2g   1/1     Running   0          7s    jenkins/label=jenkins-pipeline_5-lbs5j,jenkins=slave
myapp1                                 1/1     Running   0          21h   app=myapp1
podTemplate
The podTemplate is a template of a pod that will be used to create agents. It can be either configured via the user interface, or via pipeline.
Either way it provides access to the following fields:
- cloud The name of the cloud as defined in Jenkins settings. Defaults to
kubernetes - name The name of the pod.
- namespace The namespace of the pod.
- label The label of the pod. Can be set to a unique value to avoid conflicts across builds, or omitted and
POD_LABELwill be defined inside the step. - yaml yaml representation of the Pod, to allow setting any values not supported as fields
- yamlMergeStrategy
merge()oroverride(). Controls whether the yaml definition overrides or is merged with the yaml definition inherited from pod templates declared withinheritFrom. Defaults tooverride(). - containers The container templates that are use to create the containers of the pod (see below).
- serviceAccount The service account of the pod.
- nodeSelector The node selector of the pod.
- nodeUsageMode Either 'NORMAL' or 'EXCLUSIVE', this controls whether Jenkins only schedules jobs with label expressions matching or use the node as much as possible.
- volumes Volumes that are defined for the pod and are mounted by ALL containers.
- envVars Environment variables that are applied to ALL containers.
- envVar An environment variable whose value is defined inline.
- secretEnvVar An environment variable whose value is derived from a Kubernetes secret.
- imagePullSecrets List of pull secret names, to pull images from a private Docker registry.
- annotations Annotations to apply to the pod.
- inheritFrom List of one or more pod templates to inherit from (more details below).
- slaveConnectTimeout Timeout in seconds for an agent to be online (more details below).
- podRetention Controls the behavior of keeping slave pods. Can be 'never()', 'onFailure()', 'always()', or 'default()' - if empty will default to deleting the pod after
activeDeadlineSecondshas passed. - activeDeadlineSeconds If
podRetentionis set to 'never()' or 'onFailure()', pod is deleted after this deadline is passed. - idleMinutes Allows the Pod to remain active for reuse until the configured number of minutes has passed since the last step was executed on it.
- showRawYaml Enable or disable the output of the raw Yaml file. Defaults to
true - runAsUser The user ID to run all containers in the pod as.
- runAsGroup The group ID to run all containers in the pod as.
- hostNetwork Use the hosts network.
3.2、Container Group
前面的 pipeline 中的 agent 是使用的默认的镜像 jenkins/jnlp-slave:3.35-5-alpine,我们也可以添加其他的一些镜像到 pod 里面。
创建一个 Pipeline 类型 Job 并命名为 jenkins-pipeline-container,然后在 Pipeline 脚本处填写一个简单的测试脚本如下:
podTemplate(containers: [
    containerTemplate(name: 'maven', image: 'maven:3.3.9-jdk-8-alpine', ttyEnabled: true, command: 'cat'),
    containerTemplate(name: 'golang', image: 'golang:1.8.0', ttyEnabled: true, command: 'cat')
  ]) {

    node(POD_LABEL) {
        stage('Get a Maven project') {
            git 'https://github.com/jenkinsci/kubernetes-plugin.git'
            container('maven') {
                stage('Build a Maven project') {
                    sh 'mvn -B clean install'
                }
            }
        }

        stage('Get a Golang project') {
            git url: 'https://github.com/hashicorp/terraform.git'
            container('golang') {
                stage('Build a Go project') {
                    sh """
                    mkdir -p /go/src/github.com/hashicorp
                    ln -s `pwd` /go/src/github.com/hashicorp/terraform
                    cd /go/src/github.com/hashicorp/terraform && make core-dev
                    """
                }
            }
        }

    }
}
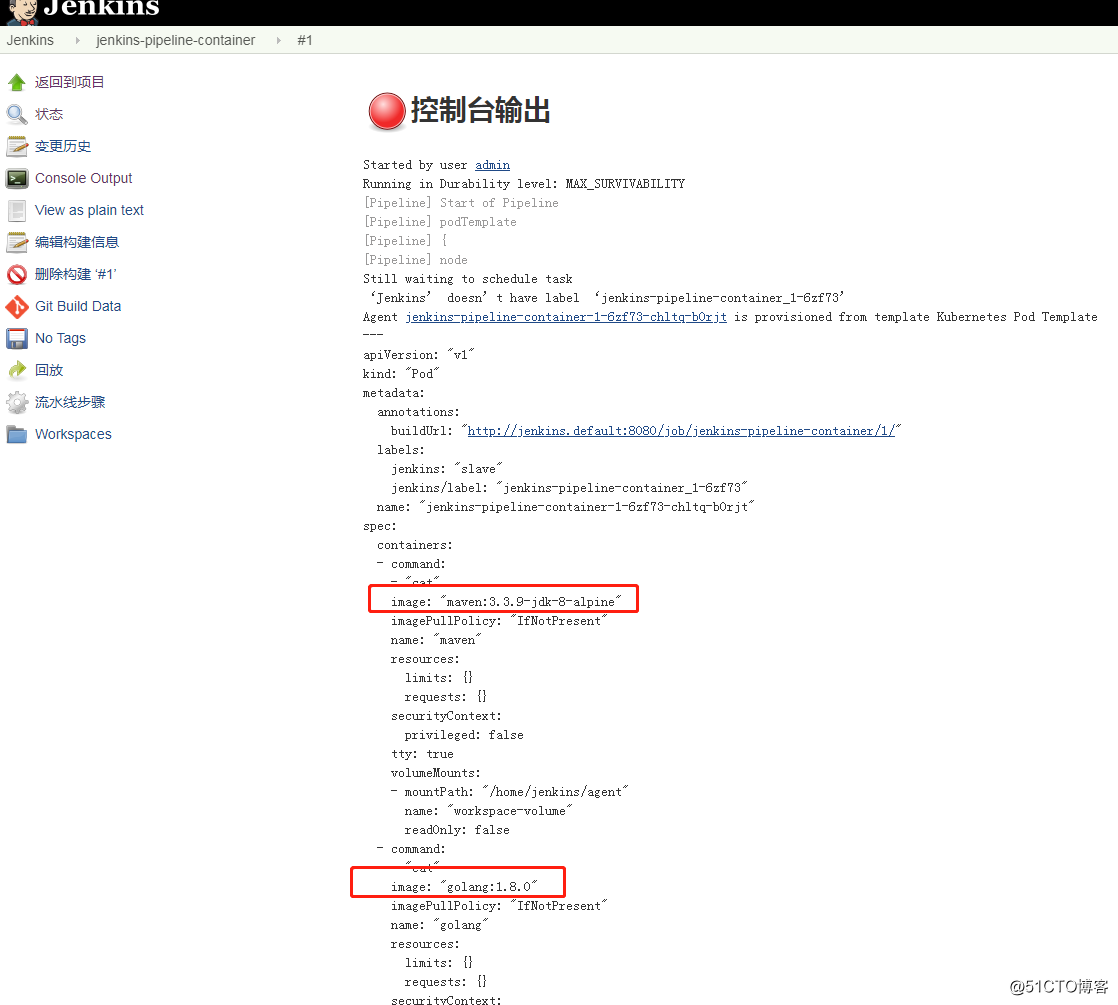
从 k8s 中也可以看到 pod 中存在三个容器。
wangzan:~/k8s $ kubectl get pod --show-labels
NAME                                             READY   STATUS    RESTARTS   AGE   LABELS
jenkins-5df4dff655-f4gk8                         1/1     Running   0          42m   app=jenkins,pod-template-hash=5df4dff655
jenkins-pipeline-container-1-6zf73-chltq-b0rjt   3/3     Running   0          70s   jenkins/label=jenkins-pipeline-container_1-6zf73,jenkins=slave
myapp1
containerTemplate
The containerTemplate is a template of container that will be added to the pod. Again, its configurable via the user interface or via pipeline and allows you to set the following fields:
- name The name of the container.
- image The image of the container.
- envVars Environment variables that are applied to the container (supplementing and overriding env vars that are set on pod level).
- envVar An environment variable whose value is defined inline.
- secretEnvVar An environment variable whose value is derived from a Kubernetes secret.
- command The command the container will execute.
- args The arguments passed to the command.
- ttyEnabled Flag to mark that tty should be enabled.
- livenessProbe Parameters to be added to a exec liveness probe in the container (does not support httpGet liveness probes)
- ports Expose ports on the container.
- alwaysPullImage The container will pull the image upon starting.
- runAsUser The user ID to run the container as.
- runAsGroup The group ID to run the container as.
3.3、使用 SCM
使用 SCM 可以有很多好处:
- 每次修改 pipeline 我们不用到 console 中去修改;
- 开发人员可以方便的自定义 pipeline,选择自己需要的 container;
- 当 jenkins 数据丢失,也不会丢掉 pipeline。
使用 SCM ,就需要我们把上面所写的 pipeline 代码放到 Jenkinsfile,一般是这个名字,当然也可以自定义名称,我们把上面第一个案例使用 SCM 运行一下,首先就是修改我们的 job。 我的 jenkinsfile 地址为 https://github.com/wangzan18/jenkins-cicd/blob/master/jenkinsfile/jenkins-pipeline-podtemplate.jenkinsfile 。
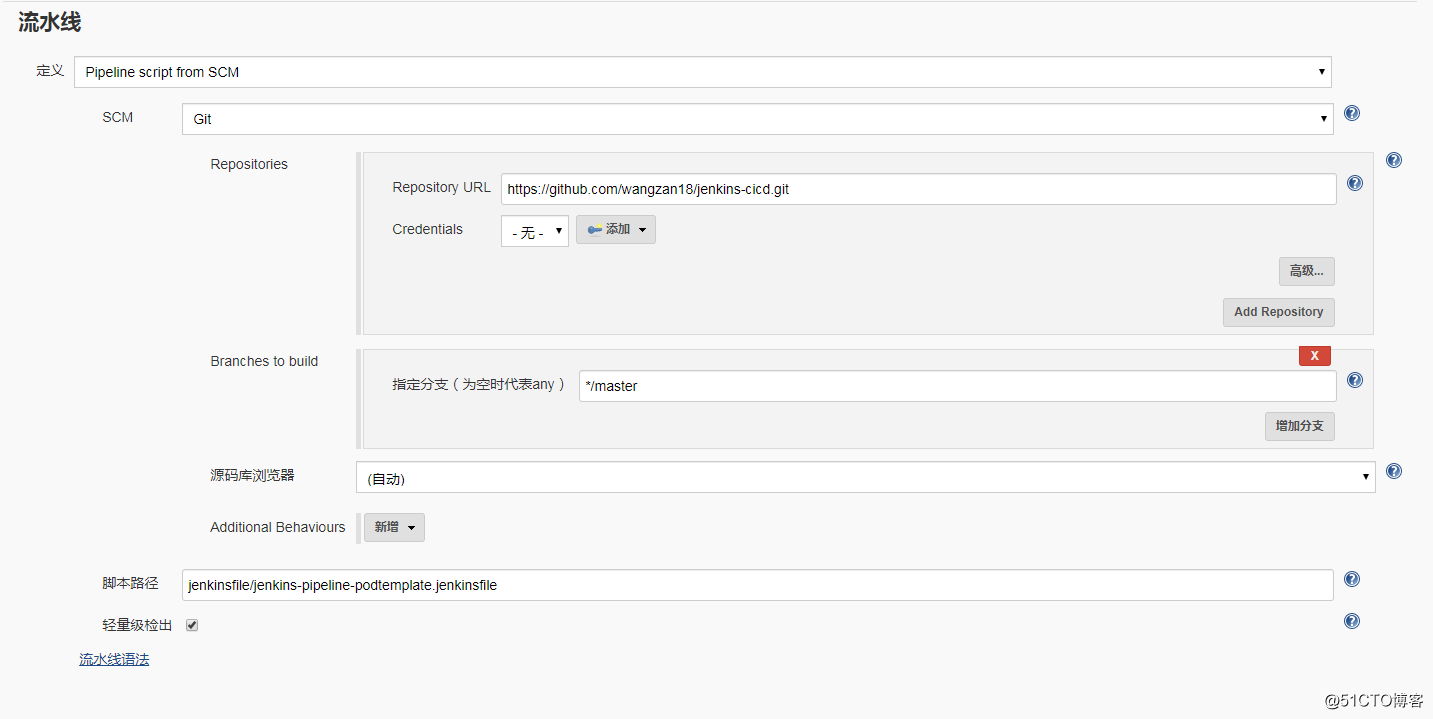
然后在控制台查看运行日志。
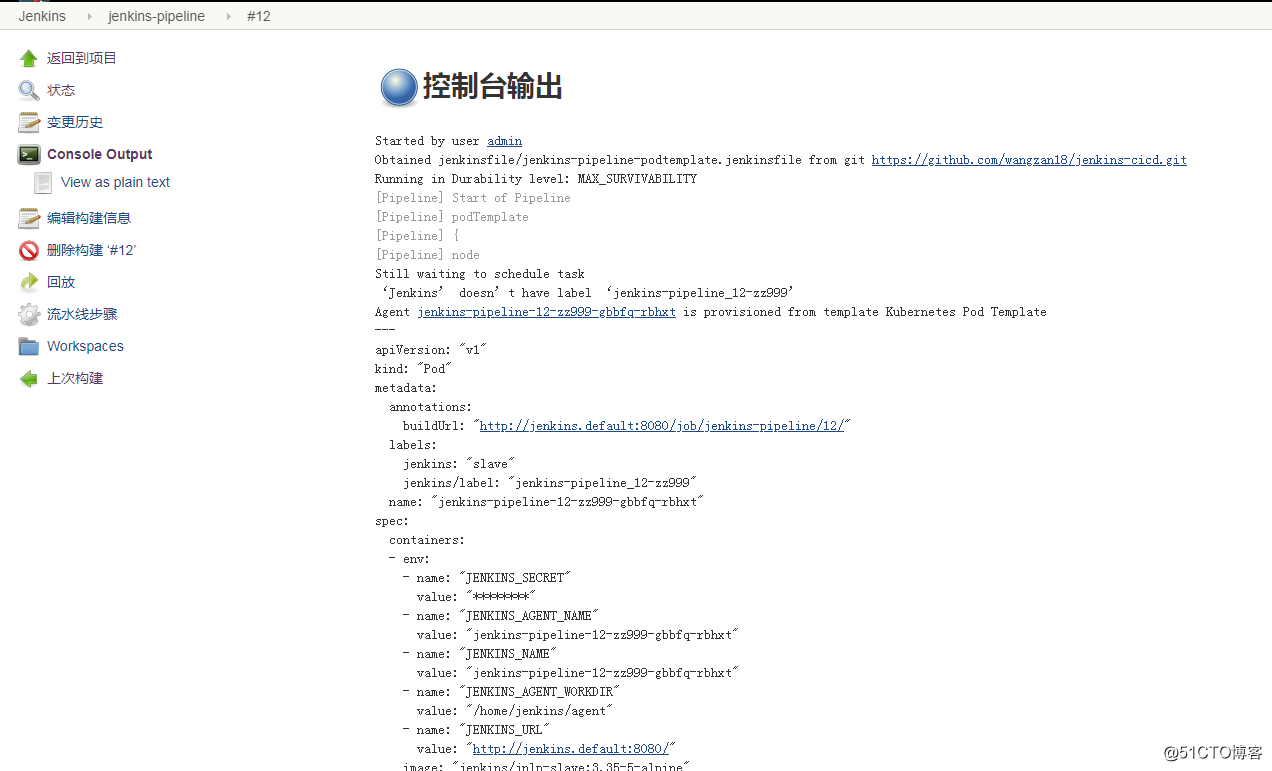
其他参数大家可以根据自己的情况进行设定。
四、普通 job 验证
Jenkins 中除了使用 Pipeline 方式运行 Job 外,通常我们也会使用普通类型 Job,如果也要想使用 kubernetes plugin 来构建任务 那么就需要点击 “系统管理” —> “系统设置” —> “云” —> “Kubernetes” —> “Add Pod Template” 进行配置 “Kubernetes Pod Template” 信息。
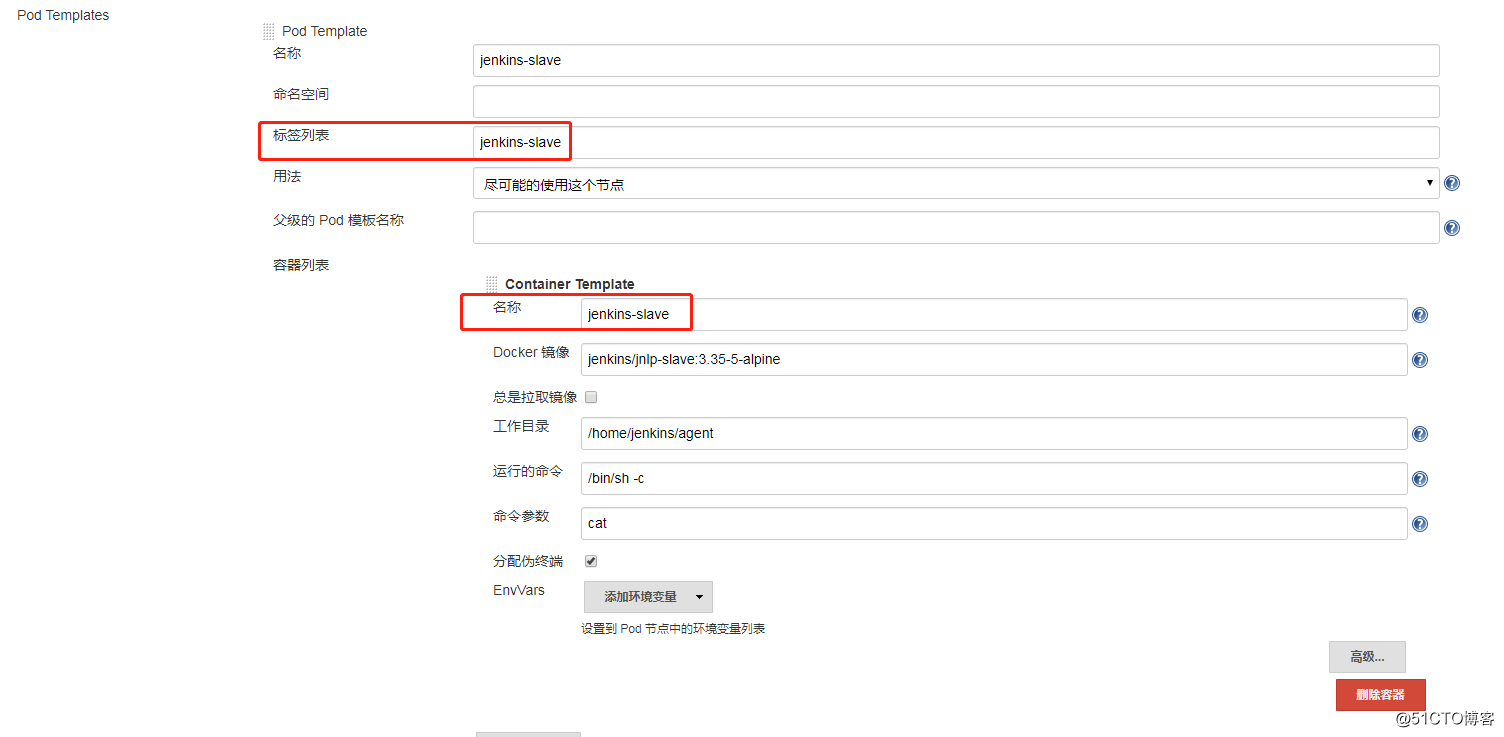
Labels 名:在配置非 pipeline 类型 Job 时,用来指定任务运行的节点。 Containers Name: 这里要注意的是,如果 Name 配置为 jnlp,那么 Kubernetes 会用下边指定的 Docker Image 代替默认的 jenkinsci/jnlp-slave 镜像,否则,Kubernetes plugin 还是会用默认的 jenkinsci/jnlp-slave 镜像与 Jenkins Server 建立连接,即使我们指定其他 Docker Image。这里我配置为 jenkins-slave,意思就是使用 plugin 默认的镜像与 jenkins server 建立连接,当我选择 jnlp 的时候,发现镜像无法与 jenkins server 建立连接,具体情况我也不太清楚,也有可能是镜像的问题。
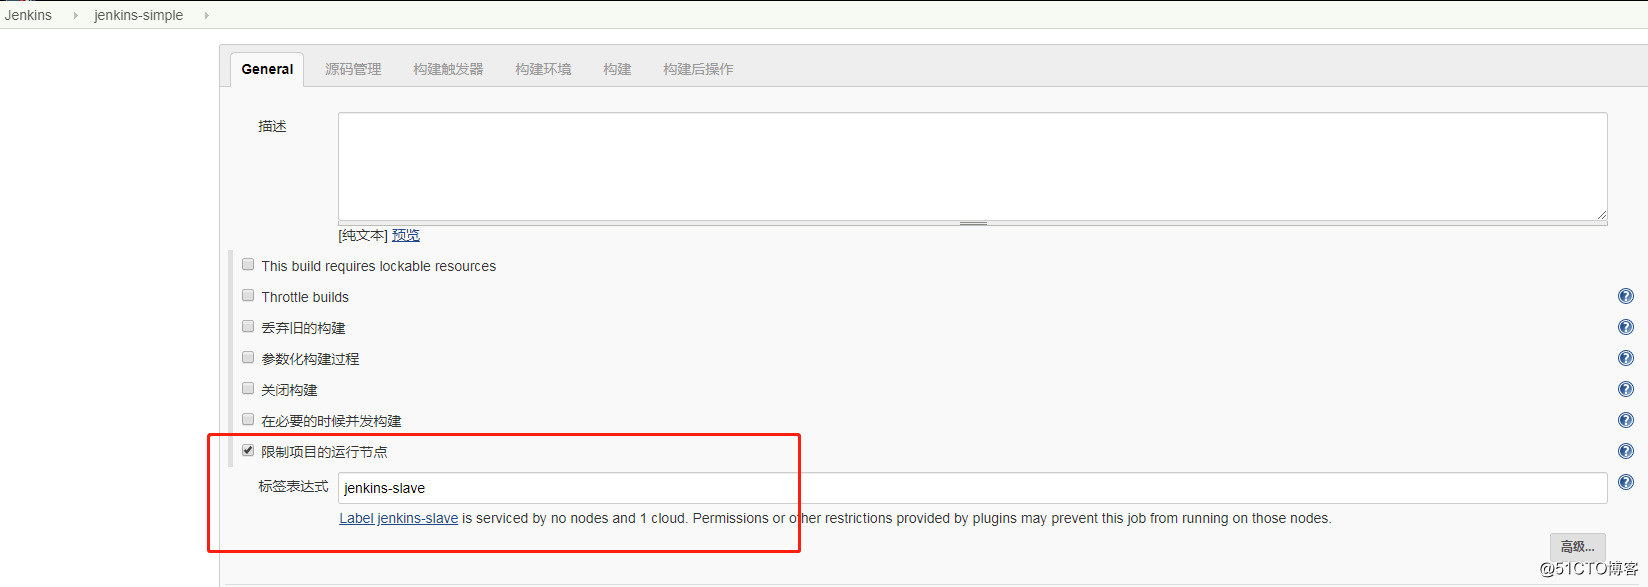
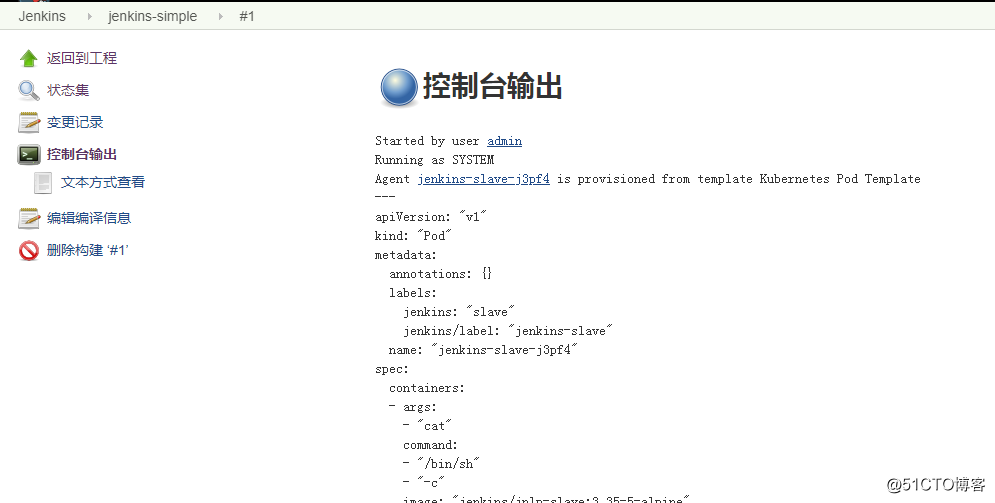
新建一个自由风格的 Job 名称为 jenkins-simple,配置 “Restrict where this project can be run” 勾选,在 “Label Expression” 后边输出我们上边创建模板是指定的 Labels 名称 jnlp-agent,意思是指定该 Job 匹配 jenkins-slave 标签的 Slave 上运行。
效果如我们预期所示:
五、自定义 jenkins-slave 镜像
前面我随便在 https://hub.docker.com/r/jenkins/jnlp-slave 中选择了一个镜像,发现无法与 jenkins server 建立连接,那我们就自己制作一个镜像。
通过 kubernetest plugin 默认提供的镜像 jenkinsci/jnlp-slave 可以完成一些基本的操作,它是基于 openjdk:8-jdk 镜像来扩展的,但是对于我们来说这个镜像功能过于简单,比如我们想执行 Maven 编译或者其他命令时,就有问题了,那么可以通过制作自己的镜像来预安装一些软件,既能实现 jenkins-slave 功能,又可以完成自己个性化需求,那就比较不错了。如果我们从头开始制作镜像的话,会稍微麻烦些,不过可以参考 jenkinsci/jnlp-slave 和 jenkinsci/docker-slave 这两个官方镜像来做,注意:jenkinsci/jnlp-slave 镜像是基于 jenkinsci/docker-slave 来做的。这里我简单演示下,基于 jenkinsci/jnlp-slave:latest 镜像,在其基础上做扩展,安装 Maven 到镜像内,然后运行验证是否可行吧,大家可以查看我的镜像:https://hub.docker.com/r/wangzan18/jenkins-slave-maven 。
podTemplate(containers: [
    containerTemplate(
        name: 'jnlp',
        image: 'wangzan18/jenkins-agent:maven-3.6.3',
        alwaysPullImage: false,
        args: '${computer.jnlpmac} ${computer.name}'),
  ]) {

    node(POD_LABEL) {
        stage('git pull') {
           echo "hello git"
        }
        stage('build') {
           sh 'mvn -version'
        }
        stage('test') {
            echo "hello test"
        }
        stage('deploy') {
            echo "hello deploy"
            sleep 10
        }
    }
}
这里 containerTemplate 的 name 属性必须叫 jnlp,Kubernetes 才能用自定义 images 指定的镜像替换默认的 jenkinsci/jnlp-slave 镜像。此外,args 参数传递两个 jenkins-slave 运行需要的参数。还有一点就是这里并不需要指定 container('jnlp'){...} 了,因为它被 Kubernetes 指定了要被执行的容器,所以直接执行 Stage 就可以了。
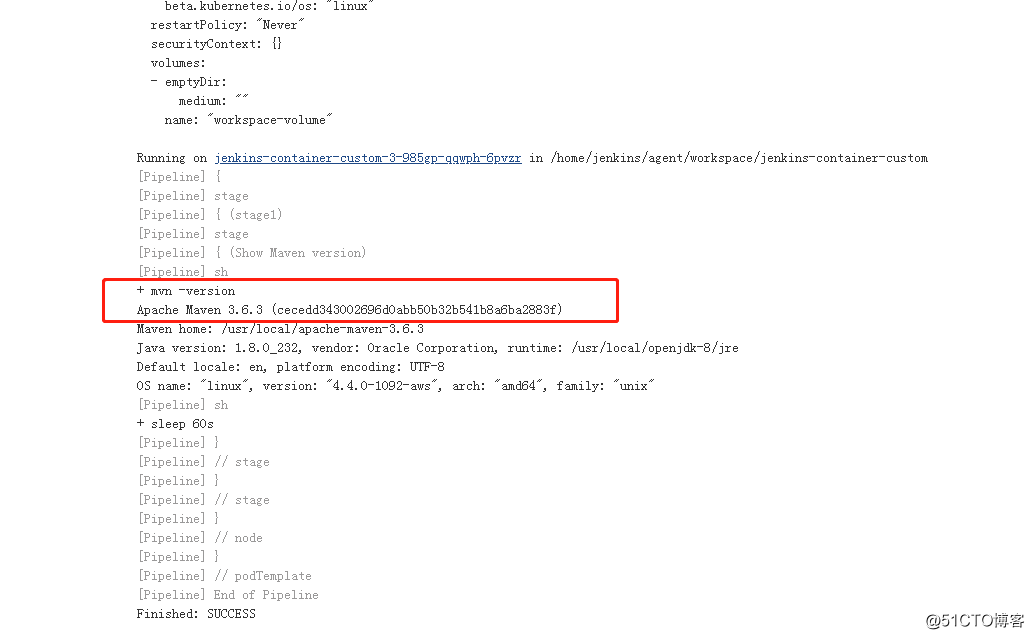
可以看到已经达到我们想要的效果,确实也是使用我们自定义的 jenkins-slave 镜像。
问题:非pipeline job
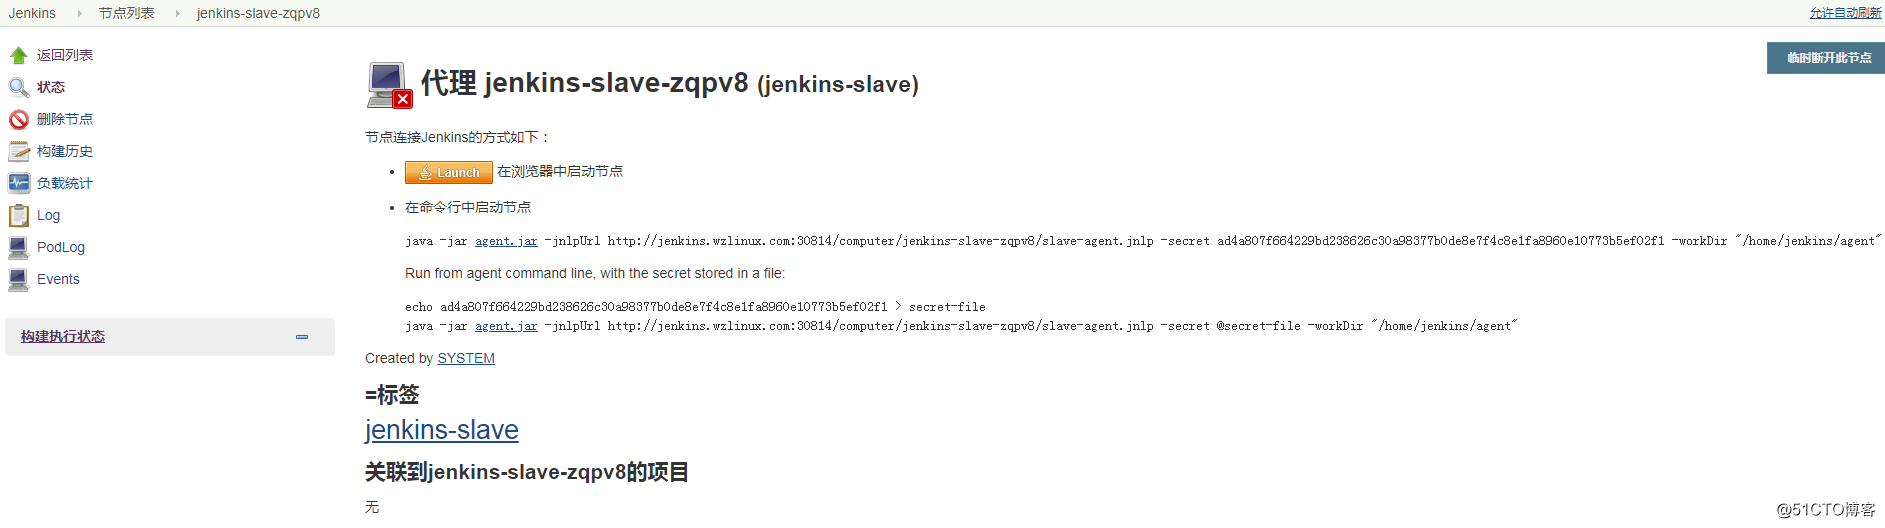
我测试的过程中,使用自由风格的 job,不管使用什么镜像,镜像就是无法自主连接 jenkins server,目前我也不清楚是哪里的原因,如果有知道的小伙伴可以留言回复。
Tag summary
Content type
Image
Digest
Size
223.4 MB
Last updated
over 6 years ago
docker pull wangzan18/jenkins-agent:maven-3.6.3