infraunnes/jupyternotebook-gpu
Jupyter Notebook with GPU Support TensorFlow and PyTorch. https://unnes.ac.id/ictcenter
664
infraunnes/jupyternotebook-gpu repository overview
Jupyter Notebook GPU
Jupyter Notebook with GPU Support, complete with TensorFlow and PyTorch stack. Feel free to use.
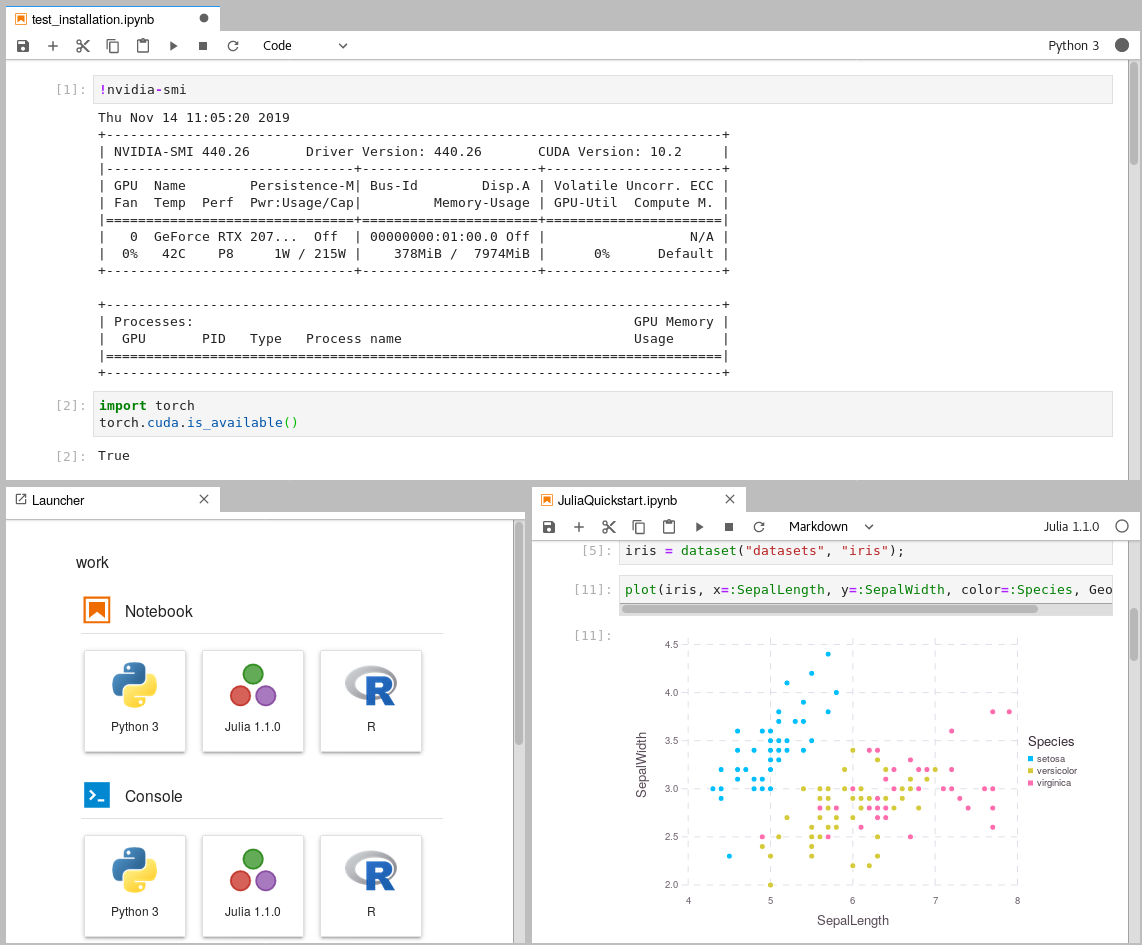
Big thanks to https://github.com/iot-salzburg/gpu-jupyter/
Contents
Quickstart
-
Ensure that you have access to a computer with an NVIDIA GPU.
-
Install Docker version 1.10.0+ and Docker Compose version 1.28.0+.
-
Get access to your GPU via CUDA drivers within Docker containers. You can confirm that you can access your GPU within Docker if the command below returns a result similar to this one:
docker run --rm --gpus all nvidia/cuda:12.5.1-cudnn-runtime-ubuntu22.04 nvidia-smiTue Nov 26 15:13:37 2024 +-----------------------------------------------------------------------------------------+ | NVIDIA-SMI 555.42.03 Driver Version: 555.85 CUDA Version: 12.5 | |-----------------------------------------+------------------------+----------------------+ | GPU Name Persistence-M | Bus-Id Disp.A | Volatile Uncorr. ECC | | Fan Temp Perf Pwr:Usage/Cap | Memory-Usage | GPU-Util Compute M. | | | | MIG M. | |=========================================+========================+======================| | 0 NVIDIA GeForce RTX 3060 ... On | 00000000:01:00.0 Off | N/A | | N/A 43C P8 12W / 60W | 4569MiB / 6144MiB | 0% Default | | | | N/A | +-----------------------------------------+------------------------+----------------------+ +-----------------------------------------------------------------------------------------+ | Processes: | | GPU GI CI PID Type Process name GPU Memory | | ID ID Usage | |=========================================================================================| | 0 N/A N/A 231 C /python3.11 N/A | +-----------------------------------------------------------------------------------------+It is important to keep your installed CUDA version in mind when you pull images. Note that you can't run images based on
nvidia/cuda:11.2if you have only CUDA version 10.1 installed, usenvcc --versionto get the correct cuda version. Additionally, a NVIDIA driver version of at least 520 is suggested, as the images are built and tested using this and later versions. -
Pull and run the image.
cd your-working-directory ll data # this path will be mounted by default docker run --gpus all -d -it -p 8848:8888 -v $(pwd)/data:/home/jovyan/work -e GRANT_SUDO=yes -e JUPYTER_ENABLE_LAB=yes --user root infraunnes/jupyternotebook-gpu:latestThis starts an instance of Jupyter Notebook GPU with the tag
infraunnes/jupyternotebook-gpu:latestat http://localhost:8848 (port8848). To log into Jupyterlab, you have to specify a token that you get from:docker exec -it [container-ID/name] jupyter server list # [JupyterServerListApp] Currently running servers: # [JupyterServerListApp] http://791003a731e1:8888/?token=5b96bb15be315ccb24643ea368a52cc0ba13657fbc29e409 :: /home/jovyanYou can optionally set a password in http://localhost:8848/login or as described below (former default password
gpu-jupyter). Additionally, data within the host'sdatadirectory is shared with the container.The following images of Jupyter Notebook GPU are available on Dockerhub:
latest(full image)python-only(only with a python interpreter and without Julia and R)slim(only with a python interpreter and without additional packages)
The latest version, e.g.
v1.8, declares the version of the generator setup. The Cuda version, e.g.cuda-12.5, must match the CUDA driver version and be supported by the GPU libraries. These and older versions of Jupyter Notebook GPU are listed on Dockerhub. In case you are using another version or the GPU libraries don't work on your hardware, please try to build the image on your own as described below. Note that the images built for Ubuntu 20.04 LTS work also on Ubuntu 22.04 LTS.
Within the Jupyterlab UI, ensure you can access your GPU by opening a new Terminal window and running nvidia-smi.
Start via Docker Compose
To start using docker-compose.yml, run the following command:
docker-compose up --build -d  # build and run in detached mode
docker-compose ps  # check if was successful
docker-compose logs -f  # view the logs
docker-compose down  # stop the container
This step requires a docker-compose version of at least 1.28.0,
as the Dockerfile requests GPU resources (see this changelog).
To update docker-compose, this discussion may be useful.
Tracing
With these commands we can investigate the container:
docker ps  # use the flat '-a' to view all
docker stats
docker logs [service-name | UID] -f  # view the logs
docker exec -it [service-name | UID] bash  # open bash in the container
To stop the local deployment, run:
docker rm -f [service-name | UID] # or
Configuration
Authorization
Set a Static Token
Jupyter by default regenerates a new token on each new start.
Jupyter Notebook GPU provides the environment variable JUPYTER_TOKEN to set a customized static token.
This option is practicable if the host machine is periodically restartet.
It is suggested to use a long token such as a UUID:
export JUPYTER_TOKEN=$(uuidgen)
echo $JUPYTER_TOKEN
-
For Docker add the parameter
-e JUPYTER_TOKEN=${JUPYTER_TOKEN}, e.g.:docker run --gpus all -d -it -p 8848:8888 -v $(pwd)/data:/home/jovyan/work -e GRANT_SUDO=yes -e JUPYTER_ENABLE_LAB=yes -e NB_UID="$(id -u)" -e NB_GID="$(id -g)" -e JUPYTER_TOKEN=${JUPYTER_TOKEN} --user root --restart always --name gpu-jupyter_1 infraunnes/jupyternotebook-gpu:latest -
In
docker-compose.yml, the environment variable can be set underENVIRONMENT:JUPYTER_TOKEN: ${JUPYTER_TOKEN}Please note that environment variables might not be accessable for all docker-compose versions. Consider to setting
JUPYTER_TOKENin a separate.env-file and usingenv_filein docker-compose or a hard-coded token.
The static token can be requested using docker exec:
docker exec -it gpu-jupyter_1 jupyter server list
Set a custom Password
There are two ways to set a password for Jupyter Notebook GPU:
-
Go to the login page (http://192.168.48.48:8848/login) when logged out and setup a Password in the corresponding field.
-
Use the
--passwordor--pwoption in the generate-Dockerfile.sh script to specify your desired password, like so:bash generate-Dockerfile.sh --password [your_password]This will update automatically the salted hashed token in the
.build/jupyter_notebook_config.jsonfile. Note that the specified password may be visible in your account's bash history.
Adaptions for using Tensorboard
Both TensorFlow and PyTorch support tensorboard. This packages is already installed in the GPU-packages and can be used with these settings:
- Forward the port in the docker command using
-p 6006:6006(only for usage outside of Juypterlab). - Starting tensorboad with port binding within a container or Jupyterlab UI. Make sure the parameter
--bind_allis set.
docker exec -it [container-name/ID] bash
root@749eb1a06d60:~# tensorboard --logdir mylogdir --bind_all
%tensorboard --logdir logs/[logdir] --bind_all
- Writing the states and results in the tensorboard log-dir, as described in the tutorials for TensorFlow and PyTorch or in the Getting Started section
data/Getting_Started. If the port is exposed, tensorboard can be accessed in the browser on localhost:6006.
Updates
Configure a shared Docker network
Additionally, Jupyter Notebook GPU is connected to the data source via the same docker-network. Therefore, This network must be set to attachable in the source's docker-compose.yml:
services:
  data-source-service:
  ...
      networks:
      - default
      - datastack
  ...
networks:
  datastack:
    driver: overlay
    attachable: true
In this example, the docker network has the name datastack as defined within the docker-compose.yml file and is configured to be attachable.
Issues and Contributing
Frequent Issues:
- No GPU available - error
The docker-compose start breaks with:
Solution: Check if the GPU is available on the host node via
ERROR: for fc8d8dfbebe9_gpu-jupyter_gpu-jupyter_1 Cannot start service gpu-jupyter: OCI runtime create failed: container_linux.go:370: starting container process caused: process_linux.go:459: container init ca used: Running hook #0:: error running hook: exit status 1, stdout: , stderr: nvidia-container-cli: initialization error: driver error: failed to process request: unknownnvidia-smiand run with the describeddocker-commands. If the error still occurs, so try there could be an issue that docker can't use the GPU. Please try this or similar tutorials on how to install the required drivers.
Tag summary
Content type
Image
Digest
sha256:905c915d0…
Size
7.6 GB
Last updated
over 1 year ago
docker pull infraunnes/jupyternotebook-gpu